
by California Casualty | Homeowners Insurance Info |
Have you spent years dreaming about a home makeover? Or find yourself sitting on social media watching others DIY thinking ‘why can’t I do that?’ You CAN! Believe it or not, you don’t have to be a design expert to create a cozy corner, a relaxing vibe, or a stylish space in your home. Here are some quick and easy DIY room makeovers for your home that you can do this spring to give your space a nice little refreshing update- on a budget.
Bedroom
– Choose a color scheme. Pick two main colors and use them to choose varying textures and patterns which will add visual interest. This will help tie together the look of your room, whether it’s a bedroom or other room in your home. Best colors for bedrooms are cool, relaxing tones. Think shades of blue and muted greens.
– Showcase your headboard. The bed is the focal point in your room. Give it a little drama with the right headboard. For an easy fix, use a curtain behind your bed as the headboard. Make your own fabric headboard with material that matches your color scheme.
– Remember the fifth wall. Who said ceilings need to be white? In bedrooms, we spend our share of the time staring at the ceiling. Paint the ceiling a color, and see how it transforms the space.
– Hang drapes from floor to ceiling. Go a few inches above your window to add height, and have the drapes go down to the floor for an elegant feel.
– Get fancy with hardware: Chances are that your nightstands and dressers have traditional knobs. Change them out for tassel hardware or other fancy options.

Living Room
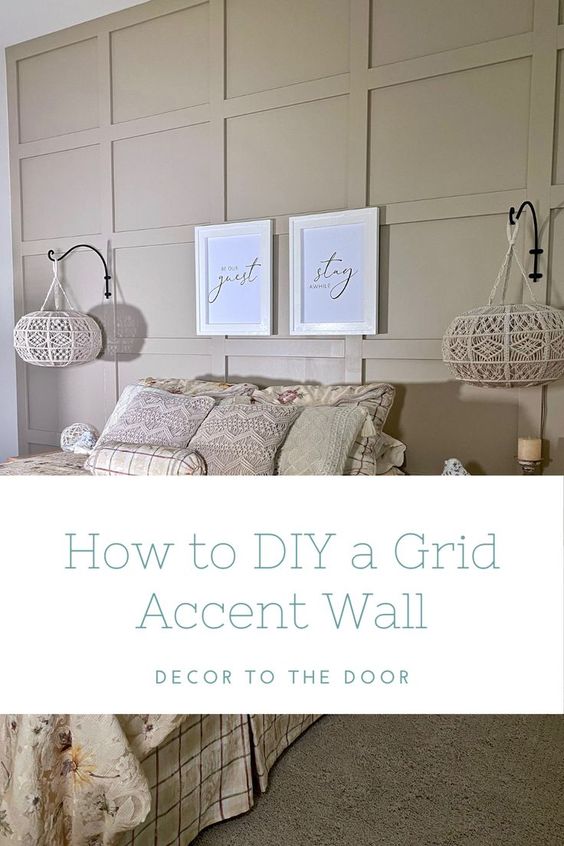
– Create a gallery wall. Choose the photos that represent wonderful moments in your life, and images of the people who are most important to you. For a cohesive look, choose the same color frames. Make it a statement wall by painting it a color that’s different from the other three walls.
– Include a hobby piece. Do you love to travel? Perhaps you play guitar. See if you can incorporate some of your favorite past times in the décor. A surfboard shelf, framed albums, a world map, or a guitar hung on your wall not only is a decoration, but a reminder of your happy place.
– Wallpaper a wall. Removable wallpaper lets us change our style without the long-term commitment. Choose a vibrant pattern in your color scheme for one focus wall. The wallpaper becomes the art and sets the tone for the space.
– Add wainscoting to your wall. This decorative trim transforms a room with its elegant accent pieces. You can even use the trim as a guide and paint the wall different colors above and below.
– Conceal the clutter. Use baskets or decorative boxes to store magazines, electronics, and loose items that you use regularly. Place them on a bookshelf to keep them out of the way.
– Add an area rug. It doesn’t matter if you have a carpet already in your living room. You can still add an area rug on top. Choose a pattern in your color scheme and it becomes artwork for your floor.

Kitchen
– Add a backsplash. It creates a beautiful focal point behind the stove and in other places above the counters. There are so many options available, from glass mosaics to tile to peel-and-stick. You can find online tutorials on how to install a backsplash from the major retailers and home improvement sites.
– Upscale your knobs and handles. Give your drawers and your cabinets a fresh look by changing out the knobs and handles. It’s a lot easier than painting cabinets, though you can do that, too.
– Install a pot rack on your wall. It’s an easy way to display your cookware while freeing space in your cabinets for other utensils.
– Add under cabinet lighting. You don’t need to be an electrician to install this type of lighting, which is self-adhesive and comes in strips that can be trimmed to fit your space. It plugs into a standard outlet and some models come with dimmer switches.
Bathroom
– Upgrade that mirror. You don’t have to spend a fortune to switch out your plain bathroom mirror for one that will be a focal piece. You can add your own frame. You can also reimagine the space with a find from the local thrift shop. Don’t hesitate to add paint for that special look.
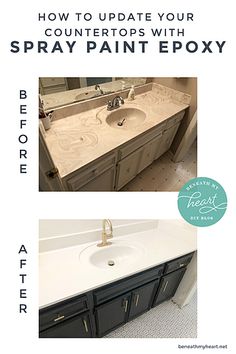
– Paint your bathroom vanity. A little paint can transform an old vanity into a beautiful piece. Switch out the knobs and drawer hardware for an even newer look.
– Change out your towel rack. You can find many towel racks at your local home improvement store. If you have the time, consider making your own to highlight your own personal style.
Not sure where to start?
– Create a mood board. Collect images of items that you like. You can do this on Pinterest or on a PowerPoint or Word document. You can even do it old school and paste the pictures on a board.
– Find your color scheme in a favorite piece of art. See if those colors will work for your room, and of course, make sure that the art piece is part of the décor.
– Move furniture around. Take out a piece of furniture. See what works and what doesn’t for your space.
For more spring DIY décor inspo, check out our Pinterest Board- Staycation DIYs! Be sure to follow us for every new DIY we discover.
Happy decorating! 🙂
This article is furnished by California Casualty, providing auto and home insurance to educators, law enforcement officers, firefighters, and nurses. Get a quote at 1.866.704.8614 or www.calcas.com.

by California Casualty | Homeowners Insurance Info |
Everyone loves a lush, green lawn. But that thick neighbor-envying grass isn’t just pretty to look at or comfortable to walk on; a well-manicured lawn can boost your home’s curb appeal and even its value. Maintaining your lawn regularly will also help keep weeds and harmful pests away.
Keeping up with lawn care is a year-round job (just ask any dad!), but the results are definitely worth it. Follow our lawn care calendar for an easy way to create a healthy and beautiful lawn all year long.
Spring (March, April, May)
– Clean up your yard. Rake up fallen leaves and dead grass. Throw away sticks and other debris.
– Test your soil. You want to know if the nutrient levels and pH are in a good range. You can buy an at-home soil test kit or send it over for a professional analysis to your local cooperative extension, nursery, or university. They will advise on any treatments needed. For example, you can use fast-acting lime to restore pH balance.
– Get your mower ready. Sharpen the blades or have them sharpened. Tune-up the mower. Replace the air filter and spark plug if needed. Fill it with fresh gas.
– Aerate your lawn. Aeration makes holes in your lawn, which open up pathways for air, water, and nutrients to reach the roots of the grass. After you aerate, break up the cores of dirt and leave them on the surface of the grass. They will decompose back into the soil.
– Dethatch. Thatch is a layer of buildup between the soil and grass. A thin layer of thatch helps to insulate the roots and keep moisture in. However, any layer thicker than a half-inch can suffocate your lawn. Check for the thatch level by digging up a patch of grass. Use a dethatching rake to break up the thatch throughout your lawn.
– Fertilize. If you live in cooler climates, fertilize in early spring. Warmer climates can wait until mid to late spring. Use a slow-release fertilizer for the best long-term results.
– Apply herbicides. When the soil reaches 58 degrees Fahrenheit, apply pre-emergent weed control, which keeps weeds like crabgrass from springing up. You can find soil thermometers at garden stores. Consider a pet-friendly herbicide if you have pets using your yard.
– Mow your lawn when the grass starts growing. Cut slightly lower than usual for the first few times. Then, mow as usual, and leave the clippings to decompose. They will help add nutrients to the soil
– Water your lawn so that it gets 1 to 1-1/4 inches of weekly moisture, including rain.
Summer (June, July, August)
– Keep mowed grass tall. Put the mower on the tallest or second-tallest setting. Keeping the blades high will help to shade the soil, reduce water evaporation, and fight against competing weeds.
– Treat grubs. These c-shaped pests are actually the larvae of Japanese beetles. They are nearer the surface during this stage. You can have some grubs, but too many in your grass will damage it. Dig up a square foot section of sod and count the grubs. Less than 10 is fine. If you find more, you will want to apply some type of chemical or organic control. (Not that organic treatment options take longer, and sometimes years.)
– Control weeds. You previously treated with a pre-emergent herbicide. Now try a post-emergent one, when weeds are present. Choose from selective herbicides which will target the weed or nonselective ones which could harm the grass around it. If you choose the second option, read the directions carefully.
– Fertilize to increase energy stores for winter. It may be summer but your grass will be storing nutrients for its dormant season. Plan to fertilize 6-8 weeks before your region’s first expected frost.
– Water your lawn. Use a water calculator to give your lawn the ideal amount for your region.
Fall (September, October, November)
– Keep mowed grass short. By late fall, your mower should be set to about 1.5-2 inches shorter than in the summer. This helps prevent shttps://www.bewaterwise.com/calculator.htmlnow mold and leaves from matting into the grass. Make your final cut of the year slightly lower than normal.
– Test your soil. Make any recommended corrections before winter sets in.
– Fertilize. Feed cool season grass to encourage strong root growth. (To know if your grass is cool season, scroll down to types of grass.)
– Treat with pre-emergent herbicides. Once nighttime temperatures are in the 65-70- degree Fahrenheit range, it’s time to apply herbicides to prevent winter weeds from germinating.
– Reduce watering. Your lawn’s need for water will decrease as rainy season sets in.
– Patch and seed. You may have some bare patches or thin areas. This is the time to seed them. Spread the seed, work it in with a rake, and add a thin layer of straw on top. This will help protect it from the birds and the weather. Water these areas regularly for the first few weeks until the grass is about an inch tall.
– Remove or mulch fallen leaves. You want to improve airflow to the grass roots. This will also help reduce the risk of disease.
Winter (December, January, February)
– Melt ice carefully. Rock salt can damage your lawn but there are ice melts that are designed to be used on grass.
– Consider a midwinter edging. You can keep your lawn neat with an edge and trim as needed.
– If you have trouble areas, take soil samples. Make sure to thaw them out before you test them.
– Fight winter weeds. You can spot green weeds among brown dormant grass. Apply herbicide as needed.
Know Your Grass Type
Did you know grass type varies by region? If you generally experience cold winters, you live in a place with cool season grasses. If you’re in the southern U.S., you live in a place with warm season grasses.
Knowing your grass type will help you decide what to plant and what will grow best on your lawn.
-
- Cool season grasses: Kentucky Bluegrass, Annual Ryegrass, Perennial Ryegrass, Fine Fescue, Tall Fescue, Creeping Bentgrass
- States: Connecticut, Delaware, Idaho, Iowa, Massachusetts, Maryland, Maine, Michigan, Minnesota, Montana, Nebraska, New Hampshire, New Jersey, New York, North Dakota, Oregon, Pennsylvania, Rhode Island, South Dakota, Utah, Vermont, Washington, Wisconsin, Wyoming
- Warm season grasses: Bahia grass, Bermuda grass, Buffalo grass, Carpet grass, Centipede grass, St. Augustine grass, Zoysia grass
- States: Alabama, Arizona, Arkansas, California, Florida, Georgia, Louisiana, Mississippi, New Mexico, South Carolina, Texas
Some grasses like zoysia work in warm and colder climates. Check with your local garden store on recommendations for what grows best in your region.
This article is furnished by California Casualty, providing auto and home insurance to educators, law enforcement officers, firefighters, and nurses. Get a quote at 1.866.704.8614 or www.calcas.com.

by California Casualty | Homeowners Insurance Info |
Getting your house ready to sell can seem like a daunting task. But the good news is, it doesn’t have to be! Knowing what to do, and giving yourself enough time to do it, are the key to keeping it a manageable, and (hopefully) stress-free, experience.
Follow these tried-and-true guidelines to get your home ready to sell.
Tip #1: Clean your home.
It may seem obvious but a dirty home discourages buyers and also can actually influence home appraisers and inspectors. Cleaning your home not only gives the impression that you take care of it, but when you clean, you will also start to notice things that you may want to address before putting your home on the market. For example, you might see a wet spot that indicates a leak or mold. Chances are you’d have to fix that before the sale goes through, so add it to your checklist. Remember, when you clean, make sure that all areas are easily accessible.
Tip #2: Install safety equipment.
Your state may require smoke detectors and carbon monoxide alarms. These are important safety devices that save lives. Understand your local safety requirements and make sure that your home meets them before putting it on the market.
Tip #3: Clean your yard.
As the saying goes, you never have a second chance to make a first impression. The first time that potential buyers will see your home will be from the outside. Therefore, curb appeal is key. Cut the grass, rake the leaves, weed the garden, and trim overgrown shrubs. Take care of obvious problems such as leaves clogging gutters, rotting trim boards, and dead trees. Power wash your house, driveways, and deck. Remove clutter such as toys and bicycles. And if you have the time, plant flowers or greenery.
Tip #4: Make easy home improvements.
Appraisers tend to measure your home’s value in increments of $500. Therefore, if you have obvious damage or you’re missing key items, it could add up against you. Walk around and look with a critical eye. Address the improvements that are easy and affordable: broken doors, nonfunctional locks, faulty light switches, leaky faucets, and other minor issues. If you can, take on the slightly more advanced items such as roof leaks, damaged siding, broken tiles, peeling paint, or anything that looks like neglect. Remember that the kitchen is a key room for buyers. The fastest and easiest way to update this room is with paint and new cabinet hardware.
Tip #5: Get the appraisal done early.
If you’re selling your home, you have to get it appraised. An appraisal* is a professional estimate of your home’s market value. A low appraisal means a lower selling price, so it’s important to present your home for its best value. Schedule it early; this way, if the inspector finds a defect, you can fix it before putting your home on the market.
*Note: An appraisal and a home inspection are not the same thing. A home inspection is a detailed inspection of a home’s plumbing, electric, HVAC systems, roof, and more. It’s almost always the buyer’s responsibility to cover that cost, and it’s done before the sale is closed.
Tip #6: Make a list of upgrades and share documents.
An appraiser won’t automatically know the home improvements you have made, especially since some aren’t easily visible. That’s why it’s helpful to put together a list of improvements. Include dates and warranties if you have them. There are other documents that will be helpful to have ready for your appraiser, including comparable sale numbers in your neighborhood and the home survey that was done when you purchased your home. Your lender or title company may have the property survey on file. If not, try the local tax assessor’s office.
Tip #7: Ask your real estate agent to attend the appraisal.
You’ll want to make it as easy as possible for the appraiser to give your home the value it deserves. Ask your real estate agent to join you at the appraisal and bring comparable sales data to support the sales price. Have him/her talk up the neighborhood and any other selling features: a good school system, a central location. Even having a Trader Joe’s, Starbucks, or Whole Foods nearby can influence home valuation.
Tip #8: Stage your home.
Now the fun begins! Here’s when you or your realtor team can update your home’s décor for a more modern and neutral look. Here are some ideas.
-
-
-
- Repaint walls, hang new curtains, change out lampshades.
- Install shiny new hardware such as doorknobs or faucets.
- Let the light in: clean windows, trim bushes blocking windows, and take down heavy drapes. Increase the wattage in your light bulbs.
- Empty half of the clothes in your closet. Rearrange the remaining clothes so they’re beautifully organized, and box up the rest.
- Take a third of your stuff and put it in storage. Include items like family memorabilia, pictures, etc. You want to depersonalize your home as much as possible.
- Conceal evidence of your pets. If you’re expecting visitors, move their food and water dishes, litter box, and other items away from the main areas. Make sure your home doesn’t smell like pet, too.
- Create a welcoming mood with an entryway that has a small bench, a vase of fresh-cut flowers, or some cookies.
- Keep your home at a comfortable temperature and make sure it’s ready to be shown at a moment’s notice.
For more tips, see our blog on Real Estate Tips for a Hot Market.
This article is furnished by California Casualty, providing auto and home insurance to educators, law enforcement officers, firefighters, and nurses. Get a quote at 1.866.704.8614 or www.calcas.com.

by California Casualty | Homeowners Insurance Info |
Your home is one of your greatest investments; you need to make sure that it’s fully protected. That’s where home insurance comes in, but it’s not one-size-fits-all. There are plenty of decisions to make when buying your own policy- from coverage limits and extra protection for your belongings to important add-ons like water back up and sump pump discharge or overflow coverage and flood insurance.
It’s easy to make a quick choice when looking for insurance without realizing there could be major consequences (that could cost you thousands of dollars out-of-pocket). That’s why we’ve compiled the most common home insurance purchasing mistakes, so that you won’t make them.
Don’t just look at the price.
Of course, you want a good price. However, sometimes a cheap policy is a red flag. The company may be shady. Talk to friends and neighbors about companies they use. See which ones are endorsed by your union, bank, etc. If you’re worried that the price is “too good to be true,” check the coverage to make sure it’s not missing important items. Also, consider that there are many ways to lower your home insurance costs if price is a concern.
Don’t buy the wrong type of policy.
There’s a different policy for insuring your home when you’re living in it, versus insuring your home when you’re renting it out. Make sure your policy addresses your living situation. If you have the wrong type of policy, there is a chance your claim may not be covered.
Don’t underinsure your home.
It may be tempting to insure your home for the amount that you owe on it, and nothing more. Don’t do it. If your home is worth $350,000 and you owe $50,000 on the mortgage, you should insure your home for the full amount. If you insure it just for $50,000, that’s what you’ll get if your home is declared a total loss. All of that money will go to the bank and you’ll be left with nothing to rebuild. That’s why at California Casualty, we don’t write a policy unless it covers 100% of the replacement cost. Ask us about our 360Value tool which makes sure you’re insured for full value.
Don’t reduce your coverage to lower your premium.
If you’re using a company other than California Casualty, and you decide to reduce your coverage below your home’s value to lower your premium, you’re putting yourself at risk. You won’t have enough money to rebuild. The better way to go is to raise your deductible. This is the amount that you pay out-of-pocket before insurance kicks in. You can do this to save money with your California Casualty policy, too. According to NerdWallet, you could save 20 percent by raising a $500 deductible to $1,000. If you do increase your deductible, make sure that you can cover that deductible should something happen.
Don’t think flood or earthquake insurance is automatically included.
Many people don’t realize that homeowner’s insurance does not include floods or earthquakes. For that, you will need a separate policy. If you’re in a flood zone, you will want that extra insurance. There’s a 30-day waiting period to buy flood insurance so don’t wait until the last minute. Live in an earthquake-prone zone? The same principles apply and you will not be covered by just a regular home insurance policy.
Don’t skip the additional coverage.
As with floods and earthquakes, not everything is covered in your basic policy. Know what is covered and what is not covered so that you aren’t surprised in the event of a loss. Take an inventory of your possessions. Make sure your policy covers the valuables in your home. There’s a theft limit to jewelry coverage, and so you might need an insurance rider, an optional add-on to your policy.
You might want additional coverage for water backup and sump pump discharge or overflow.
If you’re a member of a homeowner’s association, you might consider increasing your loss assessments coverage which goes toward special assessments for expenses associated with your community. However, you may be surprised at what your policy does cover, such as your garden shed or detached garage and its contents. It also covers your kid’s stuff when he/she is away at school, your parent’s stuff if you’re storing it for them while they’re in a nursing home. Those are covered at just 10% of coverage limits, so you might consider additional coverage.
Don’t forget to ask about discounts.
You may qualify for insurance discounts for being part of a professional association, such as groups for teachers, nurses, or first responders. There are also discounts for being 55+ and retired, and for paying in full upfront. You may qualify for a new home discount, or a discount if you have updated your utilities (electrical, plumbing, heating, cooling) in an older home. There are discounts for a new roof and an automatic sprinkler system, for fire and burglar alarms, and for monitored security systems. You can even be rewarded for being a loyal customer. When you bundle your home and auto insurance, you can often qualify for reduced rates, saving hundreds of dollars.
Don’t go it alone.
Insurance is complicated. Your house is one of your most expensive assets. Take the extra step and talk in-depth to a professional insurance agent. At California Casualty we tailor our coverage to you and your home. Your agent can help determine the unique risks for your home and what you need to fully protect it—and that you don’t pay more than you have to.
Don’t buy it and forget it.
Remember to update your policy if you renovate your house. Some companies’ contracts require you to notify them if a renovation exceeds a certain amount. In addition, you’ll want to update your policy immediately if you buy or receive additional valuables, such as jewelry.
Make sure to sit down each year to review your policy. Ask what additional endorsements are available. Review your renewals; policies change and these changes will often be explained in the renewal packet. Consider increasing personal liability to cover, at a minimum, the market value of your home.
Finally, don’t forget to…
-
- Shop around. Getting competitive quotes will help you determine the right price.
- Ask friends and family members for referrals to their insurance company.
- Research the company. Make sure the company is licensed to work in your state. Check its reviews on the Better Business Bureau and online.
- Look for a company that will be responsive to your needs. Good customer service and claims service are key.
It’s your home. Make sure it’s protected.
This article is furnished by California Casualty, providing auto and home insurance to educators, law enforcement officers, firefighters, and nurses. Get a quote at 1.866.704.8614 or www.calcas.com

by California Casualty | Homeowners Insurance Info |
You found the perfect place to rent, and you’re ready to go. Moving company, check. Boxes and bubble wrap, check. Renter’s insurance?
If you’re wondering whether you need to purchase renter’s insurance, here are the most frequently asked questions.
What does renter’s insurance cover?
Renter’s insurance is like homeowner’s insurance but for tenants. As a start, it protects your personal belongings (that’s right, your landlord’s insurance policy will not cover your belongings) but that’s not all. It’s an important safeguard if you’re found at fault for property damage or injuries at your place (and even around the world). It also can help if you don’t have access to your apartment or home due to a covered loss.
Renter’s insurance policies offer (1) personal property coverage, (2) liability insurance, and (3) additional living expenses when your apartment or home is uninhabitable.
What is personal property coverage?
Personal property coverage protects your possessions. If they are stolen, or damaged by fire/smoke or other covered “perils,” your policy will pay for them. You’ll simply have to cover the smaller upfront fee known as the deductible.
You may choose the replacement cost or the actual cash value (ACV) for reimbursement. ACV is the amount the item is worth, minus depreciation for its age. It will cost a little more for a policy that provides replacement cost since that is higher than ACV.
With personal property coverage, you choose the amount of coverage based on how much your stuff is worth. The good thing is that your possessions are insured whether they’re at your place or away from it. For example, if you have a child away at college, who has an item stolen, your policy will pay 10% of your Personal Property Coverage C limit.
Note: Some policies limit certain types of possessions, such as jewelry. If you want a higher limit, you will need to add it to the policy.
What is liability coverage?
Liability coverage protects you if someone is injured and you’re legally liable. It could be at your place or it could be anywhere in the world. For example, if your dog bites someone, you’re covered. The policy pays for the bite victim’s medical expenses and covers court fees if they sue you. Liability also covers accidental damages to the place by you or your guests. So, if you accidentally set fire to your apartment, you’re covered. There are limits, so talk to your insurance advisor about an umbrella policy, which will provide much greater coverage.
What is loss of use coverage?
If a covered danger, like a fire or an evacuation, causes your residence to be unfit to live, your policy reimburses you for additional living expenses. For example, if you normally spend $200 per month on food and now it’s costing you $300, the policy will reimburse the additional $100. There’s a time limit and a dollar limit on this, so check on your policy’s details. Payment will be for the shortest time required to repair or replace the damage or, if you permanently relocate, the shortest time required for your household to settle elsewhere. It’s worth noting that if you have a Coverage Enhancement, there’s no deductible.
What exactly is the deductible?
If a loss does occur, a deductible will often apply. A deductible is the amount that you are responsible for, before the policy pays anything. So, before you get replacement or ACV for your possessions, you pay the deductible out of your pocket. Your deductible could be $250, $500, or more. You have a choice on the amount of the deductible. The lower the deductible, the more expensive the policy.
Note: There are times when there is no deductible. In a personal liability policy, for example, a deductible does not apply.
What isn’t covered by renter’s insurance?
Renter’s insurance doesn’t cover every situation. It does not cover damage from earthquakes, mudslides or floods. It does not cover infestations of rodents or bugs. There’s only limited coverage for theft of jewelry and firearms. A standard policy doesn’t cover your roommate’s possessions (though you could add them as an endorsement known as “Other Members of Your Household” for little or no cost). Renter’s insurance also doesn’t consider your car as one of your possessions. You need a separate auto insurance policy.
Note: Ask your insurer about home office and business computer coverage. That’s different than a personal policy.
Is renter’s insurance required?
Renter’s insurance is not mandated by law, but it may be required by your landlord, property manager or owner. Renter’s insurance helps keep others, including you, from seeking damages from them, even though they’re not responsible for your possessions. If you accidentally start a fire, the landlord’s insurance kicks in after they pay the deductible. But they could use your renter’s policy to cover that cost, so it’s a win-win for them.
What happens if you don’t have renter’s insurance?
If you don’t have renter’s insurance, you’re fully responsible for any property damage or loss. You’ll have to replace your possessions in the event of theft, fire, or other perils. You’ll have to pay the medical costs of anyone injured in your apartment. You’ll have to pay for additional living expenses if your apartment is inhabitable.
How expensive is renter’s insurance?
Renter’s insurance is surprisingly affordable. For as little as $10 a month, you can get a renter’s policy at California Casualty. The cost varies depending upon the coverages you choose, the deductible, your financial responsibility score, and multipolicy discount. Even your location can have an impact. Areas with higher crime rates will have higher insurance rates.
How much renter’s insurance do you need?
You want to have enough insurance to cover your possessions and any potential liability. Start by taking an inventory of what you own and putting a dollar figure on replacing our possessions. Then, take a look at your liability. Do you entertain a lot? Do you have pets? Determine the potential for injuries on site or any other property damage. You also want to take into consideration the amount of assets you have – such as your savings, etc. You want to make sure the amount you select will cover your assets. Then, choose the deductible that is affordable for you.
Can you get renter’s insurance after you’re already moved in?
Yes. You may purchase renter’s insurance at any time. However, it’s not retroactive. You cannot buy it after there’s been damage or theft.
Not all renter’s insurance is the same. Some policies cover more than others and costs vary. Check with your insurance provider to find out the options.
This article is furnished by California Casualty, providing auto and home insurance to educators, law enforcement officers, firefighters, and nurses. Get a quote at 1.866.704.8614 or www.calcas.com.
by California Casualty | Homeowners Insurance Info |
You have a roof over your head, but chances are you’re probably not thinking too much about it. That’s because—unless your roof needs repair or replacement— there really is no reason to worry about it.
The best way to know if your roof needs to be repaired or replaced is to hire a professional to come out and take a look. We’ve compiled a quick guide on roofs and roof damage, including what to look for, so you’ll be well informed when it comes time to repair or get a new roof.
Types of Roofs
Roofs are made from different kinds of material. Some of the most common include:
-
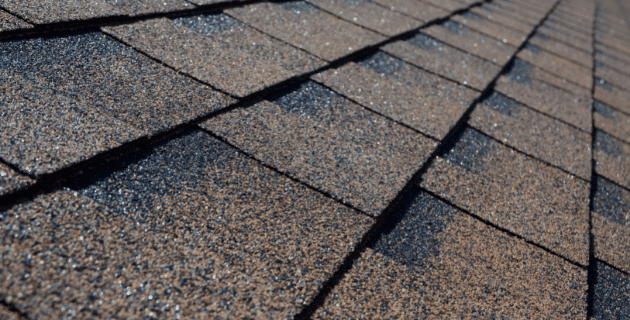
- Asphalt: This is the most affordable roofing material (and likely what is on your house). Asphalt shingles come in basic and also higher-end versions.
- Slate: One of the most expensive roofs you can buy, its shingles are made from slate tiles. They are very heavy, requiring a roof system that can bear their weight.
- Composite: These types of shingles are made from rubber, plastic and other recycled materials. They can be made to look like a cedar shake or slate roof.
- Metal: A standing seam metal roof consists of metal panels that are locked together.
There are other types of roofing materials from concrete to clay shingles and beyond, including green roofs which use gardens to top a house. Knowing the type of roof on your house is the first step to being able to repair or replace it.
Types of Roof Damage
Punctures and cracks, loose and broken shingles, damage from moisture, and worn-out roofing materials must be addressed or your roof could fail to do its job. Here’s what you might expect due to weather and over time.
-
- Water damage: Moisture gets into the cracks and crevices, and causes mildew, mold, moss, and decay.
- Hail damage: Large pieces of hail can make dents in your shingles and destroy the roof’s metal finishes. It can lead to roof leaks.
- Snow and ice damage: Heavy snow and ice can put stress on your roof, potentially causing its collapse. It also puts wear and tear on your shingles.
- Wind damage: Strong winds can rip off shingles and cause debris to hit your roof and damage it.
- Tree or branch damage: When a tree falls on your home or if you fail to keep your branches trimmed, they can put a hole in your roof, requiring immediate action.
How to Check Your Roof for Damage
It’s a good idea to check your roof for damage after a storm or other weather event, and you don’t have to get up on the roof to do it. (Leave on-the-roof exploration to the professionals, unless you are experienced at it.)
Start with a pair of binoculars on ground level. Point them toward your roof and look for obvious damage.
-
- Check for debris that may still be on your roof or clogging your gutters.
- See if there are damaged, cracked, or missing shingles. Get an approximate count and note their location.
- With asphalt roofs, look for curled edges, bubbling or blistering.
- Check for smooth dark areas that could indicate mold.
- Check for signs of moss.
- Look for signs of sagging.
- See if your gutters or downspouts have loosened or broken.
- Check the flashing, which is aluminum or steel used to cover joints in the roof, to see if it is damaged or loose.
- If you do go up on your roof, check for a bounce when you walk across it. That happens if a roof is spongy from moisture.
If you have an attic, you can assess roof damage there as well.
-
- Look for water stains that run from the ceiling to the walls.
- Check for leaks.
- Look for gaps or cracks in seals on skylights, chimney, and vents (most easily seen when lights are off in the attic and it’s a sunny day).
- Check for any signs of animal life that could indicate a hole.
- Look for shiners (nails sticking out on the underside of the roof). They’re easier to spot on a cold night. Moisture condenses on these nails, turning them white with frost.
If you don’t have an attic, you can still check for leaks and water stains on the ceiling, and along any walls or skylights. Wherever you find damage, take a picture if you can, as a reference for contractor repairs or your insurance company.
Repair or Replace
On the outside– Damaged shingles are roof leaks waiting to happen. Clogged gutters are the precursor to water damage. These instances put your roof at risk for future problems. Routine maintenance and frequent checking of your roof should help you identify these risks before they become a problem.
On the inside– You may only be aware of some of the damage through your on-the-ground and in-attic check. If you believe there is significant damage, consult a professional roof inspector. They can use hi-tech equipment including infrared sensors and drones to examine your roof.
Make sure you are protected by speaking to your home insurance provider. They will be able to review your policy with you and make sure you have the proper roof coverage that you need.
This article is furnished by California Casualty, providing auto and home insurance to educators, law enforcement officers, firefighters, and nurses. Get a quote at 1.866.704.8614 or www.calcas.com
