by California Casualty | Helpful Tips, Homeowners Insurance Info, Safety |
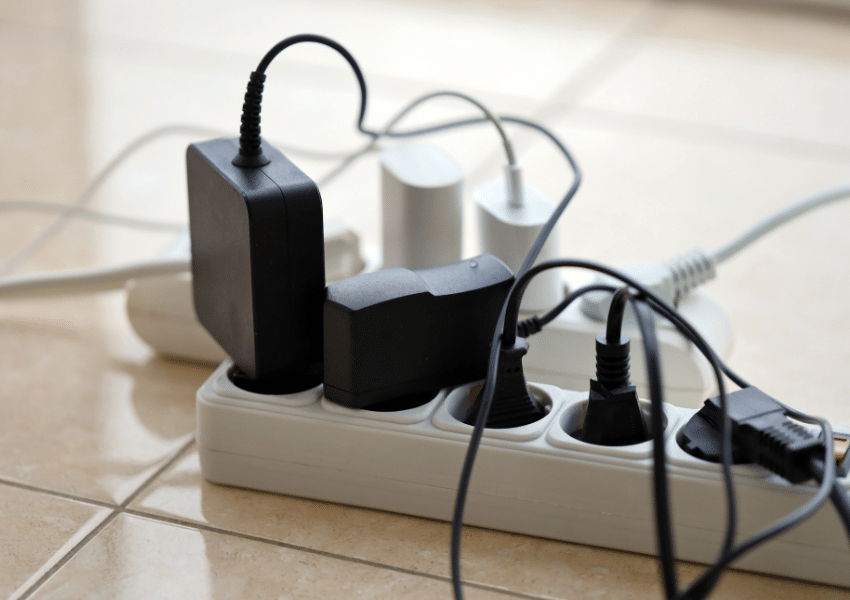
From curling irons to coffee makers, it’s tempting to plug just about everything into your power strip. But not all devices are meant to share that space. In fact, plugging the wrong items into a power strip can quietly overload your system and increase the risk of damage or even fire. Before you add one more cord, here’s what you need to know.
Power Strips vs. Surge Protectors: What’s the Difference?
Power strips are simply electrical outlets attached to a cord. They plug into a wall outlet to give you more places to plug things in.
Surge protectors, on the other hand, are power strips with a built-in safety feature. If there’s a sudden spike in electricity — such as during a lightning storm or a brief power fluctuation — they redirect excess voltage away from your devices to help prevent damage.
While surge protectors add a layer of protection, neither power strips nor surge protectors are designed to handle high-wattage appliances.
What Happens When You Overload a Power Strip?
Every device pulls a certain amount of electricity. When the combined demand of everything plugged into a power strip exceeds what it’s rated for, a power strip can overload. That overload can cause:
- Overheating
- Melted wiring or outlets
- Sparks
- Electrical fires
- Permanent damage to appliances
Most household power strips are rated for 15 amps at 120 volts, which equals 1,800 watts total. You can usually find this information printed on the strip’s label. Before plugging in any device, make sure its wattage keeps the total below this limit. As you add more devices, keep a running total to avoid exceeding the strip’s capacity.
Avoid Plugging in These Items
Just because a plug fits in a power strip doesn’t mean it belongs there. The items below use a lot of electricity — often in sudden bursts — which can overload a power strip and create serious safety risks.
1. Air Conditioners: Air conditioners cycle on and off, creating power spikes. Their continuous high electrical draw can overheat a power strip and melt internal wiring.
2. Air Fryers: Air fryers use short bursts of extremely high wattage. These surges can overwhelm a power strip and damage both the strip and your appliance.
3. Blenders: Blenders have powerful motors that draw a high amount of wattage, especially at startup—far more than a power strip can safely handle.
4. Curling Irons & Flat Irons: Hair styling tools heat quickly and often draw over 1,500 watts, pushing most power strips to their limit.
5. Coffee Makers: Coffee makers rely on heating elements that require intense bursts of power, increasing the risk of overheating or electrical damage.
6. Dehumidifiers: Like air conditioners, dehumidifiers use compressors that cycle on and off, causing power surges and sustained electrical loads.
7. Electric Blankets: These blankets contain heating elements that draw significant wattage for long periods, making them unsafe for power strips.
8. Extension Cords: Never plug an extension cord into a power strip. This practice, known as daisy chaining, is a well-known fire hazard.
9. Hair Dryers: Hair dryers frequently pull 1,500 watts or more, making them one of the most common causes of overloaded strips.
10. Microwaves: Microwaves draw between 1,000 and 1,500 watts and use powerful motors, which far exceeds what a standard power strip can handle.
11. Power Tools: Table saws, circular saws, chop saws, and air compressors all have high startup amperage surges that can overload a strip instantly.
12. Refrigerators: Refrigerators use compressors that cycle repeatedly, pulling a high current each time they start — something power strips aren’t built for.
13. Space Heaters: Drawing around 1,500 watts, space heaters push power strips to their absolute limit. Their constant cycling makes them especially dangerous.
14. Toaster Ovens: With powerful heating elements and rapid bursts of high wattage, toaster ovens should always be plugged directly into a wall outlet.
15. Washing Machines & Dryers: These appliances require high-current loads and, in many cases, 240-volt outlets. Power strips are never appropriate for them.
Warning Signs Your Power Strip Is Overloaded
Power strips don’t always fail dramatically. Often, they give subtle warning signs first. Knowing what to look for can help you catch a problem early and prevent damage or fire risk.
- The strip feels warm or hot to the touch
- The circuit breaker trips frequently
- Devices shut off unexpectedly
If you notice any of these signs, unplug devices immediately and move high-powered items to a wall outlet.
The Safer Rule of Thumb
If an appliance:
- Produces heat
- Has a motor
- Uses a compressor
- Or draws a lot of power
…it belongs directly in a wall outlet, not a power strip.
Finally, make sure to fully protect your home with the right insurance. If despite your best efforts to follow all the safety rules, a fire was to happen, your policy can provide added peace of mind.
This article is furnished by California Casualty, providing auto and home insurance to educators, law enforcement officers, firefighters, and nurses. Get a quote at 1.866.704.8614 or www.calcas.com.

by California Casualty | Helpful Tips, Homeowners Insurance Info |
While older homes are known for their craftsmanship and character, they often require extra attention when it comes to safety. Understanding potential hazards — from lead paint to carbon monoxide — can help you take the right steps to maintain a safe and healthy living environment. Here’s what you need to know.
Electrical Systems: When Yesterday’s Wiring Meets Today’s Demands
Many homes built before the 1940s still contain knob-and-tube or aluminum wiring. While these systems may have worked just fine decades ago, they often can’t handle the electrical load of today’s appliances, devices, and technology. That strain can increase the risk of overheating and fire.
Warning signs that your electrical system needs attention include flickering lights, frequently blown fuses or tripped breakers, and an overreliance on extension cords or power strips. Unusual odors or a burning smell near outlets are serious red flags. Stop using the outlet immediately and contact a professional.
Having a licensed electrician inspect your wiring is one of the smartest investments you can make in an older home. An evaluation will confirm whether your system is up to code and help identify upgrades that can significantly improve safety.
Plumbing: Old Pipes, New Problems
Older homes often have a patchwork of plumbing materials, including cast iron, galvanized steel, polybutylene, and even lead pipes. Over time, these materials can corrode, crack, or restrict water flow.
Galvanized steel pipes, in particular, are prone to corrosion that can cause low water pressure and discoloration, while polybutylene pipes are known for leaks and sudden failures. Slow or frequently clogged drains — in bathrooms, kitchens, or basement floor drains — can also indicate aging pipes.
Another hidden concern lies underground. Sewer lines in older neighborhoods may be compromised by roots from mature trees, potentially leading to backups and basement flooding. Replacing aging plumbing with modern materials like copper or PEX can reduce leaks, improve water quality, and prevent expensive damage down the road.
Heating, Cooling, and Insulation: Comfort Challenges in Historic Homes
Many older homes were built long before central air conditioning was common. Radiator heating systems are still found in houses from the early 1900s, and these homes often lack ductwork entirely. Thick plaster walls or walls that are too thin can make adding ducts difficult or impractical, leaving homeowners reliant on window units or ductless air conditioning systems.
Energy efficiency is another challenge. Drafty windows, uninsulated attics, and gaps around doors allow heated and cooled air to escape, driving up energy costs. Improving insulation, sealing cracks, and upgrading heating and cooling systems can make a noticeable difference in comfort and efficiency without sacrificing historic character.
Hazardous Materials: Hidden Risks You Can’t Ignore
Homes built before the late 1970s are more likely to contain hazardous materials, including lead paint and asbestos.
Lead-based paint is particularly dangerous for children and pregnant women. Even if it’s been painted over, deteriorating lead paint can create toxic dust and chips. Federal law requires sellers and landlords to provide a lead disclosure for properties built before 1978, and homeowners can use lead test kits or hire certified inspectors for peace of mind.
Asbestos may be found in insulation, floor tiles, siding, or roofing materials. When disturbed, asbestos fibers can cause serious lung disease and cancer, making professional removal essential.
Radon is another invisible threat. This naturally occurring radioactive gas forms from decaying rock and soil and can accumulate in homes, especially those with dirt or stone foundations. Testing is the only way to know if radon levels are high, and professional mitigation systems can effectively reduce exposure.
Windows and Doors: Drafts, Decay, and Energy Loss
Wooden window and door frames in older homes can rot or warp over time, making them difficult to open, close, or seal properly. Single-pane glass, which is common in vintage houses, offers little insulation and can significantly increase heating and cooling costs. Inspect windows and doors for drafts, gaps, and signs of decay. Installing weatherstripping, applying sealants, or upgrading to energy-efficient replacements designed to match the home’s style can improve comfort without compromising aesthetics.
Moisture and Mold: A Silent, Spreading Problem
Older homes weren’t built with modern moisture barriers, making them more susceptible to water intrusion, flooding, and mold growth. Basements and crawl spaces are particularly vulnerable, especially if the foundation has cracks or drainage issues. Plaster walls can also absorb moisture, creating ideal conditions for mold.
Mold isn’t just unsightly; it can pose serious health risks. Addressing moisture issues promptly is key. That may include improving exterior drainage, sealing foundation cracks, increasing ventilation, installing sump pumps, or applying waterproof coatings to basement walls.
Pest Infestations: Unwanted Tenants
Termites, carpenter ants, and rodents are especially attracted to older homes with untreated wood and small entry points. Left unchecked, pests can cause significant structural damage. Regular inspections and prompt treatment can help protect both your home and your investment.
Structural Issues: The Weight of Time
Decades of settling, moisture exposure, and pest activity can weaken a home’s foundation, beams, and joists. Homes built before the 1940s often rest on stone, brick, or early concrete foundations that don’t meet modern building standards.
Warning signs include uneven or sloping floors, doors that won’t close properly, cracks near ceilings or doorways, bowing walls, and large horizontal foundation cracks. Addressing structural issues early can prevent more extensive — and expensive — repairs later.
Roofing: First Line of Defense Against the Elements
Slate, clay tile, and wood shingle roofs are beautiful and durable, but even these materials wear down over time. Cracked tiles, missing shingles, water stains on ceilings, or visible sagging are signs it’s time for a professional inspection. Staying proactive helps prevent leaks and costly water damage.
Historical Preservation: When Rules Apply
If your home is located in a historic district or designated as a landmark, renovations may be subject to strict guidelines. Certain materials or methods may be required, and repairs often need specialized craftsmen. Understanding local regulations and working with experienced professionals can save time, money, and frustration.
Unique Insurance Considerations
Older homes can present unique insurance challenges, from higher repair costs to the need for specialized coverage. Rebuilding with like-kind materials, meeting updated building codes after a loss, or insuring valuables may require additional planning. A knowledgeable insurance provider can help ensure your coverage reflects the true needs of your home.
Owning an older home means embracing both its beauty and its quirks. With regular inspections, thoughtful upgrades, and a proactive approach to maintenance and insurance, you can enjoy its character while keeping your household safe and secure.
This article is furnished by California Casualty, providing auto and home insurance to educators, law enforcement officers, firefighters, and nurses. Get a quote at 1.866.704.8614 or www.calcas.com.
by California Casualty | Helpful Tips, Homeowners Insurance Info |
When your apartment is short on square footage but long on stuff, every inch suddenly feels like prime real estate. Closets overflow, kitchen cabinets turn into a never-ending game of Tetris, and don’t even get started on where to stash that extra set of sheets. The good news? You don’t need a bigger place — or a landlord’s permission — to get organized. With a little creativity and a few clever storage hacks, even the smallest apartment can feel spacious, stylish, and totally livable.
Start at the Door: Tame the Entryway Chaos
Your entryway sets the tone for your entire apartment, and it’s often the first place that clutter piles up. Even a tiny corner by the door can function as a drop zone with the right setup.
- Create a DIY entryway organizer using adhesive hooks, narrow shelving, or a pegboard so everything has a dedicated spot.
- Add a slim coat rack or a small storage bench for jackets, bags, and shoes.
- Baskets or bins under a bench help keep footwear out of sight.
Think Vertically (Your Walls Are Working Overtime)
When floor space is limited, the solution is simple: look up. The higher you go, the less clutter you see at eye level, which makes the whole apartment feel more open.
- Tall bookcases or floating shelves above the couch, bed, or desk keep clutter off surfaces and draw the eye upward.
- Wall hooks aren’t just for coats; use them for hats, bags, headphones, or even kitchen tools.
- Over-the-toilet shelving instantly adds storage in bathrooms without taking up valuable floor space.
- Over-the-door organizers are the unsung heroes of small apartments. Use hanging pocket organizers not just for shoes, but for:
- Pantry items or produce
- Cleaning supplies
- Hair tools and beauty products
- Hats, scarves, and gloves
Choose Furniture That Pulls Double Duty
In a small apartment, every piece of furniture should earn its keep. If it doesn’t multitask, it might not deserve a spot.
- Storage ottomans hold blankets, books, or extra pillows while doubling as seating.
- Beds with built-in drawers or hidden storage headboards eliminate the need for extra dressers.
- Use a dresser as a TV stand to sneak in additional storage.
- Fold-down dining tables or wall-mounted desks give you flexibility without sacrificing space.
Maximize What You Already Have
You don’t need new furniture to create more storage — you just need better organization.
- Cabinet door caddies are perfect for spices, cleaning supplies, or hair products.
- Double closet rods instantly double hanging space for clothes.
- Wall hooks inside closets keep belts, bags, and accessories from getting tangled.
- Under-bed storage bins are ideal for off-season clothes, shoes, or extra linens.
- Pegboards can organize everything from kitchen tools to office supplies.
- Stackable bins or storage cubes — especially clear or wire — let you see everything at a glance.
- Pull-out shelves for deep cabinets prevent items from getting lost in the back. (Ask your landlord’s permission if you’re installing them.)
Don’t Ignore the Corners
Corners are often wasted space, but they don’t have to be. Every awkward angle is an opportunity in disguise.
- Corner shelving units provide storage without dominating the room.
- Corner desks are perfect for work-from-home setups.
- Add a small chair or stool for flexible seating that tucks neatly away.
Get Creative with Sleeping Arrangements
Your bed takes up a lot of space. Make it work harder.
- Loft beds or Murphy beds free up floor space for a desk, sofa, or storage underneath.
- Ottoman beds offer hidden storage for bulky items.
- Sofa beds or daybeds are perfect for hosting overnight guests without sacrificing everyday space.
Storage That Doubles as Style
Storage doesn’t have to be boring; it can be part of your décor.
- Hang hats, scarves, or bags on the wall for a functional display.
- Use a cork wall or pegboard to showcase jewelry alongside photos or artwork.
- Hang a curtain or add a room divider to define spaces, then place storage cubes behind it.
- Think outside the box:
- A garden hose holder becomes a storage caddy
- A wine rack stores rolled towels
- A toilet paper holder organizes hair tools
- Storage ladders are both decorative and practical. Drape blankets, hang towels, or clip baskets to the rungs.
- Hang pots and pans to free up cabinet space and add a chef-inspired vibe.
- Use a rolling kitchen island or cart with drawers and a work surface, then roll it out of sight when not in use.
- Magnetic shelves on the fridge hold spices or everyday items, clearing precious counter space.
- Vacuum storage bags shrink seasonal clothing, bedding, and bulky items until you need them again.
Small Space, Big Potential
Living small doesn’t mean living cluttered. With smart storage solutions, multifunctional furniture, and a little creativity, your apartment can feel organized, stylish, and surprisingly spacious. The key is to make every inch count.
Finally, don’t forget the renter’s insurance. It’s an easy way to protect your valuables and other possessions for added peace of mind.
This article is furnished by California Casualty, providing auto and home insurance to educators, law enforcement officers, firefighters, and nurses. Get a quote at 1.866.704.8614 or www.calcas.com.

by California Casualty | Helpful Tips, Homeowners Insurance Info, Safety |
The holidays sparkle with lights, candles, and festive meals. All that cheer makes the season special but it also brings a few fire risks we don’t always think about.
In fact, home fires happen more often between Thanksgiving and New Year’s than at any other time of year. The good news? With just a handful of easy precautions, you can keep the season safe, cozy, and full of joy. Here’s how to protect your home and loved ones while still enjoying all the magic of the holidays.
Holiday Cooking: The Heart of the Home — and a Common Fire Risk
Holiday meals often mean more time in the kitchen, more dishes on the stovetop, and more distractions. Cooking fires are the leading cause of home fires during the holidays, especially when distractions shift your attention away from cooking.
Fire Risks
- Leaving food unattended on the stove or in the oven
- Steam, splashing oil, or hot liquids causing burns or igniting nearby flammable items
- Grease fires that can flare up quickly if frying food overheats
- Stoves left on, long after cooking is complete
Safety Tips
- Stay in the kitchen while cooking, especially when frying, boiling, or broiling.
- Keep flammable items away from the stovetop, including oven mitts, wooden utensils, food packaging, towels, and curtains.
- Use a timer as a reminder that something is cooking, even if you step away briefly.
- Create a kid-free and pet-free zone of at least three feet around the stove and oven to prevent accidental bumps or burns.
- Avoid cooking if you’re sleepy or have consumed alcohol, as both can slow reaction time and increase risk.
Electrical Power & Holiday Lighting: Sparkle Without the Spark
Holiday lights add warmth and cheer, but faulty cords or overloaded outlets can quickly turn decorative into dangerous.
Fire Risks
- Flickering lights especially when other appliances are turned on (signals a loose connection)
- Discolored or warm outlets
- Burning plastic or rubbery smells near outlets or cords
- Buzzing, sizzling or cracking sounds from outlets or cords
- Frequently blown fuses or tripped breakers
Safety Tips
- Use lights that are tested and approved by a qualified testing lab.
- Make sure outdoor lights are rated for outdoor use and protected from moisture.
- Replace worn, frayed, or broken cords
- Avoid overloading outlets and skip multi-plug adapters whenever possible.
- Always turn off holiday lights before going to bed or leaving the house.
Christmas Trees: Festive Focal Points That Need Care
A Christmas tree — real or artificial — can be a stunning centerpiece, but it also deserves careful placement and maintenance.
Fire Risks
- Trees placed too close to heat sources such as fireplaces, radiators, or space heaters
- Frayed wires or overloaded extension cords igniting branches
- Live trees drying out and becoming increasingly flammable
Safety Tips
- Place your tree at least three feet away from any heat source, including fireplaces, heat vents, candles, or lights.
- Use lights labeled for indoor use and follow manufacturer guidelines on how many strands can be safely connected.
- Water live trees daily. A well-hydrated tree is far less likely to ignite.
- Turn off tree lights before going to bed or leaving the house.
- Dispose of live trees promptly after the holiday, before they dry out.
- For artificial trees, look for a fire-resistant label for added peace of mind.
Candle Fires: Warm Glow, Real Risk
Candles play a meaningful role in many holiday traditions, including the menorah of Chanukah and the kinara of Kwanzaa. Decorative candles are also popular throughout the season. While candles beautifully set the festive mood, open flames always require care.
Fire Risks
- Candles placed too close to decorations, curtains, or furniture
- Unstable candle holders that can tip over
- Curious children or pets knocking candles over
Safety Tips
- Place menorahs or kinaras on a nonflammable surface, such as a tray lined with aluminum foil to catch dripping wax.
- Never leave candles unattended. Blow them out when leaving a room or going to bed.
- Keep candles out of reach of children and pets. Curious hands and wagging tails can cause accidents in seconds.
- Keep lit candles well away from decorations and other flammable materials.
Decorations: Festive, Fun—and Sometimes Flammable
Holiday décor adds personality and warmth to your home, but many decorations are made from materials that can ignite if exposed to heat or sparks.
Fire Risks
- Decorations placed near heat vents, lights, or fireplaces
- Flammable materials igniting from a spark or hot surface
Safety Tips
- Choose decorations that are flame-retardant or flame-resistant whenever possible.
- Keep decorations away from heat sources, including vents, candles, and fireplaces.
Fireplaces: Cozy Comfort with Important Rules
A crackling fire is a holiday favorite, but fireplaces require extra attention during busy gatherings.
Fire Risks
- Stockings, garlands, or decorations hung on the mantel can ignite if exposed to heat or sparks.
- Embers or sparks can escape the fireplace and ignite nearby furniture, rugs, or wrapping paper.
- Creosote buildup in the chimney increases the risk of a chimney fire.
- Fires left unattended or not fully extinguished before bedtime can reignite overnight.
Safety Tips
- Never light the fireplace if stockings or decorations are hanging from the mantel.
- Keep wrapping paper, gift boxes, and decorations at least three feet away from the fire.
- Use a fire screen to prevent embers from escaping.
- Make sure all embers are completely out before heading to bed or leaving the room for the night.
- Install and maintain working smoke detectors on every level of your home.
- Keep a fire extinguisher accessible and make sure adults in the household know how to use it.
- Review your home insurance coverage to ensure you’re properly protected, an important step for peace of mind year-round.
A safe home is the foundation of a joyful holiday season. By staying mindful and taking a few proactive steps, you can focus on what truly matters — time together, cherished traditions, and making memories that last long after the decorations come down.
Happy holidays from all of us at California Casualty!
This article is furnished by California Casualty, providing auto and home insurance to educators, law enforcement officers, firefighters, and nurses. Get a quote at 1.866.704.8614 or www.calcas.com.

by California Casualty | Helpful Tips, Homeowners Insurance Info |
Think you’ve found the perfect hiding spot for your cash or jewelry? Think again. From the freezer to the sock drawer, burglars know all the “secret” places homeowners use to stash their valuables. Before you tuck away your treasures in plain sight, learn which hiding places offer false security — and where your valuables will truly be safe.
Front Door
We’ve all heard the advice about keeping a spare key “just in case,” but hiding one near your front door is practically an open invitation. The doormat, flowerpot, mailbox, or fake rock –these are the first places a burglar will check. If you need to keep an extra key, leave it with a trusted neighbor instead.
Entryway
Your entry table may be the perfect place for dropping your car keys, wallet, or spare cash when you walk in, but it’s also the first stop for an intruder. Those items are quick to grab and easy to carry. A thief could be in and out of your home in under a minute with your keys, ID, and bank cards in hand.
Bedrooms
Burglars make a beeline for the master bedroom because they know that’s where people store their most valuable items — cash, jewelry, and small electronics. They’ll check dresser drawers, armoires, sock drawers, and even the space under your mattress. Suitcases and storage boxes? Those are fair game, too. The very spots that are most convenient for you are the ones they will check.
Freezer
Think your freezer is foolproof? Think again. Many homeowners wrap cash or jewelry in plastic and tuck it behind the frozen vegetables. But this “clever” hiding place is common knowledge among burglars. If it’s easy for you to access, it’s easy for them to find.
Bathrooms
Your bathroom medicine cabinet may seem like a private place, but it’s often one of the first areas a thief will check — especially if they’re looking for prescription drugs to sell. Don’t keep cash or jewelry there either; it’s too easy to reach.
Cookie Jar
It might seem like a sweet spot to stash your grocery money, but thieves know this classic trick. The same goes for flour tins and coffee canisters. If it’s in plain sight in the kitchen, assume it’s on a burglar’s radar.
Home Office
Your office is a goldmine for identity thieves. Computers, passports, checkbooks, and tax forms can all be used to steal your identity or drain your accounts. Keep sensitive documents locked away and back up important files to a secure cloud account.
Portable Safes
A small safe can keep kids or guests out of your valuables, but it won’t stop a thief from carrying the whole thing out the door. Unless your safe is bolted to the floor or wall, it’s just another box waiting to be picked up and opened later.
Other Bad Spots
Anywhere damp, dirty, or difficult to monitor is also a poor choice. Inside toilet tanks, for example, may seem clever, but the moisture can ruin documents and cash.
Where to Hide Your Valuables Instead
The best hiding places are the ones that require effort to access or don’t make sense for a thief to bother with. Think inconvenient, hidden, or disguised. Here are some ideas.
Trash Can with a False Bottom
A cleverly designed trash can with a hidden compartment can be a surprisingly effective deterrent. Thieves are unlikely to rummage through garbage. Just make sure your valuables are sealed against moisture — and don’t accidentally toss them out on trash day!
Fake Wall Outlets
You can purchase wall outlets that look completely real but pull out to reveal a small hidden compartment. They’re perfect for storing cash, jewelry, or small documents. Just be sure the outlet isn’t connected to any wiring.
Hidden Household Items
Fake food cans or containers designed to mimic ordinary products — like shaving cream or soup — are a discreet way to hide valuables. You can even make your own by hollowing out real cans. Just be careful to make them look authentic, and don’t place them in high-traffic areas where someone might mistake them for the real thing.
Structural Hiding Spots
If you’re handy, consider creating built-in hiding spaces behind removable panels or trim. Hollowed-out wainscoting, door jambs, or floorboards can be excellent concealment spots. Pre-made versions are also available for purchase and can be installed without major renovations.
Books and VHS Cases
A hollowed-out book on a crowded bookshelf — or an old VHS tape in a dusty box — won’t draw a second glance. Just don’t use a book or a tape case you might mistakenly donate.
Storage Bins
Large, unlabeled bins can attract attention, so disguise your valuables among ordinary items. Label bins with dull titles like “Old School Projects,” “Holiday Décor,” or “Winter Clothes.” Even if burglars do open a few, they’re unlikely to dig deep through boxes of tinsel or kids’ art supplies.
Kids’ Bedrooms
While the master bedroom is a prime target, thieves usually skip children’s bedrooms. Consider stashing your valuables in a box on a high shelf in the closet. Further protect it with a misleading label.
Add an Extra Layer of Security
Even the best hiding spots can’t protect your valuables completely. Strengthen your security by:
- Installing a home security system with cameras and alarms to deter burglars.
- Using motion-sensor lighting around entry points to discourage nighttime intrusions.
- Keeping your valuables insured through your homeowner’s or renter’s policy so you’re financially protected even if the worst happens.
By avoiding the most obvious hiding places and thinking creatively about security, you can protect your valuables and your peace of mind.
This article is furnished by California Casualty, providing auto and home insurance to educators, law enforcement officers, firefighters, and nurses. Get a quote at 1.866.704.8614 or www.calcas.com.

by California Casualty | Helpful Tips, Homeowners Insurance Info |
You’ve found the dream apartment — great neighborhood, easy commute, maybe even a dishwasher (score!). But before you start packing boxes, there’s one big question to answer: Can you actually afford it? Figuring out how much rent fits your budget isn’t necessarily exciting, but it can save you from living on instant noodles by mid-month. Let’s break it down.
The Classic 30% Rule: A Starting Point, Not the Whole Story
You’ve probably heard of the 30% rule, the long-standing guideline that says you should spend no more than 30% of your gross monthly income on rent. For instance, if you make $60,000 a year, that’s $5,000 a month before taxes — so 30% would be $1,500 for rent.
Landlords often use a version of this when screening tenants. They look for applicants with an annual income that is at least three times the monthly rent. While this rule can be a useful benchmark, it’s a rough measure. It doesn’t consider student loans, credit card debt, childcare, or savings goals.
In short: the 30% rule is a place to start — but not where your math should end.
Build a Budget That Works for You
Instead of relying on outdated formulas, create a personalized budget that reflects your lifestyle and financial situation. Here’s how.
Step 1: Track Every Expense
To figure out how much you can realistically spend on rent, you first need to know where your money is going. Spend a month tracking your expenses — every dollar. Apps like YNAB (You Need a Budget), or Rocket Money can make this easier by automatically linking to your accounts and categorizing purchases.
Be sure to include:
- Utilities: Gas/electric, water, internet
- Groceries and dining out
- Transportation: Gas, parking, public transit, car payments, vehicle maintenance, and insurance
- Health insurance and out-of-pocket medical expenses
- Debt payments: Student loans, credit cards, personal loans
- Recurring expenses: Subscriptions, memberships, and automated payments
- Entertainment and streaming services
- Gifts, clothes, and home supplies
- Pet expenses
Step 2: Subtract Expenses from Income
Once you’ve totaled your monthly spending, subtract it from your take-home pay (after taxes). What’s left gives you a real idea of what you can afford for rent.
If that number feels tight, look for easy trims. Could you cut back on takeout or unused subscriptions? Maybe refinance student loans or car payments for lower rates. Don’t go overboard — budget changes that are too drastic rarely stick — but even small shifts can free up hundreds a month. Consider a roommate if that’s an option.
The 50/30/20 Rule: A Smarter Spending Framework
If you like structure but want more flexibility than the 30% rule, try the 50/30/20 budget. It divides your income into three simple categories:
- 50% for needs: Rent, utilities, groceries, transportation, insurance, and other essentials
- 30% for wants: Dining out, clothing, hobbies, travel, and entertainment
- 20% for savings and debt: Emergency fund, retirement contributions, or extra payments toward loans
This framework gives you room to breathe while keeping savings front and center. And if your “needs” category (including rent) creeps higher than 50%, that’s your signal to re-evaluate what you can comfortably afford.
Plan for the Unexpected
Even the best budgets can be derailed by surprise expenses — car repairs, medical bills, or job changes. That’s why it’s smart to build an emergency fund.
Financial experts recommend setting aside enough to cover three to six months of expenses. That might sound like a lot, but you can start small. Even putting away $50–$100 a month adds up over time — and gives you peace of mind knowing you’re protected if something unexpected happens.
Beware of Rental Scams
In today’s tight housing market, scammers are getting more creative — and more convincing. If a listing feels off, trust your gut. Here are some red flags that could indicate a fake rental ad:
- The deal seems too good to be true (it probably is).
- There’s no physical address
- Communication happens only through email or text — no phone calls or in-person meetings.
- The “landlord” seems too eager to rent and skips background checks.
- You’re asked to wire money or send a deposit before seeing the property.
- There’s no lease or you’re told one isn’t necessary.
- The landlord claims to be “out of town” but will hold the unit for you once you send money.
Always visit the property in person, verify the owner’s identity, and never send payment until you’ve signed a legitimate lease.
Don’t Skip Renter’s Insurance
Once you’ve signed the lease and unpacked your boxes, there’s one more thing you’ll want to check off your list: renter’s insurance. Starting at around $10 a month, renter’s insurance is one of the most affordable ways to protect yourself financially. Your landlord’s insurance only covers the building — not your personal belongings.
Renter’s insurance typically includes:
- Personal Property Coverage – Protects your belongings from theft, fire, or other covered losses.
- Liability Coverage – Helps pay for damages or injuries if you’re found responsible.
- Additional Living Expenses – Covers hotel or temporary housing costs if your apartment becomes uninhabitable.
Think of it as a safety net for the unexpected. And if you bundle your renter’s policy with an auto policy through California Casualty, you may qualify for premium discounts — a smart way to save even more each month.
Finding the perfect apartment should be exciting, not stressful. By taking the time to crunch the numbers, track your spending, and plan ahead, you can move into your new place with confidence (and still have money left over for furniture or Friday night pizza).
This article is furnished by California Casualty, providing auto and home insurance to educators, law enforcement officers, firefighters, and nurses. Get a quote at 1.866.704.8614 or www.calcas.com.
