by California Casualty | Safety |
 In many areas, the weather has been pretty good so far this year. But, this week started a flurry (pun intended) of winter weather, and I thought it would be a good time to recap some important safety tips for cold weather!
Winter Care Care Checklist – if you haven’t prepped your car for cold weather, you still have time!
What to do when your pipes freeze – It happens to the best of us (or, at least, it happened to me!). A quick guide to getting your pipes thawed without flooding your house.
Carbon monoxide safety – Firing up your heaters can lead to hidden dangers. Here are some tips for CO prevention.
Driving Safety in Snow and Ice – When the snow and ice come down, the roads get slippery. Here are some tips for making that commute safely.

by California Casualty | Educators |
Get ready to turn your classroom into the most festive world tour your students have ever taken. From sparkling lanterns to joyful songs and colorful crafts, the season offers endless opportunities to help students discover the beauty of different cultures. By weaving these global customs into your lessons, you can create a classroom where curiosity thrives, connections grow, and every child sees their world expand in meaningful, memorable ways.
Pro Tip: Survey your class before you start the tour of the holidays. That way you can include the traditions of all your students. Then, call upon your resident “experts” and their families as you teach these lessons.
Here are the winter holidays listed in roughly date order. Note that some holidays are fixed to a date, while others will move around the calendar from year to year.
St. Nicholas Day
Observed in parts of Europe on December 6, this holiday honors St. Nicholas, known for anonymous gift-giving and acts of kindness.
Classroom Activity:
- Have students leave their shoes in the hallway. Ask a staff member or parent fill the shoes with treats like stickers, pencils, or candy for a joyful surprise.
- Reward acts of kindness in your classroom with St Nicholas stickers.
- Organize a service project such as a classroom collection of socks or toys, or have your students write notes to seniors in nursing homes.
Las Posadas
Las Posadas is a beloved Mexican and Latin American tradition held Dec. 16–24. It reenacts Mary and Joseph’s search for shelter. The celebration features processions, candlelit prayers, music, and piñatas.
Classroom Activity:
- Make decorative paper-bag lanterns with flameless candles.
- Create individual mini piñatas with paper cups decorated with colorful crepe paper fringe. Fill them with candy.
- Have students act out the procession by knocking on classroom doors and when welcomed, singing a Spanish song and giving out treats.
St. Lucia Day
Celebrated on December 13 in Sweden, Norway, and Finland, this Festival of Light honors St. Lucia. The celebration features candlelit processions, saffron buns, and gingerbread treats. There are themes of light and kindness.
Classroom Activity:
- Find the Scandinavian countries on a map and learn about their locations and climates.
- Make paper St. Lucia crowns with candle cutouts.
- Read by “candlelight” (flashlight or flameless candles) in your classroom. If you like, include a gingerbread treat.
Hanukkah
The eight-day Jewish Festival of Lights commemorates the rededication of the Second Temple. Students enjoy learning about menorahs, dreidels, and foods fried in oil like latkes and donuts.
Classroom Activity:
- Play the dreidel game (math integration bonus!)
- Make edible dreidels. Put a pretzel stick in a marshmallow for the top. Use icing to “glue” a Hershey’s kiss to the bottom.
- Make a paper plate menorah. Cut it in half and draw the candelabra branches. Decorate with construction paper candles.
Dongzhi Festival
This East Asian festival celebrates the Winter Solstice — the shortest day and longest night of the year. It’s observed by eating symbolic foods like rice balls and dumplings.
Classroom Activity:
- Make a yin-yang design as a lesson on balance and harmony.
- Create simple lanterns to celebrate the return of light.
- Explore the concept of the Solstice and track when spring will arrive.
Eid al-Fitr
Eid marks the end of Ramadan and emphasizes empathy, gratitude, and charity. Feasting, giving gifts, and sharing with the community are common.
Classroom Activity:
- Create mobiles featuring the crescent moon and stars.
- Make a kindness jar inspired by Eid traditions. Use it to record acts of kindness that students are doing in your class and outside of it.
- Use a world map to find the countries that celebrate Eid al-Fitr.
Christmas
Celebrated worldwide on December 25, Christmas includes traditions ranging from religious observances and nativity scenes to more secular gift-giving, caroling, and decorating trees.
Classroom Activity:
- Use your classroom library to host a Book Flood like Iceland does for Christmas Eve.
- Make and decorate stockings or ornaments.
- Use the 12 Days of Christmas song for a math tie-in. Younger grades can draw, group and count the gifts; older ones can total the cost for each day.
Kwanzaa
Kwanzaa is a celebration of African heritage observed in the U.S. from Dec. 26–Jan. 1. Each day honors one of the Seven Principles, represented by candles in a kinara. The principles are unity, self-determination, collective work and responsibility, cooperative economics, purpose, creativity and faith.
Classroom Activity:
- Cut red and green paper strips and weave them through black construction paper into a Kwanzaa mat, called a mkeka.
- Use cardboard toilet paper rolls to create a kinara with one black, three red and three green candles.
- Older students can look up the meanings of the principles and create stories that show a principle in action.
Chinese New Year (Lunar New Year)
Chinese New Year is a vibrant celebration of renewal, family, and good fortune marking the start of the new lunisolar year (between Jan. 21 and Feb. 20). Students love learning about zodiac animals, lanterns, and the symbolism behind red decorations.
Classroom Activity:
- Have students discover their zodiac animal, or choose one that they like, then write a short persuasive piece about why it fits their personality.
- Create paper lanterns to adorn the classroom.
- Decorate red envelopes and fill them with written wishes for the new year.
With thoughtful preparation, accurate research, and family involvement, the holidays can become a memorable learning journey around the world. And no matter how you celebrate, happy holidays from all of us at California Casualty!
This article is furnished by California Casualty, providing auto and home insurance to educators, law enforcement officers, firefighters, and nurses. Get a quote at 1.866.704.8614 or www.calcas.com.
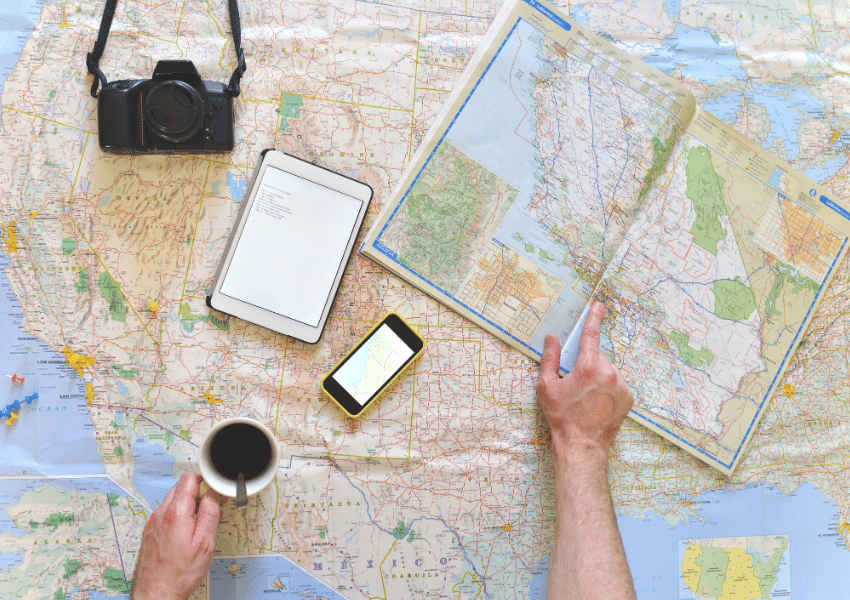
by California Casualty | Auto Insurance Info, Helpful Tips, Travel |
The fall and winter holidays are here, and that means one thing — road trip season! Whether you’re packing up the car for a cozy weekend with family or planning a winter getaway, a little prep now can make the miles ahead smooth and stress-free. So before you hit the highway, let’s make sure both your car and your crew are road trip ready.
1. Give Your Car a Quick Checkup
Take some time to make sure your vehicle is in good shape. A simple once-over now can prevent big headaches later.
- Tires: Start from the ground up. Check tread depth using the penny test — if you can see the top of Lincoln’s head, it’s time for new tires. Adjust the air pressure to the manufacturer’s recommendation (listed on the inside of your driver’s door), and make sure your spare tire is in good shape and properly inflated.
- Battery: Car batteries tend to struggle in extreme temperatures. If your battery is more than three years old, have it tested before your trip. A weak battery can leave you stranded in a rest area or gas station parking lot — never fun with a trunk full of luggage and kids in the back seat.
- Lights: Do a quick walk-around to check your headlights, taillights, brake lights, and turn signals. Replacing a bulb takes only a few minutes and improves both visibility and safety.
- Oil & Fluids: If you’re due (or close to due) for an oil change, take care of it before your trip. Clean oil helps your engine run more efficiently on long drives. Don’t forget to top off brake fluid, power steering fluid, windshield washer fluid, and coolant (anti-freeze) — especially if you’re heading into colder weather.
- Belts & Hoses: Pop the hood and look for cracks, fraying, or leaks. Worn-out belts and hoses are a common cause of breakdowns on long drives.
- Recalls: Before you leave, take a minute to look up your VIN at gov/recalls. It’s an easy way to see if your car has any unaddressed safety issues.
2. Stock Up and Plan for Emergencies
Even with the best prep, life can throw a curveball. A well-stocked emergency kit ensures you’re ready for whatever comes your way. Pack these essentials:
- Jumper cables
- First aid kit
- Flashlight with extra batteries
- Blankets or emergency thermal wraps
- Reflective triangles or road flares
- Tire pressure gauge
- Tire sealant for small punctures
- Multipurpose tool or pocketknife
You’ll also want to keep a portable phone charger or power bank handy, especially if your car doesn’t have USB ports. Toss in personal medications, a small stash of cash (for tolls or emergencies), and some bottled water and nonperishable snacks in case you get delayed. For comfort, include pillows, cozy blankets, and a travel cooler filled with snacks and drinks. A happy car equals happy passengers — and fewer unscheduled pit stops!
3. Keep It Clean and Comfortable
Nothing ruins a road trip faster than clutter and chaos. Before you go, clean out the interior and start with a fresh, organized space. Make sure to bring along:
- A small trash bag or reusable bin for wrappers and napkins
- Hand sanitizer and disinfecting wipes for quick cleanups
- A travel-size tissue pack or paper towels
If you’re traveling with kids, you may want to childproof your car and stock up on car-friendly activities — audio books, travel games, or coloring pads. For adults, download your favorite playlists or podcasts before leaving areas with spotty reception. Little touches like seat cushions, neck pillows, or a cozy throw blanket can turn long stretches of highway into something a bit more comfortable.
4. Don’t Forget the Paperwork
Make sure your essential documents are where they belong. Keep your driver’s license in your wallet and your vehicle registration and insurance card together in your glove compartment for easy access. It’s also a good idea to store digital copies of key documents in your phone’s secure folder or email for backup.
Bringing your pet along? Don’t forget their vaccination records, ID tags, and pet insurance information. Pack food, a collapsible water bowl, leash, and waste bags. Remember to plan regular stops for bathroom breaks and walks — both for safety and comfort.
A well-kept home sends the message that someone’s still around, discouraging would-be burglars and helping you relax on your trip. A few simple precautions can make it look like you never left.
- Let a trusted neighbor know your plans and how to reach you.
- Avoid posting your trip on social media until you’re back.
- Mow your lawn and tidy up the yard before you leave.
- Stop your mail and newspaper deliveries or ask a neighbor to collect them.
- Leave a car parked in your driveway or ask a friend to park there occasionally.
- Set indoor lights on timers to turn on and off automatically.
- Consider installing a home security system or video doorbell for extra reassurance.
6. Check the Forecast and Plan Your Route
Before you head out, check the weather — not just for your destination but for every major stop along your route. Knowing about snow, heavy rain, or construction zones can help you reroute or adjust your travel times. If the forecast calls for snow or ice, pack an ice scraper, small shovel, and sand or kitty litter for traction. You might not need them, but you’ll be glad to have them if you do.
Download a reliable navigation app like Google Maps or Waze and save offline maps in case of poor service. If you’ll be driving through rural or mountainous areas, keep a printed map as a backup — sometimes, old-school really is best.
7. Enjoy the Ride
Once your checklist is complete, it’s time to focus on the best part — making memories on the open road. Cue up a fun playlist, plan a few scenic stops, and don’t rush. Whether you’re watching the leaves change or catching a winter sunrise, the journey itself can be just as rewarding as the destination.
This article is furnished by California Casualty, providing auto and home insurance to educators, law enforcement officers, firefighters, and nurses. Get a quote at 1.866.704.8614 or www.calcas.com.
by California Casualty | Auto Insurance Info, Helpful Tips |
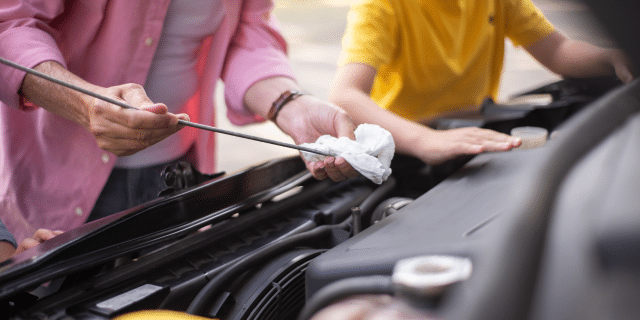
Your car’s fluids are like its lifeblood—without them, things can go south fast. From keeping your engine cool to ensuring your brakes respond in a split second, fluids play a critical role in your vehicle’s performance and safety. The good news? You don’t have to be a mechanic to keep tabs on them. With a few simple checks, you can catch issues early and keep your car running smoothly, mile after mile.
Why Fluid Checks Matter
Many vehicle fluids need attention more frequently than the typical 5,000- to 10,000-mile service intervals. Ignoring fluid levels can lead to poor performance, unexpected breakdowns, or even long-term engine damage.
Whether you’re prepping for a road trip or just want to protect your investment, regular fluid checks are a smart habit to adopt.
General Tips for Checking Fluids
Park on a level surface before checking any fluids.
- Never overfill—a little too much can be just as harmful as too little.
- Clean around caps and reservoirs before opening to avoid introducing dirt or debris.
- Always use the type of fluid recommended by your vehicle’s manufacturer (your owner’s manual will have the specs).
- If you find yourself topping off fluids frequently, it could be a sign of a leak or other issue—have it checked by a professional.
- Your owner’s manual is a good first step for knowing where the components are, and what to check.
Engine Oil
What it does: Lubricates engine parts, removes debris, and helps regulate heat.
When to check: Monthly. Change it every 3,000 to 5,000 miles, or according to your car’s recommendations.
How to check:
- Turn off the engine and let it cool.
- Open the hood and locate the oil dipstick (usually marked with a bright handle).
- Pull it out, wipe it clean, and reinsert it fully.
- Pull it out again and check the level. It should fall between the min and max markers.
- If low, add oil slowly and recheck. Usually, one quart is enough to go from the lower to the upper mark.
Check oil quality too:
Rub a little between your fingers. If it feels gritty, it may be breaking down. Look at the color—clean oil is amber or golden. Dark brown or black oil means it’s time for a change. Milky oil? That could indicate a coolant leak—get it checked ASAP.
Brake Fluid
What it does: Transfers force from your foot on the pedal to the brakes themselves.
When to check: Monthly. Replace every 1–2 years, or sooner if braking feels soft or delayed.
How to check:
- Locate the brake fluid reservoir, usually near the back of the engine bay.
- The fluid should be between the min and max lines.
- If it’s low, add the correct brake fluid for your vehicle.
- The fluid should be clear or light yellow. If it’s dark or cloudy, it needs to be replaced.
Note: Brake fluid absorbs moisture over time, which can lead to spongy brakes. Never ignore braking issues and know when you need new brakes.
Transmission Fluid (Automatic)
What it does: Lubricates transmission components and enables smooth gear shifts.
When to check: Monthly. Replace every 30,000 to 60,000 miles, or sooner if shifting feels rough.
How to check:
- Make sure the engine is running and warmed up.
- Engage the parking brake.
- Remove the transmission dipstick (if equipped), wipe it clean, then reinsert and remove it again to check the level.
- Fluid should be red, amber, or pink. If it’s brown, cloudy, smells burnt, or feels gritty, it’s time to change it.
- If low, add the appropriate fluid. Be cautious not to overfill.
Tip: Some newer cars have sealed transmissions. If you can’t find a dipstick, checking the fluid may require a mechanic.
Coolant (Antifreeze)
What it does: Regulates your engine’s temperature to prevent overheating and freezing.
When to check: At least twice a year. Full flush every 2–3 years (or longer, depending on the coolant type).
How to check:
- Only check when the engine is completely cool.
- Locate the coolant reservoir—usually a clear plastic tank with markings.
- Fluid should be between the min and max lines.
- If low, add a 50/50 mix of coolant and water unless your car specifies otherwise.
Warning: Be aware of the location of your radiator. Never open the radiator cap when the engine is hot—it can release scalding steam.
Power Steering Fluid
What it does: Makes steering smooth and responsive.
When to check: Monthly. Replace every 50,000 miles (varies by vehicle).
How to check:
- Turn off the engine.
- Locate the power steering fluid reservoir.
- Check that fluid is at the proper level (some caps have dipsticks).
- Some reservoirs have hot and cold markings—check according to your engine’s temperature.
Watch out for: Difficulty steering or a whining noise when turning could mean low fluid or a leak.
Windshield Washer Fluid
What it does: Keeps your windshield clean and ensures visibility.
When to check: Monthly—or more often in messy weather.
How to check:
- Open the cap to the washer fluid reservoir (usually marked with a windshield icon).
- If the level is low, top it off.
- In warm weather, use a bug-removing fluid. In winter, use a solution with antifreeze properties to prevent freezing.
When to Visit a Professional
While regular fluid checks can prevent many issues, some problems need a pro. Schedule a visit to your mechanic if you notice:
- Leaking fluids under your car—these often appear as puddles or drips.
- Dashboard warning lights—especially related to oil pressure, brakes, or coolant.
- Unusual noises—squealing, grinding, or whining sounds could point to fluid problems.
- Smoke from under the hood—could be due to leaking oil or overheating coolant.
And don’t forget, keeping your fluids in check is just one part of car maintenance. Protect your vehicle with the right insurance coverage to safeguard against the unexpected. Safe travels.
This article is furnished by California Casualty, providing auto and home insurance to educators, law enforcement officers, firefighters, and nurses. Get a quote at 1.866.704.8614 or www.calcas.com.
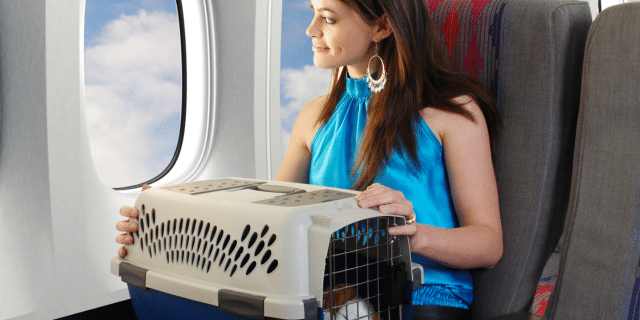
by California Casualty | Pets, Travel |
Whether your pet is a seasoned jetsetter or a first-time flyer, navigating air travel with a four-legged friend takes planning, patience, and know-how. From booking the right seat to ensuring a smooth security check, here’s how to make flying with your pet a paws-itively stress-free adventure!
Cabin or Cargo? Choosing the Best Travel Option
Your pet’s size will determine whether they can fly in the cabin with you or if they must go in cargo. Cargo is not for every pet, and if you must consider it, make sure to check with your vet that it is safe for your pet’s breed, age and health.
Carry-On Pets:
- Pets in the plane’s cabin are limited to cats and small dogs meeting size requirements.
- Your pet must remain in a carrier under the seat in front of you for the flight.
- Some airlines allow you to purchase an extra seat for your pet carrier. You still will need to keep your pet in the carrier, and you also will need to place the carrier under the seat during takeoff and landing.
- Choose a window or aisle seat which will have the most room to stow your pet’s carrier under the seat. Avoid emergency exit rows and bulkhead seats.
- A pet fee applies. Check with the airline for the exact amount.
Cargo Travel:
- Larger dogs must fly in cargo, which is the space at the bottom of the plane where luggage is stored.
- While cargo is ventilated, it is not temperature controlled, and airflow is not the same as in the cabin. Pets may not be allowed in cargo during extreme heat or cold.
- Short-nosed breeds like bulldogs, pugs, and Persian cats are at higher risk for breathing issues and should never fly in cargo.
- Pets must be placed in cargo-approved kennels. Check your airline for specifications.
- While most pets travel safely in cargo, poor ventilation or mishandling can pose risks.
- Most airlines are required to report on companion animal safety. Check your airline’s safety record before booking your pet in cargo.
- A pet fee also applies.
Service Dogs:
- Service dogs are an exception to the pet traveling policies. They are allowed to be out of a carrier but must not block the aisle. Generally, they are not allowed on seats.
- To qualify as a service dog, they must be fully trained and certified to assist a person with a disability.
- Emotional support animals are considered pets and not service dogs. They must follow standard pet travel guidelines.
- Service dogs will usually fly free of charge.
Booking Your Flight
- Research quarantine, vaccine, and other restrictions for your destination so you will have the right paperwork.
- Always communicate with the airline in advance. You don’t want any surprises.
- Book direct flights. There is less chance of handoffs going wrong.
- For cargo, if traveling in the summer, pick early morning or evening flights to avoid the hottest parts of the day. In winter, book midday flights to avoid the cold.
Prepping Your Pet for Takeoff
Before your trip, make sure your pet is in tip-top shape for travel. Here’s how:
- Vet Visit: Schedule a checkup to ensure your pet is healthy enough to fly. Some destinations require a health certificate issued within 10 days of travel.
- Skip Sedatives: Tranquilizers can affect breathing. Ask your vet for guidance on whether you should use them. You also can consider pet calming chews with melatonin or chamomile. For nervous cats, try pheromone sprays to help ease anxiety.
- Microchip & ID: Make sure your pet’s microchip info is up to date and their collar includes both your home address and temporary travel address.
Helping Your Pet Adjust to Air Travel
Crate Training: Get your pet comfortable with their travel carrier well in advance. Reward them with treats and praise.
- Crowd Exposure: Airports are busy and noisy! Take your dog to a crowded, dog-friendly area to get them used to similar sights and sounds.
- Practice Security Checks: TSA requires pets to go through security outside of their carrier. Practice taking your pet in and out calmly.
Packing List: Don’t Forget These Essentials
Proof of vaccinations and vet contact info
- Microchip number and pet license
- Airline-approved carrier (waterproof & spacious enough for your pet to stand, turn, and lie down)
- Collapsible water bowl
- Small bag of food in case of delays
- Treats and chew toy (helps with pressure changes)
- Poop bags and pet wipes for clean-ups
- Extra collar and leash
- A recent photo of your pet (for ID purposes)
Pro Tip: For pets traveling in cargo, freeze water in the collapsible water bowl. This will help prevent spills. By the time your pet is thirsty, the water will have defrosted. You can also attach a water bottle dispenser.
Airport Tips: Navigating the Terminal with Your Pet
Strange sounds, sights and smells can be challenging even for the most well-trained pet. Changes in diet and water also can affect your pet. Here are some ways to navigate specific issues with traveling.
Skip Breakfast? A light stomach may help prevent nausea—check with your vet.
- Pre-Flight Potty Break: Ensure your pet relieves themselves before heading to check-in.
- Cargo Flyers: Label crates with LIVE ANIMAL in large letters and add arrows to indicate the upright position. Attach a photo of your pet, and line the bottom with towels. This will help absorb any liquids if there are accidents. You will be dropping off your pet at the check-in counter along with your luggage.
- Cabin Flyers: Be prepared to remove your pet from the carrier for TSA screening. Once through security, locate pet relief areas before boarding.
- Alert the Flight Crew: If your pet is traveling in cargo, notify a flight attendant so they’re aware. They should be able to confirm that your pet is safely on board.
- Meet Your Pet: The airline will direct you to a place where you can meet your pet and show them some love following your flight.
Are you flying with small children, too? Check out our blog on Flying with Kids.
Travel with Peace of Mind
Finally, don’t forget to protect your fur baby with pet insurance for added peace of mind, and to save on your vet bill. Remember, you can easily add pet insurance from Pet’s Best to your California Casualty auto or home policy. Find out more about what pet insurance can cover by talking with a California Casualty customer service representative today.
This article is furnished by California Casualty, providing auto and home insurance to educators, law enforcement officers, firefighters, and nurses. Get a quote at 1.866.704.8614 or www.calcas.com.
