
Thump, thump, thump. The sound of a flat tire doesn’t have to ruin your day. Be prepared for a future blow-out or puncture by reviewing how to use a car jack safely. In honor of National Preparedness Month, we’ve prepared a step-by-step guide. Bookmark this or print it out for when you need it.
First, what kind of jack do you have?
There are different kinds of jacks, and they operate slightly differently. Know which one you have.
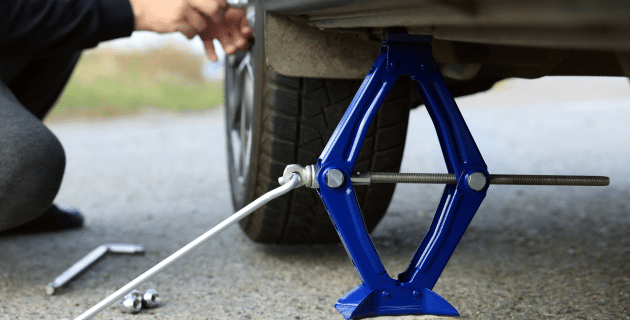
- Chances are you have a scissor jack. These are the jacks that typically come with new cars. Their compact size allows them to easily fit in a vehicle’s trunk. They look like two pairs of scissors joined at the tips, creating a diamond shape. Scissor jacks are designed to get the job done but they’re not meant for repeated use over time.
- Hydraulic floor jacks are used by car enthusiasts. They’re also known as bottle jacks. They have a metal base with a lever extending to the side. They can be used repeatedly over time. However, their bulkier size makes them harder to store.
Step-by-step Instructions
Step 1: Park the car.
- You saw the tire warning light or heard the thudding sound of a tire going flat. Safely pull over away from traffic. Don’t try to drive on a flat tire; it can cause harm to the wheel.
- Make sure you are parked on solid ground. Don’t put a jack on dirt or grass. It will not be stable enough. (If you have to park on dirt or grass, use a thick, flat piece of wood to create a stable platform for the jack.)
- Don’t use a jack on an incline. If you must, make sure you’re close to the curb. If you’re parked downhill, turn your front wheels toward the curb. If you’re parked uphill, turn your wheels away from the curb.
- Put the car in park and engage the parking brake. If your car has a manual transmission, put it in first gear and engage the parking brake. Turn the engine off and put on your hazard lights.
Step 2: Secure the wheels.
- For an added precaution, you will want to “chock” at least one wheel. A chock is a block or wedge placed against a wheel to prevent it from moving.
- You can buy an inexpensive chock block or wheel wedge from an auto or big box store. If you don’t have one, you may use wood blocks or bricks.
- If you’re lifting the front of the car, put the chock behind the back tire.
- Do the opposite of the corner that you’re going to lift. If you’re lifting the front right wheel, then chock the rear left and vice versa.
Step 3: Set up the jack.
- You will find your jack in the trunk or under the luggage floor cover.
- Jacks are not labeled with “this side up.” Make sure that it’s not upside down when you place it on the ground. For a scissor jack, look for a larger flat base at the bottom and a smaller “saddle” pad at the top.
- If you have a handle assembly, put the handle together. For scissor jacks, slip the included rod tool through the hole and turn to pull the sides of the scissor inward and the top and bottom of the jack apart. For hydraulic jacks, you will need to place the handle in the opening. To operate hydraulic jacks, simply pump the handle.
- Practice without a load. You can use silicone spray if the jack is tight or jerky.
Step 4: Place the jack.
- On most vehicles, there are 4 jacking points with reinforced metal to safely lift your car.
- Look just behind the front wheels and just in front of rear wheels or consult your owner’s manual.
- If you are lifting just one wheel, choose a jack point near that corner. Most likely, the right place is on the pinch weld (where the metal pieces are welded together) between the front and rear tires. There may be a solid square of metal underneath the car for your jack point.
- Stay away from fuel lines and fragile parts.
Step 4: Raise the car.
- Turn the handle of your scissor jack to the right (or pump your hydraulic jack). There will be some initial resistance, but the tire will eventually come off the ground.
- Make sure the jack stays straight up. If it’s leaning, it will not be able to support the car correctly.
- Pay attention to sounds. You may hear a pop or a thud if the jack shifts slightly. Check that it hasn’t slipped out of position.
- Stop when the wheel is just a few inches off the ground. You don’t need much room to change a tire.
- Check your jack. Give your car a gentle shake to make sure it’s secure. If the jack moves, then raise or lower it to the point where there’s no movement.
Step 5: Add jack stands (optional).
- Jack stands will help provide additional support. They are essential if you are working under the car but optional if you are changing a tire and not going underneath.
- Place your jack stand directly under the lifting point. Use the pin or screw to lock it in place, per the manufacturer’s instructions.
- Do not use cinder blocks or bricks as a substitute for jack stands.
Step 6: Lower the car.
- When you are done changing the tire, it is time to lower the car. Raise the car an inch or two so you can remove the jack stands.
- To lower the car, turn a scissor jack counterclockwise or to the left.
- For a hydraulic jack, open the relief valve to let the fluid drain. This will lower the arm. Make sure to open the valve slowly so you don’t drop the car down too fast.
- Put the jack away for use at another time. Congratulate yourself on a job well done.
Your car is one of your greatest investments. Keep your car well maintained and protect it with the right insurance. Safe travels.
This article is furnished by California Casualty, providing auto and home insurance to educators, law enforcement officers, firefighters, and nurses. Get a quote at 1.866.704.8614 or www.calcas.com.

- California Casualty Earns Financial Stability Rating® of A, Exceptional, From Demotech, Inc. - April 28, 2025
- Music & Arts Grant Recipients – 2024 - December 13, 2024
- Understanding Auto and Home Insurance Rate Changes - December 3, 2024