
by California Casualty | Health, Nurses |
Flu season can feel like a marathon for nurses, with every shift presenting new challenges to stay healthy. As the frontline defense against the virus, you know how crucial it is to protect yourself while supporting your patients. From bolstering your immune system to managing stress during long hours, these flu season survival tips will help you stay strong, focused, and ready to tackle whatever comes your way. Because when you’re at your best, so is your care.
Stock Up on Essentials
Preparation is key. Ensure you have an ample supply of personal protective equipment (PPE), such as masks, gloves, and gowns, and always ensure they are properly fitted and changed between patients. Keep sanitizers, disinfectants, hand creams, and lozenges on hand. Stock your home with over-the-counter medications, thermometers, and electrolyte solutions in case you or a loved one falls ill. Having these supplies ready allows you to focus on care without unnecessary stress.
Practice Exceptional Hand Hygiene
Hand hygiene is one of the most effective ways to prevent the spread of infection. Follow strict sanitation practices, washing your hands with soap and water for at least 20 seconds after each patient interaction and after touching shared surfaces. Remember, some viruses like norovirus are resistant to hand sanitizers, so soap and water are crucial. Avoid touching your face—especially your eyes, nose, and mouth—with unwashed hands. This simple habit can dramatically reduce your exposure to harmful pathogens.
Clean and Disinfect Workspaces
Shared spaces can harbor countless germs, making regular cleaning a must. Wipe down frequently touched surfaces such as desks, telephones, computer keyboards, and breakroom appliances daily. In common areas, pay attention to high-touch points like water fountain handles and microwave door handles. Keeping these areas clean helps minimize the risk of cross-contamination.
Stay Up to Date on Vaccinations
Vaccination remains one of the most effective tools in preventing the flu. Make sure your immunizations are current, including your annual flu shot, and encourage coworkers and patients to do the same. Vaccines not only protect you but also help reduce the spread of illness within your workplace and the broader community.
Boost Your Immune System
Your immune system is your strongest ally during flu season. Fuel your body with a nutritionally balanced diet rich in fruits, vegetables, whole grains, lean proteins, and healthy fats. Stay hydrated by drinking about 2 liters of water daily and carrying a water bottle to sip throughout your shift. Prioritize healthy sleep habits, aiming for 7-9 hours per night to allow your body to recharge. Incorporate stress-reducing activities like deep breathing exercises, meditation, or yoga into your routine. Regular physical activity can also boost your immunity. Find a workout you enjoy to help you stay motivated.
Manage Your Workload Effectively
A well-organized workload can reduce stress and improve efficiency. Start by prioritizing patient care based on urgency and complexity, focusing on high-risk patients first. Bundle similar tasks together to save time and energy. For example, group medication rounds or paperwork sessions to streamline your day. Delegate non-critical tasks to coworkers when appropriate, allowing you to concentrate on providing the best possible care.
Address Stress and Fatigue
Prolonged stress and fatigue can weaken your immune system, leaving you more vulnerable to illness. Incorporate short self-care breaks into your day to recharge. Use these moments to practice deep breathing, stretch, or enjoy a brief moment of mindfulness. Make restful sleep a priority, even if it means adjusting your schedule. Create a calming bedtime routine to signal to your body that it’s time to rest.
Collaborate with Your Healthcare Team
Effective communication with your team is vital during flu season. Maintain open lines of communication with fellow nurses, physicians, and caregivers to ensure efficient workflows and minimize gaps in care. Share updates on patient conditions, supply needs, and any changes in protocol. A united team effort can make a significant difference in managing the demands of flu season.
If You’re Sick, Stay Home
As a nurse, it’s natural to want to push through illness, but it’s essential to prioritize your health and the safety of those around you. If you feel unwell, take the time to recover. Stay hydrated, treat aches and fever with over-the-counter medications, and rest as much as possible. Cover your mouth and nose when coughing or sneezing and run a humidifier to ease congestion. Remember to replace your toothbrush after recovering from an illness to avoid reinfection.
Flu Season Preparedness at Home
Don’t forget to prepare your household for flu season as well. Encourage family members to practice good hygiene and stay up to date on their vaccinations. Designate a sick room for anyone who becomes ill and establish a cleaning routine to keep the rest of your home germ-free. By creating a safe and clean environment at home, you’ll minimize the risk of spreading illness within your family.
Stay Positive
Flu season can be challenging, but maintaining a positive mindset can make a big difference. Focus on the small wins, like successfully preventing an illness or seeing a patient recover. Celebrate your hard work and dedication, knowing that your efforts are making a meaningful impact in the lives of your patients and community.
This article is furnished by California Casualty, providing auto and home insurance to educators, law enforcement officers, firefighters, and nurses. Get a quote at 1.866.704.8614 or www.calcas.com.

by California Casualty | Auto Insurance Info, Helpful Tips, Travel |
You’re ready to hit the road, but your car has other plans—stuck in a snowbank with tires spinning. Before your frustration gets out of hand, take a deep breath. With the right techniques and a little patience, you can free your vehicle and get back on track. Here’s your step-by-step guide to escape the snow’s icy grip without breaking a sweat—or your car!
1. Stay Safe and Assess the Situation
Before doing anything, ensure you’re safe. Turn on your hazard lights and assess the situation. Are other vehicles nearby? Make sure you’re visible to others and have enough space to work around your car safely.
2. Clear the Exhaust Pipe
Check your car’s tailpipe for snow and ice. A clogged exhaust can cause dangerous carbon monoxide to back up into the vehicle’s cabin. Clearing it is a critical safety step before you start working to free your car.
Use a shovel or any sturdy tool to remove snow around the tires, under the car, and along the path you want to travel. Clearing as much snow as possible will make it easier to gain traction and move forward.
4. Try Melting the Snow
If the snow around your wheels is packed and icy, try sprinkling salt or a de-icing agent. Be cautious, as salt can cause rust on your vehicle, and some chemicals may be harmful to pets and the environment.
5. Add Traction
Improve your grip by spreading dry materials like sand, kitty litter, or even your car’s floor mats under the tires. These items can provide the friction needed to get your car moving.
Pro Tip: Lower your window slightly to listen for spinning wheels as you press on the gas. If you hear them spinning, it’s not working.
6. Choose the Right Driving Technique
Depending on your type of vehicle, you will want to take advantage of its strengths.
-
-
- 4-Wheel Drive: If your vehicle has a 4-wheel drive option, turn it on to deliver power to all wheels. Use a low gear in an automatic to reduce wheel spinning.
- Front-Wheel Drive: Turn your steering wheel left and right repeatedly to find a patch of traction.
- Manual Transmission: Start in second gear to reduce wheel spin and increase grip.
7. Turn Off Traction Control
Your traction control system can prevent your wheels from spinning, which helps in skids but can hinder your efforts when stuck. Temporarily disable it to give your wheels the power they need to move.
8. Rock Your Vehicle
Gently rock your car by shifting between forward and reverse gears. Apply light gas pressure—avoid flooring it—and stop if it’s not working after a few tries to prevent transmission damage.
9. Let Air Out of Your Tires
In extreme cases, slightly deflate your tires to increase surface contact and improve traction. Only do this if you’re near a place to reinflate them, as driving on underinflated tires can be dangerous.
10. Call for Roadside Assistance
If all else fails, it’s time to call for help. Roadside assistance professionals have the tools and expertise to safely free your vehicle.
After You’re Unstuck
Once your car is free, pull over in a safe spot and inspect your tires. Spinning wheels can pack snow and ice into the treads, making steering difficult. Use a snow scraper to clear them and restore proper grip. Don’t forget to turn your traction control back on before resuming your drive. Follow winter driving safety tips to prevent any future issues.
Be Prepared for the Future
Getting stuck in deep snow can damage your car’s transmission, battery, or drivetrain. Get your car checked out if you have been stuck in deep snow.
In addition, prepare for any future incidents. Keep a winter emergency kit in your vehicle, including:
- Ice scraper and snow brush
- First aid kit
- Flashlight and flares
- Blankets
- Tire pressure gauge
- Car jack
- Cell phone charger
- Kitty litter or sand for traction
Finally, make sure your vehicle is protected for winter with the right insurance. This will help add peace of mind. Safe travels.
This article is furnished by California Casualty, providing auto and home insurance to educators, law enforcement officers, firefighters, and nurses. Get a quote at 1.866.704.8614 or www.calcas.com.
by California Casualty | Helpful Tips, Homeowners Insurance Info |
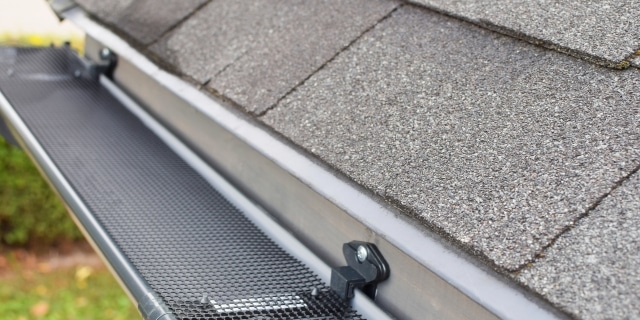
Those beautiful autumn leaves you’ve been admiring are not so pretty when they’re clogging your gutters. Acorns, leaves, branches, and other debris have a way of piling up, leading to blockages that can cause water damage and costly repairs. Enter gutter guards—a practical solution that keeps debris out while letting rainwater flow freely. Here’s a quick guide to gutter guards, including why autumn is the best time to check and clean your own gutters.
What exactly are gutters?
Gutters are channels along the edge of your roof that direct water away from your home. They include downspouts that bring water down to the ground, moving it at least 5-10 feet away from the foundation. When gutters get clogged, they no longer work the way they should. Water could stay pooled in the channels or move in ways that negatively affect your home. Clogged gutters can lead to expensive problems: soil erosion, basement flooding, structural damage, roof damage, siding damage, and foundation issues. A buildup of debris could also increase the risk of a fire. Luckily, there is an easy way to protect your gutters from getting clogged – gutter guards.
Types of Gutter Guards
There are many different types of gutter guards. Some can be self-installed, and others require a professional. Below is a brief description of the main kinds along with their pros and cons. (Check the warranty on your shingles before you install a gutter guard that requires attaching directly to shingles with screws or nails as that could potentially void it.)
Screen Guards
This is like a window screen for your gutters. The screen keeps out debris while the holes let the water pass through.
Pros: These guards are affordable and can be self-installed.
Cons: Dirt and small debris can still pass through the screen and get in your gutter. These guards need to be removed and cleaned at least once a year.
Micro-mesh Guards
Micro-mesh guards are like screen guards, but with holes that are much tinier. They are particularly good at keeping out pine needles and dirt, which can slip through larger openings. These guards are usually made of stainless steel and other durable materials.
Pros: Micro-mesh guards are low maintenance, and long lasting. They are easy to clean and should be cleaned every 3-12 months.
Cons: They require professional installation.
Reverse-Curve Guards (Surface Tension Guards)
These guards are attached beneath the shingles, and they go over the gutter and curve back a little. The curve creates a hood, so debris doesn’t get into the gutter, but the unique design lets the water seep through.
Pros: These are long-lasting and low maintenance guards.
Cons: Reverse-curve guards require professional installation. They also are highly visible and could affect your home’s aesthetic.
Brush Guards
These guards are made of stiff brushes that point up inside your gutters. The bristles catch debris as the water passes through.
Pros: They are easy to install and remove for cleaning.
Cons: These guards require frequent cleaning. Small debris can get caught in the brushes’ bristles, and these guards can be tough to clean as a result.
Foam Guards
This triangular-shaped foam fits inside your gutter to prevent leaves and other debris from lodging there. It’s usually made from polyurethane and has a spongy texture that allows water to flow through. Some foam guards restrict water flow more than others.
Pros: These are affordable and easy to install. They are good at blocking large debris.
Cons: Small debris can enter through gaps between the foam and gutter walls. The foam also can break and is susceptible to mold due to dampness. These need to be replaced every 1-2 years, depending on weather conditions in your area.
DIY vs. Professional
Should you install your own gutter guards or hire a professional? Here are some things to consider.
Choose DIY gutter guards and install them yourself if:
- You want or need to save money.
- You’re generally handy and comfortable on a ladder.
- Your roof is easy to access.
- You like the choices available for DIY. You can find most at your local home improvement store.
Hire a professional to install your gutter guards if:
- You have the budget for professional installation, and you prefer the convenience.
- You want a warranty to show the installation was done correctly and that will address potential future issues.
- You want a higher quality gutter guard than is available DIY.
- Your roof is unusually steep or is difficult to access.
- You have concerns about doing it yourself.
Before the Installation
The best time to install gutter guards is late summer and early fall. This helps prepare for the large volume of leaves that start coming down during the season. Before the installation, you will want to clean and check your gutters.
Cleaning your gutters is part of fall home maintenance. It helps to ensure that your home is ready for winter storm season and severe weather. Here’s a quick overview of how the process is done.
- Gather your supplies: a bucket for debris, trowel or gutter scoop, garden hose with spray nozzle, latex or waterproof gloves to protect your hands from wet debris, safety eyewear, and a sturdy ladder.
- Start at the downspout. Use your gloved hand or a trowel to remove leaves, twigs and packed material.
- Then go up to roof level on your ladder. Use your gloved hand to clear large debris like leaves or twigs. Use the trowel for compacted debris.
- Remove and clean the downspout strainer.
- Flush the downspout and the gutter with water from your hose.
- Look for leaks, making sure water flows freely through the downspout. You will want to repair any issues before you add gutter guards.
- Inspect your gutter for rust spots or peeling paint which could show signs of deterioration. Again you will want to address any issues and potentially replace those parts before adding the guards.
- Look for mold or mildew near the foundation which could mean water is getting in there. That could signal a larger problem.
Ready to start the project?
Once you have clean gutters without any issues, you are ready to protect them with gutter guards. Measure your gutters so that you will be able to purchase the right length of gutter guards. If you’re doing a DYI installation, make sure to fully read and understand the instructions. Watch tutorials and online customer reviews for a heads up on potential mistakes. Know that installing gutter guards can take anywhere from a couple of hours to a couple of days. If you’re choosing a professional installation, make sure to get several estimates and ask for references to avoid scams.
Your home is your greatest investment. Keep it fully protected for added peace of mind.
This article is furnished by California Casualty, providing auto and home insurance to educators, law enforcement officers, firefighters, and nurses. Get a quote at 1.866.704.8614 or www.calcas.com.

by California Casualty | Helpful Tips, Homeowners Insurance Info |
When it comes to house hunting, preparation is key. Whether you’re a first-time buyer or an experienced one, the right tools can make all the difference. From capturing details to measuring spaces, here’s the gear you need to ensure a smooth and successful search for your new home.
Tape Measure
While you can use an app on your phone to measure a space, it will be less accurate than using a traditional metal tape measure. You can buy one at any hardware or big box store. Before you go house hunting, make sure to measure your furniture so you’ll know whether it will be right for the homes you are touring. For your potential new home, here are some considerations.
- How wide are the door openings? Will your furniture fit through?
- Measure the rooms where you will be bringing furniture. Do you have sufficient space to arrange them the way you’d like?
- Measure the appliance spaces if you are bringing your own washer-dryer, refrigerator, etc. to ensure they will fit.
Camera/Phone and Notepad
You don’t want to rely on photos from the listing. Those are staged. Speak to your agent and ask if you can take photos. You also don’t want to rely on your memory. Use your phone or a notepad to take notes. You also can make quick sketches.
- Jot down things you like and don’t like about each home.
- Sketch out floorplans. Mark locations of windows and doors for future reference.
- Take photos of the house and rooms from different angles.
- Pro tip: Bring along printouts of online listings so you won’t have to write everything down.
A Level
Homes are never completely level. They settle over time. However, you shouldn’t find sloping floors, warped walls or cabinets that do not appear straight. You can buy a pocket level, a measuring tool that shows whether a surface is perfectly parallel.
- These tools typically have a bubble of air suspended in a vial of liquid. When a surface is level, the bubble will be within the guidelines. There are digital and laser levels, too, which are more expensive.
- Place your pocket level along the floor, on counters, or anywhere else that should be a horizontal surface.
- Look for the space between the doors and the floor as they swing out. Is the gap wider at any point?
- Floors that are not level could signal larger structural problems. Do your due diligence if you are buying a home in that condition.
Moisture Meter
Moisture problems aren’t always obvious and can be hidden. Bring along a moisture meter and you can measure the amount within the home. You can buy these meters at a hardware or big box home store. Choose one without pins so that you won’t put holes into a home you might not be buying.
- Moisture meters usually go from 1 (dry) to 100 (wet). Anything at 17 or above is a cause for concern. It could indicate water damage and leaks.
- The moisture meter must contact the surface to provide an accurate reading. There should be no visible moisture on the surface being tested.
- Place your meter flat against a surface such as wood or drywall. Try it in different places as you may find varying moisture levels.
- Pro Tip: Go house hunting after it rains. You’ll see where water collects around the house and in the gutters, and you may observe moisture or leaks inside.
Outlet Tester
This handy tool checks that each contact in the outlet is connected to the correct wire. It can identify several common wiring errors. You can buy a standard receptacle tester that plugs into an outlet or a non-contact voltage tester. Always be careful when performing tests on a live outlet.
- Plug your tester into an outlet. Repeat for several outlets throughout the home.
- A series of lights on your outlet tester will light up. Read the key code to determine what the lights mean. In some cases, an alarm will sound.
- If you do get a concerning reading, that means there are likely issues with the wiring in the house.
- You can use that additional anticipated expense to bring the price down, or you may choose to walk away from the potential problem.
Water Pressure Gauge
With low water pressure, showers and laundry will be longer and more frustrating. Low pressure also could signify a problem with the plumbing. Bring along a water pressure gauge to check out whether this is an issue in your potential purchase.
- If the water comes from a municipal utility, you can use an outdoor hose spigot near where water enters the house. If water is from a well, use a faucet close to the tank.
- For the most accurate reading, make sure water isn’t being used elsewhere in the house, such as with laundry or dishwashers.
- Do not test from a hose. Make sure your pressure gauge screws directly onto the spigot or faucet and that the seal is tight.
- Turn the water on all the way and read the gauge. A normal reading is from 40-80. Anything outside that range is cause for concern.
Flashlight
Even well-lit homes have dark corners and areas that aren’t easily seen. If you’re considering a purchase, you want to see everything—the good and the bad. Bring a pocket-sized flashlight or use the light on your phone to peek into dark areas.
- Look under appliances, in corners, dark basements, etc.
- Look for spiders, mold and any potential problem areas.
- A mirror can help you peek around corners.
- Pro Tip: Bring a UV flashlight and shine it on carpets to reveal places where pets have made messes.
Looking for a new home is an exciting time. Should you have questions about protecting your new investment, don’t hesitate to reach out to an agent for the right policy.
Happy house hunting!
This article is furnished by California Casualty, providing auto and home insurance to educators, law enforcement officers, firefighters, and nurses. Get a quote at 1.866.704.8614 or www.calcas.com.

by California Casualty | Helpful Tips, Homeowners Insurance Info, Safety |
It’s the Houdini of winter, the slippery vanishing act that turns a simple stroll into a slip-and-fall. We’re talking about black ice, that invisible coating that has us spinning out of control on the roadways. When it appears on our driveways and sidewalks, pedestrians beware.
Not only don’t you want to slip on black ice, you also don’t want to injure someone on your property. That might lead to legal problems. It is your responsibility as a homeowner to keep your property safe.
Read on to find out how to remove black ice from your driveway and sidewalk.
What exactly is black ice?
Black ice is a thin, almost transparent layer of ice on the surface of a roadway, driveway, deck, or other surface. It forms when a surface is wet and then temperatures drop below freezing. What makes it so dangerous is that it’s hard to see. It blends in with the surface and you don’t realize that it’s there until you’re slipping and sliding on it.
If you’re looking for black ice, there are some telltale signs. Sometimes you can notice a glossy or shiny appearance. However, if an area looks dry while surrounding areas are wet or have snow, there could be black ice present. Whether or not you see it, there are steps you can take to remove it, and even prevent it from forming.
Ways to Remove and Prevent Black Ice
Put on protective gear.
To keep yourself from slipping and sliding, you will want sturdy boots with good traction. Water resistant winter gloves will help protect your hands. When spreading chemicals, you also will want to wear safety glasses to shield your eyes. Remember that stairs leading down from your house could be especially slippery and covered in black ice. Use handrails.
Clear the snow and ice.
Shoveling the snow and breaking up the ice will help prevent it from melting and reforming as black ice. Use a snow shovel and ice pick. Finish off with a broom with stiff bristles to sweep away the loose ice. Toss snow and ice away from driveways and walkways. Make sure that when the snow and ice melt, they won’t run back onto the driveway and sidewalk.
Pro Tip: Sometimes you cannot smash the ice or shovel it away. In those cases, use a spade to scratch the surface in several places. This will make the black ice visible to others.
Salt, sand, or de-ice.
You want to prevent slipping, and you can do that by creating traction with sand or sawdust. Alternately, you can use an ice melting product. Use a spreader or bucket to spread these products. Note that salt and chemicals can be harmful to pets, plants, and young children. They also can damage your surfaces and the environment, so use them carefully.
- Rock salt lowers the freezing point of water, causing ice to melt. Spread a thin, even layer of salt. Allow it to penetrate and melt the ice. Use a shovel or broom to remove any ice and salt residue.
- Sand provides traction. While it doesn’t melt the ice, it creates a gritty surface. Spread generous amount of sand, gravel, kitty litter, or sawdust. Leave it in place until ice melts naturally. After the temperatures warm and ice is no longer a danger, be prepared to clean up the mess that results.
- De-icers (deicers) are chemical compounds. They come in many forms including liquids, pellets, and granules. Choose ones that are pet safe; even if you don’t have a pet, chances are your neighbors do. Sprinkle or spread the deicer evenly. Remove any remaining ice with a shovel or broom.
Use heated mats.
While heated driveways aren’t an option for many of us, we can use the more affordable alternative: snow-melting mats. These heated mats are made of slip resistant, waterproof rubber with a built-in heating system. If you turn on the mats before the snowfall, your walkways could stay dry and clear. They make larger ones for driveway use that cars can drive on. Snow melting mats aren’t cheap, but they are less expensive than installing radiant heat under your driveway and sidewalk.
Try rubberized stair treads or tarps.
Rubberized stair treads provide a high traction surface for your shoes, so it’s less likely that you will slip. You also may try a winter weather tarp to cover the surfaces that would typically get ice and snow. They are like a carpet for your driveway. You put them down before a snowfall and lift them up afterward.
Unblock drains and gutters.
Blocked drains can cause water to build up and surfaces to ice over. Clogged gutters also can divert water to places where it shouldn’t go, such as driveways. Make sure that these areas are clear ahead of storms.
Finally, protect your home and property with the right insurance for added peace of mind. After all, it’s one of your greatest investments.
This article is furnished by California Casualty, providing auto and home insurance to educators, law enforcement officers, firefighters, and nurses. Get a quote at 1.866.704.8614 or www.calcas.com.
