
by California Casualty | Auto Insurance Info, Helpful Tips, Safety |
As temperatures drop and roads become icy, taking steps to winterize your car ensures you stay safe and stress-free. From checking your battery to swapping out wiper blades, preparing for the season is all about protecting yourself and your ride. Ready to keep your car in peak performance through the cold months? Let’s get started!
Take care of your tires.
You depend on your tires to grip the road. Make sure they’re in the best condition to help you maneuver safely.
- Check the tread. Tread gives you traction, and worn tread will take longer to stop on slippery roads with ice and snow. Put a penny into one of the grooves with Lincoln’s head facing you and upside down. If you see all his head, your tread depth is dangerously low. Replace your tires.
- Rotate your tires. Tires don’t wear evenly. The front tires usually have more wear on the outside edges, because they lean when you turn right or left. The front tires also hold the weight of the engine. To help your tires wear evenly, you need to rotate them every 5,000-7,000 miles.
- Align your tires. If you’ve ever taken your hand off the wheel while driving, and notice your car veering toward the side, you need an alignment. You need to align your tires to keep them pointing straight ahead. You can easily knock them out of alignment by going over a pothole. If you don’t align your tires, you can experience steering problems, poor fuel economy, and uneven tire wear.
- Consider snow tires. If you live in a place where snow is heavy, you may wish to switch to snow tires. Their softer rubber remains flexible in cold weather and helps them grip the road. Their wider grooves also are better at repelling water and gaining traction in snow.
- Check your tire pressure. As the weather changes, you will notice corresponding changes in your tire pressure. That’s because air expands as it gets hotter, which raises the pressure. It contracts as it gets colder, which lowers it. In cold weather, tire pressure can decrease about 1 psi for every 10-degree drop in temperature. That’s why it’s important to check your tire pressure when the weather changes, in extreme heat and cold, and adjust as needed.
Take care of your fluids.
Cold weather affects your car’s essential fluids.
- Change your oil. Cold weather thickens engine oil. That makes it harder for parts to turn. It also puts a strain on the starter and the battery. Choose a lighter weight oil for winter. Check your owner’s manual for the proper oil weight.
- Top off coolant (antifreeze) Coolant prevents your engine from overheating or freezing. Check the reservoir tank (not the radiator) and ensure the level is between the “min” and “max” lines. Use the correct coolant specified in your owner’s manual, as using the wrong type can damage the engine. Mix coolant with water in the ratio recommended in your manual.
- Refill windshield fluid. We use our windshield wipers a lot in the snow and rain. Make sure you have enough wiper fluid. Use a formula designed for low temperatures to avoid freezing. Keep an extra gallon in your car for emergencies.
- Change differential fluid if needed. This fluid helps to lubricate the gears and helps the wheels rotate at different speeds. It should be changed every 30,000 to 60,000 miles as the fluid breaks down over time.
Take care of your car’s components.
Cold weather can wear down critical parts of your vehicle. Getting your vehicle checked out with routine maintenance helps you stay on top of things.
- Test your battery. Cold temperatures slow down chemical reactions in the battery, reducing power. Check for corrosion and ensure it holds a charge. Replace old batteries to avoid breakdowns.
- Inspect belts and hoses. Cracks or wear in belts and hoses can lead to failures in cold weather. Address any issues immediately.
- Check your brakes. On slippery winter roadways, your brakes must be in good condition. Check and make sure your pads are not worn down. Otherwise, it will take longer to stop and could cause an accident.
- Check your spark plugs. Worn spark plugs can make your car more difficult to start in the winter. Look for signs of wear like carbon buildup, a damaged ceramic insulator, or oil deposits. Check your owner’s manual for recommended replacement intervals.
- Change your wiper blades. Snow, salt and slush builds up on your windshield. Your wipers need to work well. If your wipers look dry and feel brittle, if they make noise, or if they leave streaks, you will want to replace them. You can also get winter wipers which have a rubber edge and are heavier than regular wipers. A heavier weight makes the wiper motor work harder so make sure to remove them come spring.
- Change the cabin air filter if needed. A dirty filter can cause your HVAC system to perform poorly. It can slow down defogging of your windows, and not screen airborne contaminants. Change the filter at recommended intervals.
Equip your car with emergency essentials.
Winter driving can be unpredictable, so pack for the unexpected.
- Stay warm. Include hand warmers, blankets, and a winter emergency kit.
- Be ready for snow and ice. Make sure you have an ice scraper and snow brush.
- Bring along cat litter. Keep a bag of cat litter to sprinkle if you get stuck in the snow or on a slick patch. The extra weight will also increase your tire’s grip on the road.
- Stay fueled. Fill up your gas tank every time it hits the halfway mark. That way if you’re stranded, you’ll have gas to run the heat and keep you warm until help comes.
- Stock up. Keep bottled water and snacks handy. In case of a breakdown, that will help.
Finally, protect your vehicle with the right insurance for added peace of mind. Safe travels this season.
This article is furnished by California Casualty, providing auto and home insurance to educators, law enforcement officers, firefighters, and nurses. Get a quote at 1.866.704.8614 or www.calcas.com.

by California Casualty | Auto Insurance Info, Helpful Tips |
Your car is more than just a mode of transportation; it’s a companion on life’s journey. But like any good friend, it needs a little care to keep it going strong. Whether you’re a road trip enthusiast or someone who relies on their wheels for daily commutes, extending the life of your vehicle makes sense. So, buckle up as we explore some simple yet effective ways to make your car last longer.
Ditch the heavy keychain.
When you put the key into the ignition, a heavy keychain can drag it down. That puts pressure on the tumblers inside the ignition. Over time, that can cause the ignition switch to fail. If your car keys share space with lots of other keys, consider a car-only keychain.
Watch for this warning sign: your key sticking in the ignition when you turn on the car. Get the ignition replaced before it leaves you stranded.
Use your parking brake.
The parking brake has an important job: to keep your car from rolling when parked. However, you don’t just need a parking brake on an incline; you need it whenever and wherever you park. Parking brakes help take the stress off the transmission. In addition, if not used, your parking brake can corrode over time. This can lead to expensive repairs. So, engage that parking brake whenever you park.
Don’t idle in the driveway.
It’s not a good idea to idle your car for long periods of time. Not only does it waste gas, but it can also do some damage. During idling, the oil pressure may not send oil to every part of the engine. The engine also won’t operate at its peak temperature. That means there could be incomplete fuel combustion, soot deposits on cylinder walls, contaminated oil, and damaged components.
Be mindful of moisture.
Moisture can do a lot of damage to your vehicle. Water that seeps into your car’s body panels can cause rust. Extreme heat and humidity can reduce your car’s battery life. Moisture inside your car can also lead to mold and mildew. Finally, salt water can damage your car’s paint. Don’t drive through water, which can expose your undercarriage to unnecessary moisture. Clean corroded battery terminals if you live in humid areas. Make sure to keep your car dry and as cool as possible during the hot, humid months to avoid expensive future repairs.
Change the oil and the air filter.
If your oil is dirty, it can affect the components in your engine. Without proper oil changes, your engine could seize up, which will cost you more than nearly any other car repair. Most manufacturers suggest changing the oil every 5,000-7,500 miles. Newer vehicles will alert you when you need an oil change. You also need to change the air filter, although not as often as the oil. The air filter removes dirt and debris, which also can harm your engine. Change your air filter every 15,000 to 20,000 miles.
Help your tires wear evenly.
Tires naturally wear down over time. Keep them working well by inflating them at the recommended pressure. That will help prevent blowouts. Tires also wear unevenly; that’s why it’s important to rotate them every 6 months or 6,000-8,000 miles. Otherwise, your tires will wear out faster and have to be replaced.
Wash your car.
Cars get dirty, and that dirt buildup is more than cosmetic. It can slowly destroy your paint, which can lead to rust. That’s why washing your car is important. How often depends on the weather, whether you park outside, and if your car is exposed to pollen, bugs, sap from trees, salt on winter roads and more. Wash biweekly or as needed and wax every month or so.
Prevent pests.
If you leave food and wrappers in your car, you could attract mice and bugs. They in turn can do damage that requires repairs. Clean up all food items, wrappers, and containers. Block broken seals or holes where they can get in. If you suspect pests, have your upholstery professionally cleaned.
Protect the interior.
Leather can become dry and brittle after years of exposure to the sun. Apply a conditioning solution routinely to help prevent cracks and keep seats in good condition. Use a windshield shade to help slow upholstery fading.
Don’t fill your tank if you see the tanker.
Gasoline tankers can stir up sediment as they refuel the tanks at gas stations. That could cause you to get dirty gasoline, which can clog your fuel filter or fuel injector. Avoid filling up at a station when it is being filled by a tanker. You’ll avoid a potential expensive repair.
Avoid bad driving habits.
Certain driving habits can reduce the lifespan of your car. Don’t brake hard all the time, it can lead to deterioration of your brake pads. Don’t turn at high speeds; that’s hard on your tires. Don’t strongly accelerate when the engine is cold. Don’t rev your engine when your car isn’t properly warmed up. Avoid potholes and running over curbs which can harm your tires. Good driving habits can help reduce the need for expensive repairs.
Pay attention to maintenance lights.
Don’t skip routine maintenance. It may cost you now but save you money in the long run.
If you have a newer car, it will let you know when it needs service. When the maintenance light is on, schedule your appointment. However, you can look out for things, too. If you hear an unusual noise, take your car in. Watch for puddles under your car. It’s better to get ahead of potential problems than to pay for them as they become big issues.
Keep your car protected.
You may do everything right but accidents still happen, including some that could total your car. Your car is one of your greatest investments. Protect it with the right auto insurance for added peace of mind.
Check out our blog on Pro Tips to Keeping Your New Car Ageless for more tips.
This article is furnished by California Casualty, providing auto and home insurance to educators, law enforcement officers, firefighters, and nurses. Get a quote at 1.866.704.8614 or www.calcas.com.

by California Casualty | Educators, Firefighters, Health, Nurses, Peace Officers |
If the winter months get you down, you’re not alone. Seasonal Affective Disorder (SAD) affects millions of people, and it’s more than just the winter blues. It can affect your mental and physical health.
Here’s what you need to know about SAD, including how to recognize signs and symptoms, some available treatments, and how to help those around you if you think they suffer from this condition.
What is SAD?
Seasonal Affective Disorder is a type of depression. It is more than feeling sad or unhappy, and it is not a condition that can be wished away. Symptoms start in the late fall and continue into the winter months. They are most severe during December, January, and February. Generally, SAD resolves itself during the light-filled days of spring. (There also is a form of summer SAD, thought to be caused by the heat, humidity, and allergies. Summer SAD is much less common.) SAD usually starts in adulthood. It is rare among people who are under age 20. It is more common among women than men.
What causes SAD?
The exact cause is not known, but it is thought that SAD is linked to reduced exposure to sunlight. Light stimulates the hormone, serotonin, in our brain which makes us feel happy. Increased darkness on the other hand prompts the brain to make more melatonin, causing sleepiness and reduced energy.
What are the signs of SAD?
SAD can affect how you feel, think, and behave. The symptoms are persistent and can be severe. While not every person experiences all the symptoms, here are some common ones for winter SAD.
- Losing interest in activities: If the activities that usually interest you lose their appeal, that’s a symptom of a low mood or depression.
- Low energy and sluggishness: You may find it difficult to muster the energy to do the most basic tasks. You might experience extreme fatigue.
- Sleeping too much: You find yourself sleeping more than usual, and you have difficulty waking up. You may experience daytime drowsiness.
- Appetite changes: You crave the mood and energy boosting comfort of carbs. However, overloading on carbs can lead to weight gain.
- Difficulty concentrating: You may be unable to focus and have trouble thinking clearly.
- Negative thinking: You may feel hopeless, worthless, or even suicidal. You might be anxious and irritable.
What are options for treatment?
Without treatment, SAD can last months. However, most people who seek help can see improvement in a matter of weeks. The symptoms of SAD may look like other mental health conditions, so it’s important to get a diagnosis. A doctor or mental health professional can diagnose SAD and offer options for treatment. Treatments may include:
- Light therapy: This involves sitting in front of a special light in a lightbox or panel for a specific amount of time each day.
- Sunlight exposure: Spending more time outside during daylight hours can help. Consider a daily walk or outdoor exercise.
- Psychotherapy: Talk therapy can help you to understand SAD and manage its symptoms from anxiety to depression.
- Medications: ln some cases, antidepressants may be prescribed to correct the chemical imbalance caused by SAD.
Here are some ways to help prevent SAD.
You can take steps to prepare for winter SAD, which may help to reduce its effects.
- It may be tempting to go into hibernation mode when it starts to become dark early. However, that can perpetuate the feelings of depression. Instead, plan activities to stay social. This will help to boost your mood.
- Exercise regularly. If you can exercise in the sunlight, that’s a double boost.
- Eat a healthy balanced diet. If you’re tempted by carbs for a quick energy boost, go for complex carbohydrates instead. For example, choose whole grain breads and fruits over sweets and chips.
- Maintain a consistent sleep routine. Avoid excessive amounts of caffeine and alcohol, especially before bed.
Finally, seek professional help if your symptoms persist. SAD is treatable, and fortunately, does not last forever.
This article is furnished by California Casualty, providing auto and home insurance to educators, law enforcement officers, firefighters, and nurses. Get a quote at 1.866.704.8614 or www.calcas.com.
by California Casualty | Auto Insurance Info |
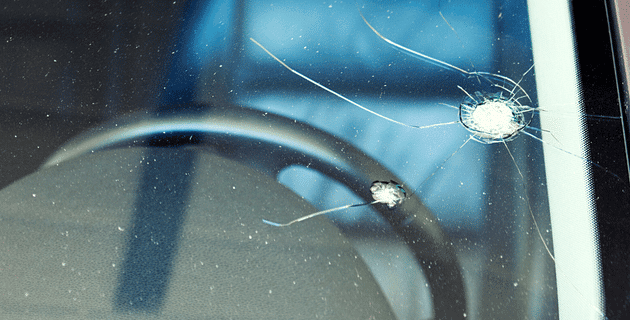
If you’ve ever had your windshield hit by a rock, you know the sinking feeling of watching a crack appear—and grow.
Cracks happen and sometimes they’re unavoidable. But did you know that your windshield is at higher risk for cracks in the winter? It’s true. Knowing the causes of cracks will help you protect your windshield this season. If you do get a crack, we’ve included a guide on how to handle it, which can hopefully save you an expensive repair.
All About Your Windshield
Your windshield is a protective barrier between you and the road ahead. It also provides a clear line of sight. When your windshield cracks, it compromises your safety and can limit your visibility.
Windshields are made of laminated glass, which includes two layers of glass with a piece of plastic in the middle. The layers are fused together, making them stronger than ordinary glass. Even though windshield glass is strong, however, cracks still happen.
Tiny cracks can occur from everyday driving. Cracks happen when your windshield is hit by a rock or debris. The metal frame of your windshield expands and contracts in extreme temperatures. This causes stress on your glass which can crack it over time. Finally, our own human error can cause glass to crack, such as when we pour hot water over an icy windshield. A crack between the two layers of glass can trap moisture between the layers. This can weaken the structural integrity of your windshield and cause cracks down the road.
Types of Cracks
In most cases, cracks or chips smaller than the size of a quarter are able to be fixed. But you cannot let even a tiny crack alone. Don’t ignore these small cracks or chips; they can start out small and eventually get larger, past the point of repair, and cause you to need a total windshield replacement.
Not all cracks are the same, and it’s good to know what kind you have. The type of crack determines how you deal with it.
-
- Basic crack – The simplest crack is a line that is not near the edge of the windshield. If the line is less than 1 inch long and doesn’t have other lines extending from it, it can be repaired.
- Floater – A crack that occurs away from the windshield edge is known as a floater. These can spread quickly.
- Edge crack – If the crack is near the edge of your windshield, chances are that the entire windshield needs to be replaced.
- Chip – If a small piece of glass is missing, you have a chip. A chip less than 1 inch in diameter, without any cracks coming from it, can be filled or repaired.
- Star – If your crack looks like a small chip with tiny cracks extending from it, you have a star crack. This type of crack could possibly be fixed but the repair may be visible.
- Bulls-eye – If your crack resembles a circular bulls-eye target, you have more extensive damage than it appears. This type of crack usually requires a full windshield replacement.
How to Avoid Cracks
Remove ice responsibly. In most places in the U.S., you’ll be dealing with icy windshields this winter. You need to clear the ice in order to drive. Glass can be brittle in cold temperatures, so you will want to avoid any sudden temperature changes.
-
- Do not throw hot water on your windshield. Hot water will refreeze, and surprisingly, it does so faster than cold water. Don’t use room temperature water either. This will still be a temperature extreme from the icy conditions and can crack your windshield.
- Skip the vinegar and water mixture. Vinegar doesn’t work well when there is already ice there. It also is an acid that can eat into glass causing pits.
- Don’t use a propane torch, hair dryer, or cigarette lighter. These are extreme changes in temperature and can crack the glass.
- Do not use a knife or blade that will chip or scratch your glass.
- Don’t hit the ice. It doesn’t take a lot of impact to cause damage to the glass.
- Do not use keys, snow shovels, or spatulas. They can all leave scratches and grooves.
- Do warm your car up slowly. Use your car’s heater and defrost settings. Wait until your car is warm to turn your car’s defrosters on high.
- Do use a plastic ice scraper. Ice scrapers are among the must-carry items in your car in winter.
- Do use a liquid deicer if you would like.
Avoid flying debris. While rocks and debris can hit your windshield almost anywhere, you can take steps to keep your car away from this potential hazard.
-
- Don’t drive over gravel roads, but if you must, keep a safe following distance from the vehicle in front of you.
- Don’t follow construction vehicles too closely.
- Don’t drive in hailstorms if you can help it. The best strategy is to find covered parking while it’s hailing. If you must drive in a hailstorm, slow down to lessen the impact.
Park in protected places. Mother nature can be tough on our windshields. Keeping your vehicle in a place with a constant temperature and away from wind, winter storms, snowstorms, and extreme weather can help to protect the windshield.
-
- Avoid exposing your windshield to extreme temperatures. If it’s going to be very cold, park your car inside if you can.
- You also can cover your car, which will help to protect your windshield wipers from freezing and cracking. You don’t want damaged wipers to scratch your windshield.
- If you can, park your car inside a garage during the winter months.
Periodically inspect your windshield. You may not even be aware of tiny cracks in your windshield. The sooner you catch them, the sooner you can address them.
-
- It’s hard to notice cracks while you’re driving. Make it part of your winter routine to periodically inspect your windshield when you get in or out of your car.
- Keep the windshield glass clean. This will help you to notice small cracks and chips.
- A winter car wash can help, but don’t run your car through one if there are any windshield cracks.
- Replace your wiper blades before winter hits.
- Don’t drive around with a crack. The sooner you take care of it, the less expensive the repair will likely be.
What to Do if You Get a Crack
Drive carefully. Drive over bumps slowly. Don’t whip around corners or cause any vibrations that could make damage worse.
Guard against dirt and moisture. While you are waiting for the repair, keep the crack clean and dry. Dirt and moisture can make repairs more complicated. (Pro Tip: Even window washer fluid can stain the crack so use a drop or two of dishwashing soap on a damp cloth.)
You only have one chance to get it right. DIY options include inexpensive windshield repair kits.
Most kits aren’t high quality and won’t last long-term. Some folks have tried to seal the crack with household items like superglue or nail polish remover. Don’t even consider that. It will prevent you from getting a professional repair.
Contact an auto glass repair specialist. California Casualty works with Safelite on claims for cracked windshields. Many glass repair providers offer same-day service and can come to you. A technician can fix repairable cracks in a matter of minutes. Most comprehensive auto insurance policies cover the cost of fixing small chips and cracks in your windshield. Even without insurance, a windshield repair is much less than a replacement.
This article is furnished by California Casualty, providing auto and home insurance to educators, law enforcement officers, firefighters, and nurses. Get a quote at 1.866.704.8614 or www.calcas.com.
by California Casualty | Educators |
Written by Casey Jeffers, Owner of Fair Winds Teaching & MSEA Second Grade Teacher The hustle and bustle of the end of the school year is like no other. It comes so quickly; in March I think about all the awesome things I still want to accomplish for the school...
