
by California Casualty | Auto Insurance Info, Helpful Tips, Safety |
The hunt for the perfect set of wheels is a rite of passage for teen drivers. While they may want style and speed, you know it’s better to choose safety and value. How do you find the perfect car that will win them over and fulfill your wish list? Here’s what you need to look for when determining the best cars for teens in 2024. (Scroll down for a list of recommended vehicles by price.)
There are certain safety features that are helpful for new, young drivers. When you look for cars for your teen driver, look for these:
- Blind spot monitoring to alert drivers of nearby vehicles
- Automatic emergency braking systems to avoid collisions
- Lane-keeping assist and lane departure warning systems to keep the car in its lane
- Pedestrian detection systems
- Speed warnings and audio muting while driving
Several automakers help parents monitor teen driving habits with technology that can set limitations, like maximum speed. Ford has MyKey and Chevy has General Motors’ Teen Driver Technology.
Some vehicles could be dangerous for teen drivers. Knowing what to avoid is also important.
- Sports cars have excessive horsepower which might encourage teens to drive recklessly. These cars also are more expensive to insure.
- Compact cars weighing less than 2,750 pounds may lack adequate crumple zones—important in a collision.
- Large vehicles have prolonged braking distances. They are also harder to maneuver and park.
- Vehicles that seat numerous passengers could raise the risk of distractions.
New Cars vs. Used Cars
New cars will automatically come with many safety features. However, they will also come with a higher price tag. Used cars are a better value. If you can’t get every safety feature, at minimum, you will want the following: anti-lock brakes, traction control, and stability control. Also, most cars from model year 2017 and later have rearview cameras.
Recommended Vehicles
The following vehicles offer top safety ratings from the IIHS and NHTSA. IIHS is the Insurance Institute for Highway Safety. NHTSA is the National Highway Traffic Safety Administration. The ones we’ve selected also consider reliability and fuel economy and are recommended by the Kelley Blue Book. Prices listed are based on the Kelly Blue Book Fair Purchase Price national average and could vary due to purchase location, mileage, condition, and trim package.
Cars under $30,000
| 2023 Toyota Prius |
$27,450 |
| 2024 Honda Civic |
$23,950 |
| 2024 Toyota Corolla |
$21,900 |
| 2024 Kia Seltos |
$24,390 |
| 2024 Subaru Crosstrek |
$24,995 |
| 2023 Hyundai Kona |
$22,140 |
| 2024 Chevrolet Trailblazer |
$23,100 |
| 2024 Nissan Sentra |
$20,630 |
Cars under $20,000
| 2017 Toyota RAV4 |
$16,665 |
| 2018 Mazda CX-5 |
$15,176 |
| 2017 Honda CR-V |
$18,272 |
| 2020 Toyota Corolla |
$15,872 |
| 2019 Mazda3 |
$13,983 |
| 2017 Honda Accord |
$16,021 |
| 2017 Toyota Prius |
$17,157 |
| 2018 Kia Sportage |
$12,989 |
| 2018 Honda Civic |
$16,049 |
| 2019 Chevrolet Equinox |
$13,594 |
Cars under $15,000
| 2018 Kia Soul |
$10,807 |
| 2017 Toyota Corolla |
$11,959 |
| 2018 Mazda3 |
$12,299 |
| 2015 Honda CR-V |
$14,141 |
| 2016 Mazda CX-5 |
$11,969 |
| 2015 Toyota Prius |
$12,442 |
Cars under $10,000
| 2013 Honda Accord |
$9,626 |
| 2013 Toyota Camry |
$9,344 |
| 2014 Mazda3 |
$7,773 |
| 2013 Toyota Corolla |
$8,441 |
| 2015 Honda Civic |
$9,463 |
| 2009 Toyota RAV4 |
$7,926 |
| 2010 Honda Element |
$9,760 |
| 2011 Toyota Avalon |
$9,873 |
Final Thoughts
There are ways to save when adding a teen driver to your auto policy. Check with your insurer to find out more.
Safe travels to you and your new driver.
This article is furnished by California Casualty, providing auto and home insurance to educators, law enforcement officers, firefighters, and nurses. Get a quote at 1.866.704.8614 or www.calcas.com.

by California Casualty | Helpful Tips, Pets, Safety |
Spring is in the air, and your yard is practically begging for a green makeover. Before you dive headfirst into planting paradise, however, let’s talk about our four-legged friends. Pets don’t just smell the roses, they eat them. Which plants are a big “no-no,” and which ones are safe for our fur babies?
Pet-friendly plants:
We did the research to find the list of plants that are considered pet friendly. Here are some of the most popular options for your garden.
- Camellias are flowering shrubs with pretty blooms. They are perennials, and once established will come back again and again. These plants prefer shade, and once established need little care.
- Cat grass is great for digestion, and cats love it. This is an annual plant that you can put directly in your garden, after the frosty season has passed. Most likely you’ll grow I from seed. Make sure you watch for weeds and pests, both of which are common outdoors.
- Coral bells feature small sprigs of tiny flowers on long stems. Their leaves also are colorful and can come in shades from green to orange and black.
- Fuchsias have beautiful pink and purple blooms that look great in hanging baskets. They bloom from spring to late fall.
- Marigolds are colorful annuals that act as a type of natural pest control. They keep beetles and other bugs away, while also attracting bees.
- Purple basil plants add vibrant color to your garden and, as a bonus, can be harvested and used in your favorite pesto recipe. They prefer a sunny spot and need plenty of water.
- Snapdragons are beautiful additions to your garden with their range of colors on tall stems. They do best in full sun.
- Sunflowers come in a variety of sizes and colors. They can grow several feet tall for a dramatic effect. Plus, the seeds attract birds throughout the fall.
- Zinnias come in many colors including purple, white, yellow, orange, pink, red, and even green. You will love that they attract butterflies to your garden.
Spring is for outdoor gardening, but don’t forget that there are many pet-friendly house plants too.
Plants dangerous to pets:
There are hundreds of problematic plants — too many to list in a single blog. We’ve compiled a list of some common ones you might already have in your garden. After all, you didn’t know until now that they could be harmful. Before you plant anything new or unfamiliar, do your research to ensure it’s safe for your pet.
- Azaleas can cause stomach upset, heart issues, and seizures. Eating azaleas can be fatal without treatment.
- Daffodils can cause severe vomiting and diarrhea, low blood pressure, and heart arrhythmias. In addition, the sharp calcium oxalate crystals contained in daffodils also can cause irritation of the tongue, mouth, and throat. Even drinking water from a vase filled with daffodils is dangerous.
- Foxglove can cause nausea, vomiting, an irregular slow pulse, tremors, and bloody diarrhea. This can be life-threatening.
- Hyacinth can cause intense vomiting, bloody diarrhea, and tremors. The bulbs include toxic calcium oxalate crystals which pierce a pet’s sensitive mouth and the inside of the intestines. The result could be severe intestinal damage.
- Lilies can cause kidney failure in cats. They are also somewhat toxic to dogs, causing upset tummies.
- Morning glory can cause vomiting, diarrhea, tremors, rapid heartbeat, and liver failure. The seeds are the most toxic part of the plant, and ingesting a large amount may cause hallucinations.
- Rhododendrons are related to azaleas and have similar effects, including stomach upset, heart issues, and seizures. They can be fatal if eaten.
- Tomato plant leaves are full of solanine, which can cause nausea, vomiting, and a slow heart rate.
- Tulips can cause vomiting and diarrhea, abdominal pain, tremors, and even coma. Even drinking water from a vase filled with tulips is dangerous.
- If you live in the western part of the U.S., be on the lookout for foxtails, a type of grass-like weed. Not only can they get stuck in your pet’s hair, but they can also work their way up into their nose and ears, causing serious infection and even death.
For added peace of mind, consider pet insurance which can help make treatments more affordable if your fur baby does get into a household danger or outdoor hazard.
Happy Spring and safe gardening!
This article is furnished by California Casualty, providing auto and home insurance to educators, law enforcement officers, firefighters, and nurses. Get a quote at 1.866.704.8614 or www.calcas.com.
by California Casualty | Auto Insurance Info, Helpful Tips, Safety, Travel |
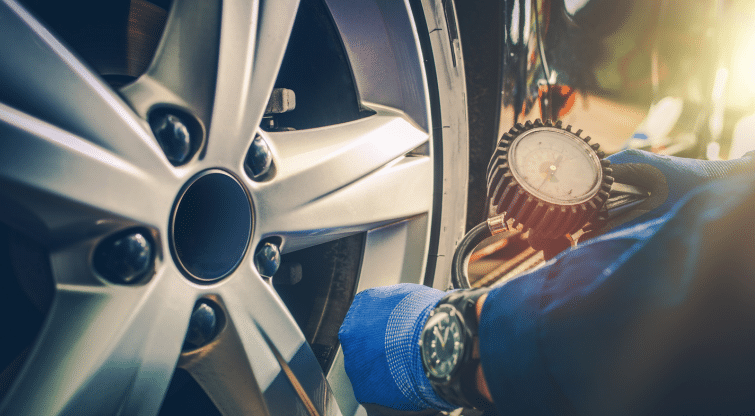
When it comes to keeping your tires inflated, you have a choice. You can fill up with air, like people have done for decades, or you can use nitrogen. What are the pros and cons of each? Let’s take a closer look.
Nitrogen
Remember when you studied molecules in science class? Molecules are the smallest amount of a substance that still carries its properties. Nitrogen molecules are larger and slower than the molecules in air. As a gas, nitrogen also is drier. These properties give nitrogen some advantages.
PROS
-
- Nitrogen won’t seep out of your tires as quickly as air because of its larger, slower molecules. That will help you to maintain your tire pressure longer.
- The moisture naturally found in air can cause changes in temperature. With nitrogen, there is no moisture and therefore it is less susceptible to temperature changes that affect tire pressure.
- Nitrogen is especially good for locations with very high or low temperatures. It is often used in race cars, heavy vehicles, and aircraft because it is nonflammable and able to more easily maintain its temperature.
- Nitrogen will not react to rubber, steel, or any of the tire’s components. There is no oxidation which can damage tires. That should help preserve your tire over time.
CONS
-
- You most likely will pay to inflate your tires with nitrogen. The initial charge to remove the air and fill them with nitrogen can cost about $30 per tire. Then, it will be about $7-10 per tire for topping it off as you need more nitrogen.
- Nitrogen may not be significantly better than air at maintaining tire pressure. Consumer Reports found only a 1.3 psi difference between air and nitrogen over the timeframe of a year.
- There is no scientific evidence that nitrogen helps with fuel economy.
- It is harder to find places to fill up with nitrogen. You will have to search for locations that offer nitrogen, even for a fee.
Note: If your tire is low and there is no place to get nitrogen, you can top your tire off with air. It won’t harm your tires, but it will reduce the effectiveness of the nitrogen alone.
Air
You may be surprised to learn that air is composed of mostly nitrogen. In fact, the mix is 78% nitrogen, 21% oxygen, and about 1% of other gases. Air, which has been used to inflate tires for over a century, also has its advantages.
PROS
-
- Air is often free. If it costs, it is minimal such as a dollar or two.
- Air is readily available. You can find it at gas stations, convenience stores, wholesale clubs, tire shops, and more.
- While air loses pressure over time, its rate is close to that of nitrogen. Plus, with air, drivers are more likely to check in often versus relying on nitrogen to stay pressurized.
CONS
-
- You will experience more pressure changes with air. Air is affected by temperature changes due to water vapor in its mix. However, it is worth noting that most tire shops have moisture separators that limit the amount of water vapor.
- The oxygen in air can cause oxidation, which can make rubber brittle over time.
- You will have to fill your tires more often when you have air versus nitrogen.
Tire Pressure is Key
When you fill up with nitrogen, you get a green cap on your tire valve. When you fill up with air, your cap will be black. However, whether you use nitrogen or air, you still will fill your tires to the same recommended pressure. Check the inside of your door or your driver’s manual to find the right psi.
Maintaining the correct pressure helps your tires last longer, your car handle better, and could even help with fuel economy. Under or over inflated tires increase your risk of a blowout and increase wear and tear. No matter whether you use nitrogen or air, regularly checking the pressure of your tires is part of responsible vehicle maintenance.
Your car is one of your greatest investments. Protect it with the right insurance for added peace of mind.
Safe travels from all of us at California Casualty.
This article is furnished by California Casualty, providing auto and home insurance to educators, law enforcement officers, firefighters, and nurses. Get a quote at 1.866.704.8614 or www.calcas.com.
by California Casualty | Auto Insurance Info, Helpful Tips, Safety |
We all know the basics: stop at red lights, obey the speed limit. What about laws about passing cars on the right, or restraining pets in your vehicle? We put together a list of the lesser-known traffic laws that potentially could land you in trouble if you break them. Not knowing about them – unfortunately – isn’t a defense if you get stopped.
Use your turn signal.
Most states require that you signal when you turn right or left and when you change lanes. In fact, you are supposed to signal 100 feet before you turn or move to a new lane. You could get flagged for a non-criminal moving violation if you fail to do this.
Don’t change lanes in the middle of an intersection.
In some states, it is illegal to change lanes in the middle of the intersection. You’re expected to stay in your lane as you cross through it. Even when it is legal, it might be unsafe, and you can be pulled over for that, too.
Come to a complete stop at a stop sign.
You may be tempted to pause rather than stop at a stop sign. The law clearly states that you must come to a complete stop. That means no forward momentum with the speedometer at 0. If you don’t come to a complete stop, you can be cited for running a stop sign. We suggest stopping for three seconds, which will be long enough for an observing police officer to see you have stopped. It’s also long enough for you to check for oncoming traffic, pedestrians, or road hazards.
Follow the rules at a four-way stop.
With a four-way intersection, every driver has a stop sign. That means each vehicle should come to a complete stop. The first vehicle to arrive has the right of way. If two cars arrive at the same time, the car to the right goes first. Bicycles must follow the same rules as cars at a four-way stop and yield to the vehicle who arrived first, or the one on the right. Pedestrians, however, have the right of way, and can cross before any vehicles proceed.
Know about improper passing.
In New Jersey, you cannot pass a car on the right except in special circumstances. The car must be turning left or there must be at least two lanes of traffic traveling in the same direction. In Massachusetts, Pennsylvania, New Jersey, and Illinois, it’s illegal not to move to the right if a car is trying to pass you. In some states, the far left lane is only for passing.
Restrain your pets.
We want to keep our pets safe, and there are several states that have laws on the books to make sure we do. New Jersey has a law requiring you to secure your pet in a carrier or with a seatbelt. In Hawaii, you can be fined for having your pet on your lap or rolling down the windows without restraining your pet. Maine, Connecticut, and Arizona classify pets under distracted driving.
Know when to yield.
It may be obvious that you need to yield at a yield sign. But did you also know that in many states, you must yield to pedestrians in a crosswalk? You also must yield to those who are blind and using a white cane or seeing eye dog. In a “T” intersection, where a road dead ends into another road, the car at the dead end must yield to the continuing road. Finally, if you’re making a turn onto a road, you must yield to traffic on that road.
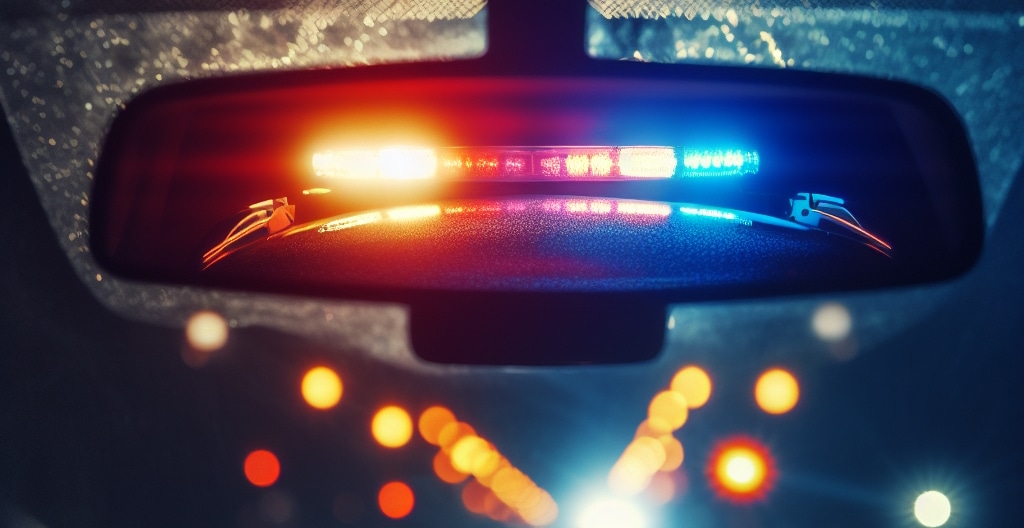
Move over and slow down for emergency vehicles.
When you see flashing lights, it’s time to slow down and move to the side of the road. This allows for the safe passage of emergency vehicles. Every state has a Move Over law except for Washington, DC. If you don’t move over or slow down, you could be subject to a fine, license suspension, or even jail time.
Put headlights on when it’s raining.
Visibility is down when it’s raining. That’s why several states require headlights to be on anytime your wipers are in use, even in daylight. Some states only require headlights in dense fog, low visibility, and at night. In these situations, your headlights can help other drivers see you better.
Don’t tailgate.
Tailgating is considered a traffic violation. While states aren’t consistent with how they define tailgating, often such tickets are issued after a rear-end collision. If you’re alert and focused on the road, it takes you about 2 seconds to react to a roadway hazard. That means a safe following distance is at least 3 seconds or more. Use the 3-second rule as a starting point. You can measure the distance in seconds this way: Find a landmark such as a mile marker or telephone pole. Start counting once the car in front of you passes that landmark. Count slowly until your car reaches the same landmark. That is the number of seconds that you are traveling behind the vehicle in front of you.
Wear your seat belt.
Most of the country has laws for seat belts. Some states require you to wear both front and back seat belts. Others just focus on front seat belts. If you’re caught without your seatbelt, you could be subject to fines.
Know your state’s cell phone laws.
Most states require cell phone use to be hands-free, and consider texting while driving as distracted driving. However, some states go further and penalize drivers for accessing, viewing, or reading non-navigation content on phones.
Keep the minimum insurance.
Most states require drivers to carry auto insurance. The state sets the minimum amount and type. Generally, this includes bodily injury liability and property damage liability. If you have a leased car, your lender will require you to have more extensive coverage.
This article is furnished by California Casualty, providing auto and home insurance to educators, law enforcement officers, firefighters, and nurses. Get a quote at 1.866.704.8614 or www.calcas.com.
by California Casualty | Helpful Tips, Homeowners Insurance Info, Safety |
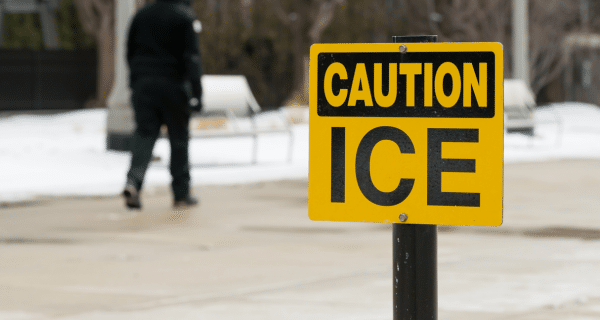
It’s the Houdini of winter, the slippery vanishing act that turns a simple stroll into a slip-and-fall. We’re talking about black ice, that invisible coating that has us spinning out of control on the roadways. When it appears on our driveways and sidewalks, pedestrians beware.
Not only don’t you want to slip on black ice, you also don’t want to injure someone on your property. That might lead to legal problems. It is your responsibility as a homeowner to keep your property safe.
Read on to find out how to remove black ice from your driveway and sidewalk.
What exactly is black ice?
Black ice is a thin, almost transparent layer of ice on the surface of a roadway, driveway, deck, or other surface. It forms when a surface is wet and then temperatures drop below freezing. What makes it so dangerous is that it’s hard to see. It blends in with the surface and you don’t realize that it’s there until you’re slipping and sliding on it.
If you’re looking for black ice, there are some telltale signs. Sometimes you can notice a glossy or shiny appearance. However, if an area looks dry while surrounding areas are wet or have snow, there could be black ice present. Whether or not you see it, there are steps you can take to remove it, and even prevent it from forming.
Ways to Remove and Prevent Black Ice
Put on protective gear.
To keep yourself from slipping and sliding, you will want sturdy boots with good traction. Water resistant winter gloves will help protect your hands. When spreading chemicals, you also will want to wear safety glasses to shield your eyes. Remember that stairs leading down from your house could be especially slippery and covered in black ice. Use handrails.
Clear the snow and ice.
Shoveling the snow and breaking up the ice will help prevent it from melting and reforming as black ice. Use a snow shovel and ice pick. Finish off with a broom with stiff bristles to sweep away the loose ice. Toss snow and ice away from driveways and walkways. Make sure that when the snow and ice melt, they won’t run back onto the driveway and sidewalk.
Pro Tip: Sometimes you cannot smash the ice or shovel it away. In those cases, use a spade to scratch the surface in several places. This will make the black ice visible to others.
Salt, sand, or de-ice.
You want to prevent slipping, and you can do that by creating traction with sand or sawdust. Alternately, you can use an ice melting product. Use a spreader or bucket to spread these products. Note that salt and chemicals can be harmful to pets, plants, and young children. They also can damage your surfaces and the environment, so use them carefully.
- Rock salt lowers the freezing point of water, causing ice to melt. Spread a thin, even layer of salt. Allow it to penetrate and melt the ice. Use a shovel or broom to remove any ice and salt residue.
- Sand provides traction. While it doesn’t melt the ice, it creates a gritty surface. Spread generous amount of sand, gravel, kitty litter, or sawdust. Leave it in place until ice melts naturally. After the temperatures warm and ice is no longer a danger, be prepared to clean up the mess that results.
- De-icers (deicers) are chemical compounds. They come in many forms including liquids, pellets, and granules. Choose ones that are pet safe; even if you don’t have a pet, chances are your neighbors do. Sprinkle or spread the deicer evenly. Remove any remaining ice with a shovel or broom.
Use heated mats.
While heated driveways aren’t an option for many of us, we can use the more affordable alternative: snow-melting mats. These heated mats are made of slip resistant, waterproof rubber with a built-in heating system. If you turn on the mats before the snowfall, your walkways could stay dry and clear. They make larger ones for driveway use that cars can drive on. Snow melting mats aren’t cheap, but they are less expensive than installing radiant heat under your driveway and sidewalk.
Try rubberized stair treads or tarps.
Rubberized stair treads provide a high traction surface for your shoes, so it’s less likely that you will slip. You also may try a winter weather tarp to cover the surfaces that would typically get ice and snow. They are like a carpet for your driveway. You put them down before a snowfall and lift them up afterward.
Unblock drains and gutters.
Blocked drains can cause water to build up and surfaces to ice over. Clogged gutters also can divert water to places where it shouldn’t go, such as driveways. Make sure that these areas are clear ahead of storms.
Finally, protect your home and property with the right insurance for added peace of mind. After all, it’s one of your greatest investments.
This article is furnished by California Casualty, providing auto and home insurance to educators, law enforcement officers, firefighters, and nurses. Get a quote at 1.866.704.8614 or www.calcas.com.
by California Casualty | Auto Insurance Info, Safety |
When to get your brakes checked
Your car could be trying to tell you something. Every screech, squeal, or grind could be its way of asking for new brakes.
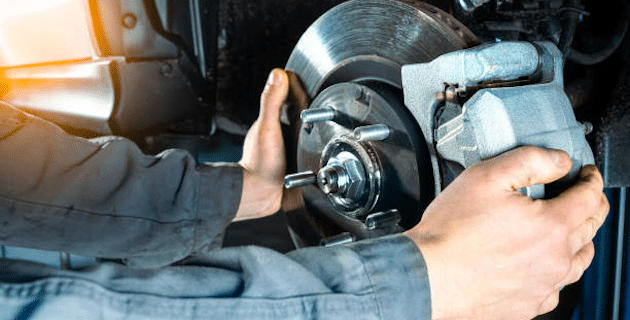
First, a word about how brakes work…
Most vehicles today have disc brakes. When you press the brake pedal, the car pushes pressurized fluid through its brake lines. The fluid goes into a pair of calipers (clamps) lined with brake pads. They start to squeeze the rotors (metallic discs) from either side. The rotors are located behind each wheel and so the resulting friction slows the spinning, and eventually stops the car.
This constant squeezing and release causes wear and tear. Cars will need new brake pads every 25,000 to 65,000 miles, and new rotors between 30,000 and 70,000 miles. The actual mileage depends on your driving habits. Frequent braking, braking at high speeds, and driving a heavier car will take their toll on your brakes.
How to tell when you need new brakes
The good news is that your car gives you warning signs when brakes begin to wear out. If you notice any of the following, it’s time to get your brakes checked.
Squealing or screeching sound
Brake pads are built with a small piece of metal that becomes exposed as the pads wear down. The metal vibrates against the rotors, causing a high-pitched squeal or screech. That usually happens when the thickness of the pad is at the lowest possible level while still being considered safe to drive. So, if you hear the squeal, you will want to act soon. If you let it go too long, it will become a heavy grinding sound and it can start damaging other parts.
Pro Tip: Know that brake squeaks and squeals can happen if a car has been sitting for a while. That’s because the pads are covered with moisture, rust, and grime. Those noises go away after a few uses of the brakes.
Low brake fluid warning light
Your brakes use hydraulic fluid and cannot function without it. If you see a low brake fluid light, that means something is going on. There could be a leak in the system. Or it could be you’re your brake pads have worn down, causing the fluid to fill the space that’s lower in the reservoir.
Pro Tip: Look for a driveway puddle after your car has been parked for a bit. This type of fluid ranges from clear to yellow brown in color. You’ll find the leak near the wheels. It’s not safe to drive if you have a brake fluid leak. It may cause the brakes to fail.
Car pulls to one side while braking
If the car is pulling to one side or the other when you brake, you’re probably only getting brake power to that side. That’s an indication that you need new brakes or pads or that you have a jammed caliper. Either way, you’ll want to get it checked out.
Pulsating during braking
If your car vibrates, shakes, or pulses as you brake, it could be due to warped or unevenly worn rotors. It also could be caused by adhesive that gets hot and smeared across the rotor. Mechanics call this “glazing” and it can compromise brakes.
Rattling or clicking when you brake
Some vehicles hold brake pads with clips, bolts, or pins. If they become loose, they’ll begin to rattle. You may hear a clicking sound when you brake.
Poor brake performance
If your car takes longer to stop than usual, or if you are pressing the brake pedal down to the floor to get your car to stop, there is a problem. Causes include worn rotors, low brake fluid, and brake pads that are too thin. It could also be an issue with your car’s hydraulic system.
Grinding sound while braking
This is a sign that your brake pads are completely worn. The grinding sound you hear is “metal on metal” as the caliper and rotor scrape against each other. Because this can easily damage them and other parts, you’ll need to get this addressed right away.
Stay on top of maintenance
When one part of the braking system is damaged, it can affect other parts. Driving with worn brakes also can damage your tires. It can wear them down and cause them to be unbalanced. Your car is one of your greatest investments. Keep it well maintained and protect it with the right insurance.
This article is furnished by California Casualty, providing auto and home insurance to educators, law enforcement officers, firefighters, and nurses. Get a quote at 1.866.704.8614 or www.calcas.com.
