by California Casualty | Homeowners Insurance Info |
Droughts, fires, floods, and storms – natural disasters can wreak havoc on your home and your property. Yet, many of us live in regions that are prone to them. If you live in such a place – or if you’re considering moving into one – how do you protect your investment?
Two ways: 1. Know your risks. 2. Have the right protection.
Know Your Risks: Is your region prone to a natural disaster?
A natural disaster can happen anywhere at any time. Weather patterns in a region are a good predictor of whether your area will likely be at-risk now and in the future.
The average weather pattern in a place over several decades is called a climate. An area’s climate affects the weather and the type of natural disaster(s) they are prone to. For example, we know the West has a very dry climate that causes frequent wildfires; the Northwest is known for its wet weather, which could lead to severe flooding. The Midwest is associated with brutally cold winters which can lead to devastating winter storms. And the warm coastal climate of the South East is the prime environment for hurricanes.
If you want to know the most common weather risks to your home or in your area, you can do a free climate risk assessment on ClimateCheck.
Know Your Risks: 6 Common Disaster Risks
Disasters come in many forms, from tornadoes and hurricanes to floods and droughts. Following are six types of disaster risks that may affect your home or property.
1. Heat Risk
Extreme heat occurs when there is high heat and humidity, and temperatures exceed 90 degrees for a period of days. In terms of disasters, extreme heat can sometimes lead to fires. (See the Fire Risk section for more detail.) U.S. counties with the greatest risk for heat include 37 counties in the south with a third of them located in Florida.
2. Drought Risk
Droughts occur when there is not sufficient precipitation. Not only does this put a stress on the water supply, but it can also have a severe impact on your landscaping. Soil dryness can also lead to settling issues with your home’s foundation. Unfortunately, for most homeowner policies, settling or shrinking is not a covered loss. U.S. counties with the greatest risk for drought include 34 counties in the west, with 21 in Colorado.
3. Fire Risk
When drought occurs and heat becomes extreme, the conditions are right for a fire to start. Wildfires can destroy your home or community. Wildfires account for about $16.5 billion in damages annually in the U.S. In the event of a fire caused by a natural disaster, your home’s dwelling coverage will pay to repair or rebuild your home up to your policy limit. U.S. counties with the greatest risk of fire are located in the West.
4. Flood Risk
This includes coastal flooding as well as flooding from surface water or nearby lakes and streams. Rising sea levels and extreme weather have contributed to flooding, which cost as much as $20 billion annually in the U.S. A traditional homeowner’s policy does not cover flooding. For your home to be covered you will need to purchase a separate flood policy. U.S. counties with the greatest risk of flooding are mostly located in the south, including Florida, Louisiana, and North Carolina.
5. Severe Storm Risk
Storms include high wind, wet or snowy weather events. These could be hail storms, hurricanes, tornadoes, or other types of destructive weather. Storm damage in the U.S. averages about $17 billion annually. Your homeowner’s policy may cover some aspects of storm damage, including hail, wind or lightning. If you are unsure, check with your insurance’s Service Department to see what is covered under your policy. U.S. counties with the highest risk of storms are located in the Northeast or Southeast.
6. Earthquake Risk
Earthquakes typically occur along fault lines and can cost millions in damages. In the U.S., they are more common in California and Alaska. A pair of earthquakes struck Ridgecrest City, California, in 2019, causing nearly $40 million in damage. Importantly, while earthquakes cause significant damage to buildings and property, they are not covered by the typical homeowner’s policy. In some states, however, you can purchase coverage for earthquakes for an additional premium.
Have the Right Protection: Do you have enough insurance for a disaster?
If a natural disaster happens in your community, and your home and property are damaged, you want to be able to rebuild. Yet, many homeowners find themselves having to fund portions of the rebuilding process because they’re underinsured. Here’s what you need to know.
-
- During a disaster, your neighbors will be rebuilding at the same time. When demand exceeds supply, that can drive up prices for materials and labor. These increased costs usually aren’t factored into homeowner’s coverage, and you have to pay out of pocket for the difference. Some policies carry a mandatory endorsement added to the policy that provides an additional 25% of coverage to cover these additional costs. There is a fee for this endorsement, known as extended repair/replacement cost.
- You may be required to meet new and stricter building codes when you rebuild. You may use up to 10% of Coverage A for the increased costs you incur due to the enforcement of any ordinance or law. For an additional premium, increased amounts of coverage can be purchased via an endorsement.
- If your area is prone to floods or earthquakes, you will want those additional policies. Your homeowner’s policy does not cover these events. Keep in mind that there is a 30-day waiting policy for flood insurance.
- Rebuilding a home can take a long time. Your policy’s living expense coverage will provide a flat percentage toward living costs, usually 30% of the Coverage A amount. Some states have time limits (e.g. 12 months) on when you can use that coverage. Plan to cover those additional expenses out of pocket.
You want to be fully prepared for a disaster, and not just with a disaster plan. Talk with your insurer about your home and property to ensure that you are fully covered, no matter which location you call home.
This article is furnished by California Casualty, providing auto and home insurance to educators, law enforcement officers, firefighters, and nurses. Get a quote at 1.866.704.8614 or www.calcas.com.

by California Casualty | Homeowners Insurance Info |
You want to do your part by helping the environment. That’s why going green sounds so good! But why is it that in reality, we often skip the trip to the recycling bin after a few days and hit the trash instead? (oops…)
Forming and continuing good habits is the key to encouraging recycling- even when you’re feeling lazy or in a hurry. Try these recycling organization hacks at home and on the job, to make recycling a part of your everyday routine.
Get a recycling bin and learn your local regulations.
Call your trash provider and ask about getting a recycling bin. Different municipalities have different rules for separating recyclables. These include paper, plastic, glass, and some metals. Use these rules as a guide to create a recycling plan. Make a list and post it for easy reference. If you’re in the office, look for recycling bins in common areas or talk to your manager about getting a small bin for your desk.
Designate containers for each type of recycling.
Label each container clearly. If you’ve got small children, color code the containers or put pictures on them in addition to words. Choose containers that are easy to use. For example- containers with wheels can be easily moved, those with comfortable handles that can be easily lifted, stacking containers take up less floor space -etc. The easier it is, the more likely you will be to use it.
Carefully choose the locations for your containers.
If a recycling container is not nearby, you may be tempted to use the trash can. At home, put recycling bins in high usage spots such as the kitchen, bathrooms, the laundry room, and home office. In the office, you can put a paper recycling bin in the copy room, a plastic recycling bin in the break room, and so on. Ask your fellow employees for the best places to put the bins in terms of how they use the workspace. Make sure the bins are visible and easy to access.
Leave recyclables in the sink to rinse when you wash your dishes.
Whether it’s in your home kitchen or the office break room, you will likely have recyclable food containers with food residue. These need to be cleaned before they hit the recycle bin. At home, it’s easy to throw the empty containers in the sink and rinse them when you do the dishes. At the office, that won’t work as well… get in the habit of rinsing your containers as soon as you are finished with them and putting them in the recycling bin.
Be as digital as possible.
Adopt a paper-conscious policy at home and in the office. Discourage printing unless absolutely necessary, and when you do, print on both sides. The less paper you use, the less you have to recycle. Plus, there are so many wonderful options from calendars to bill paying, digital file-sharing, and more. There’s even an app to help you manage your waste and recycling schedules, set up reminders, and more.
Keep reusable bags in your car and at the office.
If you’re heading out to buy some groceries or pick up supplies for the office, bring your own reusable bags! You won’t need to use the store’s disposable bags, thus reducing the amount of waste you generate. Be aware of stores’ collection sites for batteries, ink cartridges, and plastic bags, and bring those along. (Pro tip: Collect them in one of the reusable bags that will you take to that store.)
Create a compost bin for your kitchen.
Composting is good for the earth. You can create your own simple compost container from a coffee can placed near your kitchen sink. Simply add fruit and vegetable peels, coffee grounds, eggshells, old oatmeal, bread crusts, and other items that will decompose. Then periodically transfer the contents of the can to a larger compost bin outside. You can then use it to fertilize your garden or landscaping.
Reduce, reuse, & recycle your office supplies.
Set up a space for used office supplies that can still be reused. Ask employees to check this space first before getting new supplies. In addition, you can buy recycled. Replace standard products with recycled products; oftentimes, it will save you money.
Make recycling a fun challenge.
Generate excitement about recycling with a challenge. If everyone else is motivated to recycle, then you won’t have to stay on top of them. They’ll do it themselves. At work, run a weekly contest by department to see how many recycling bins can be filled, or how much less trash is generated. Choose a recyclable of the week, and award departments that recycle the most. Recognition can include signage and perks such as leaving early, working from home, and free lunches. At home, reward environmentally-conscious kids with a special treat, later bedtime, or a family outing.
While you go green indoors, make sure your vegetation is staying green too! Use this guide to easily check the health of your trees and large shrubs, and avoid a possible future homeowner’s claim.
This article is furnished by California Casualty, providing auto and home insurance to educators, law enforcement officers, firefighters, and nurses. Get a quote at 1.866.704.8614 or www.calcas.com.

by California Casualty | Auto Insurance Info, Homeowners Insurance Info |
Hail is responsible for billions of dollars of damage each year, according to the Insurance Information Institute. It only takes one bad hailstorm to damage your roof or siding, dent your vehicle or crack your windshield. Knowing what to expect, along with having the right auto and home insurance, will help you to protect your biggest investments.
What causes hail?
Hail commonly occurs during severe thunderstorms. It’s formed when storm winds carry rain up into the extremely cold parts of the atmosphere. The rain freezes, comes in contact with more rain that freezes to it, and ultimately becomes a chunk of ice. Eventually, the hailstones grow heavy and fall to the ground.
Hail can be as small as the size of a pea or as large as a softball. Most hail, however, is golf ball-sized or smaller. Windspeeds can cause hail to hit at a rate between 44-72 mph. Hail mixed with high winds has been known to cause severe damage.
What damage can hail do to your home?
ROOFS: Roof damage from hail is common. Large pieces of hail can make dents in shingles and destroy the roof’s finishes. Different types of shingles show damage in different ways. For asphalt and composition shingles, look for dings that are black in color or soft to the touch. They may resemble a bruise on an apple. Also, look for loss of granules on asphalt; the shingles may appear shiny. For wood shingles, look for splits that are brown or orange and have sharp edges. Damaged shingles can cause your roof to leak or create water damage to the structure below. Getting these fixed is important to keeping the integrity of your roof.
Pro-Tip: Are you renovating your home? Consider impact-resistant shingles that can withstand hail. Not only will they help to reduce damage, but they may also help you qualify for a discount on your property insurance.
SIDING: Hail can cause dents in aluminum siding and cracks in vinyl or wood siding. Water can seep in and cause problems. Look for warping or buckling, chipping, cracks, dents and holes. It’s best to do this when the sun isn’t too bright, as it could cast shadows and prevent you from seeing the damage. Again, get any damaged siding fixed as soon as you are able.
GLASS: During a hailstorm, stay away from skylights, windows, and glass doors, which are at risk for breakage from hail. Close your drapes, blinds, or shades in case a broken window occurs. This can help keep some of the glass from being blown around your house. Also, you may choose to install shutters which can help to protect your glass. You have a responsibility to make reasonable and necessary repairs to protect your property from further damage, as per your insurance contract. Your insurance company might reimburse you for these costs.
PATIO FURNITURE: Protect your patio furniture by covering it, or moving it inside a garage. Prune your trees ahead of time to remove weak or dead branches that can cause additional problems.
What damage can hail do to your car?
WINDSHIELD AND WINDOWS: Similar to the glass in your home, your car’s windshield, windows, and sunroof can be cracked or even shattered by hail. Cover your vehicle with a car cover. You can buy one or make your own with blankets. Secure the blankets with duct tape; while it may leave a sticky residue, it will not damage your paint.
CAR BODY: Hail can dent your car’s body as well the glass and a car cover can help. If a hailstorm is coming, park your car under an awning or in a garage. You can move your car to a local mall with a parking garage if you don’t have one. If you are driving during a hailstorm, pull over. Angle your car so that hail hits your reinforced windshield rather than the side and back windows.
What kind of insurance do you need?
You can’t control the weather, but you can purchase the insurance that keeps your home and your vehicle protected in case they are damaged by a hailstorm. These policies will give you the money you need to repair or replace covered items, subject to your policy deductible.
HOME PROTECTION
In most states, hail is one of the covered perils in a homeowner’s policy. Your dwelling coverage pays for repairs to your roof or siding while detached structures fall under “other structures coverage.” If hail gets inside and damages belongings, that can be covered under homeowner’s insurance. For personal property to be covered, the direct force of the wind or hail must damage the building, causing an opening in a roof or wall. You unfortunately won’t get any coverage if you leave the window or door open.
-
- If you live in a state that is prone to hailstorms, you may not be covered. You may have to purchase an endorsement to your policy or even a separate windstorm and hail policy to be covered for hailstorms.
- Your policy may have an exclusion for cosmetic damage to the roof and/or siding. If the damage done by hail is cosmetic, your policy will not pay. Cosmetic damage is considered damage that does not prevent the roof surface or siding coverings from functioning as a barrier to weather elements over an extended period of time.
- Depending upon the age of your roof (typically 10 years of age or more), actual cash value loss settlement could apply, meaning that you’ll receive an amount based on depreciation.
- If the damage isn’t higher than your deductible, you probably don’t need to file a claim. You can pay out of pocket, as insurance only kicks in after the deductible is met.
AUTO PROTECTION
Not all auto insurance policies cover hail damage. You have to have the right type of coverage.
-
- Other Than Collision Coverage or OTC is for natural disasters, fires, vandalism, theft, and animals that damage your vehicle. Think of it as “bad luck coverage.” This coverage is not usually required unless you’re leasing a vehicle or paying a car loan. However, it’s valuable to protect your car from hailstorm damage.
- If your car needs to stay in the shop, you will want an insurance policy with Transportation Expenses coverage, also known as rental reimbursement. If you carry coverage for damage to your auto, your California Casualty policy automatically includes coverage for a rental car up to $20 a day. For an additional fee, you can increase that amount.
- If hailstorms damage your car to the extent that it is totaled, your insurance policy will likely pay you for the actual cash value of your car.
Talk to your insurance agent to see what is covered under your policy before the next hailstorm strikes. That way you’ll be fully prepared.
This article is furnished by California Casualty, providing auto and home insurance to educators, law enforcement officers, firefighters, and nurses. Get a quote at 1.866.704.8614 or www.calcas.com.
by California Casualty | Homeowners Insurance Info |
Imagine walking downstairs and seeing your basement filled with water and your precious possessions floating around… It’s not something anyone wants to ever experience, but unfortunately, it’s something that many Americans deal with each rainy season.
A flooded basement can cost you thousands (maybe more), and it’s not just in lost belongings. Flooding can cause damage to your walls and floor and also lead to mold, mildew, and other health hazards.
Sometimes flooding is a one-time occurrence. Oftentimes, it is more frequent. Knowing the triggers of flooding can help you take steps to keep your basement dry and your possessions safe. Here are the common causes of a flooded basement. Pro Tip – You can help protect against many of them with flood insurance.
1. Location
Your location is one of the key reasons that your home floods. You may live in a low-lying area prone to flash floods. Your home may sit at the bottom of a hill, drawing precipitation toward it. If the land around your home is sloped down toward it, there could be a risk of your basement flooding. Take a critical look at your property. Look for depressions or standing water around your home, in the ground, or with pavement that has settled or deteriorated. These are areas that you will want to address.
What you can do: Fill the depressions in the ground with a mound of soil to create a slope away from your home. Use clay-based rather than sandy soil, as it will help to repel the water. Remove and/or replace pavement, and again, slope it away from your home. If a hill next to your house is causing the problem, a civil engineer may be able to provide some guidance.
2. Weatherproofing
During construction, your home’s foundation, and your basement’s walls and floor, should have received a coating of sealant to keep water out. However, sealants can deteriorate over time, allowing surface water to leak in. Surface water also can pool around your home due to the location and settings of your lawn irrigation system. Both of these issues are relatively simple to fix.
What you can do: Avoid placing irrigation next to the house, or limit water dispersed there. Make sure your irrigation system does not turn on when there has been plenty of rain. You also can take steps to reseal your basement. Use a polyurethane caulk designed for masonry to seal any cracks or gaps that are larger than 1/8 inch wide. (For finished basements, consult your local hardware store for options.) Then apply a waterproof coating to your basement’s walls and floor. You also can use waterproof paint.
3. Groundwater
If surface water is not the issue, groundwater might be. Underground pressure can push the water into your basement through cracks or holes. If you notice water coming up through the concrete floor, or coming in from multiple points, this could indicate groundwater.
What you can do: A perimeter drain system can help. Such systems relieve the pressure and use gravity to pull the water to the sides and down. They can be installed above or below the slab. An under-floor system may be better but it is more expensive. It requires some of the concrete floor to be removed in order to install the drainage pipes. If you already have a drainage system, such as drain tile or weeping tile, and you are still seeing water or moisture, it’s possible that you need to replace it. Those systems may degrade over time.
4. Clogged Gutters and Downspouts
It’s not unusual for gutters to be clogged with leaves and other debris. This prevents them from effectively doing their job, which is draining the water into a downspout and away from your home. Improperly positioned or broken downspouts also contribute to the problem. Water that drains too close to your house not only can create flooding; it can erode soil which can lead to further problems.
What you can do: Clean your gutters a few times a year. Install a gutter guard to reduce future clogs. Make sure your downspout drains far enough from the wall, at least 5-6 feet. Some experts suggest as much as 10 feet.
5. Plumbing Leaks
If you notice a large amount of water quickly, it could be a plumbing leak. Broken, cracked, and clogged pipes can cause this type of emergency. During winter months, water freezes and expands, sometimes bursting pipes. All of these issues can cause your basement to flood.
What you can do: Most likely, your pipes have to be replaced. Call your plumber to repair the issue as soon as possible.
6. Sump Pump Failure
You may have a sump pump installed, a device that collects excess water and drains it outside your home. A sump pump is powered by electricity, and therefore only works when there is power. Consider buying a sump pump with backup battery power to avoid any interruptions. If your sump pump fails because of lack of power, or because it is not working properly, that could cause your basement to flood.
What you can do: Regular inspection, cleaning, and testing your sump pump can help. Consider an add-on to your homeowner’s insurance of sump pump discharge or overflow coverage. This can help cover the costs of repair and replacement in the event of a sump pump failure.
7. Sewer Backup
Heavy rain can sometimes back up the municipal sewer system. Sewer backups also may occur due to sewer lines that are clogged with waste, tree roots, or other debris. When these things happen, flooding in your basement can occur, and the results will, at minimum, be smelly.
What you can do: If your basement is flooded with sewage, get professional help to clean it. You also will likely need to get the local government involved. Finally, you can install backflow preventers to help keep the sewage out of your house.
If your basement does flood, know that an insurance policy can help cover the costs. Many people don’t realize that a traditional homeowner’s insurance does not cover floods. For that, you will need a separate policy. If you’re in a flood zone, you will want that extra insurance.
There is a 30-day waiting period to buy flood insurance, so with the rainy season upon us don’t wait until the last minute!
This article is furnished by California Casualty, providing auto and home insurance to educators, law enforcement officers, firefighters, and nurses. Get a quote at 1.866.704.8614 or www.calcas.com.
by California Casualty | Homeowners Insurance Info |
There’s a reason spring cleaning is so popular-the birds are chirping, the sun is shining, and there is a sense of newness in the air! There’s no better time to open up those windows and scrub away all signs of winter. However, spring cleaning isn’t just for dusting and decluttering. It’s also a great chance to assess and address safety issues, especially fire hazards.
Every 89 seconds, a fire department responds to a home fire in the U.S. And according to the National Fire Protection Association, in 2020, home fires were responsible for 3,500 deaths, 15,200 injuries, and $21.9 billion in property damage.
When you clean with fire safety in mind, you help protect your home and family from these often-unforeseen fire safety dangers. To help you stay safe this season, we’ve compiled the top safety cleaning tips from fire departments around the country.
Tip #1: Clear your stovetop of fire hazards.
Stovetops account for the majority of kitchen fires. Making sure that there are no flammable hazards nearby will help prevent the flames from catching and spreading a fire.
-
- Keep your stovetop clean between cooking meals.
- Put space between your stove and anything flammable: oven mitts, wooden utensils, towels, wooden stove covers, and kitchen curtains.
- Keep your kitchen counter free of grease or clutter.
- Always stay near the food you are cooking.
- Turn pot handles inward so you can’t accidentally bump them.
Tip #2: Clean the lint trap in your dryer.
Dryers are a common cause of home fires, and too often, the lint traps are the culprit. Making sure your lint trap is not too full will help.
-
- Clean lint filters before or after each load.
- Remove lint from around the dryer rim.
- Make sure the air exhaust vent pipe is free and clear, and that the outdoor vent flap opens when the dryer is on.
- Move flammable items like cardboard and cleaning supplies away from the dryer, especially when it is on.
Tip #3: Check extension cords, outlets, and wiring.
Damaged cords, overtaxed outlets, and old wiring can cause electrical fires. Check these items to make sure that your electrical setup is not putting your safety at risk.
-
- Check for frayed or damaged extension cords. If you find any, throw them out and replace them.
- Make sure your extension cords are rated for the appliances and items that they are powering.
- Do not put electric cords under carpets or across doorways.
- Check to make sure that your outlets aren’t overloaded.
- If an electric appliance smokes, smells funny, or is drawing heat when plugged in, unplug it.
- If you’re familiar with your home’s electrical system and you can take a look, check for scorch marks or frayed wires. Call an electrician to update or rewire the system.
Tip #4: Check for potential fire hazards.
As you do your spring cleaning, check your home for possible fire hazards. Then, take the steps to minimize their risk.
-
- Keep space heaters at least 3 feet from anything that can burn. Turn them off before leaving the room and before going to sleep.
- Practice safety with candle flames. Store matches where children cannot get them. Alternatively use child-resistant lighters.
- If you have a chimney, get it professionally cleaned and inspected. Chimneys can have a build-up accumulation of creosote, a flammable substance that lines the flue.
- Keep cleaning fluids away from heat sources. Many are combustible. These chemicals could even heat up to dangerous levels outside in the sun. (Consider non-toxic cleaners that are safer when heated, such as vinegar mixed with water.)
Tip #5: Remove potential hazards from the garage.
The garage is where we often store our extra stuff. That includes items that could fuel a fire. As part of your cleaning routine, declutter the garage.
-
- Remove stored newspapers, wrapping paper, blankets, and other flammable items that you may be storing in the garage.
- Dispose of oil or greasy rags. Never leave them in a pile. If you must keep them, store them in a labeled metal container.
- Move propane or gasoline outside your home to a shed or detached garage.
- Check your lawn mower’s gas tank for rust. Make sure the fuel line has no leaks. Check any other gas-powered tools, too.
Tip #6: Clear your outside space.
Even fallen leaves and grass clippings can become fuel for a fire. That’s why clearing your yard is so important.
-
- Clean away dead vegetation, fallen branches, and any debris.
- Clean leaves from your roof and gutters.
- Move trash and woodpiles at least 30 feet away from your house.
- Replace mulch, and keep it at least 3 feet from the house.
- Position your barbecue grill away from your home. Also, keep it away from windows, heating and air conditioning units, and vegetation. Clean the grease or fat buildup every time you cook.
- Make sure your propane hose has no leaks or cracks. If you smell gas when you turn it on, shut it off immediately.
Tip #7: Be prepared.
Despite your best efforts, fires can happen. Make sure you are fully prepared to know about them and to take action.
-
- Test smoke alarms monthly. Make sure they have working batteries. Replace batteries every six months. Replace the smoke detectors every 10 years.
- Make sure smoke detectors are on every level of the house, including the basement, and outside every bedroom. Consider interconnected smoke alarms, so if one goes off, then all will sound the alarm.
- Keep fire extinguishers fully charged and easily reachable.
- Make sure doors and windows easily open in case of the need to escape fast.
- Display your house number prominently in case you need to call for help.
- Create a family escape plan. Include a map of each level of your home. Make sure there are 2 escape routes for each room, such as a window and door. Make sure you account for pets, and also name an outside meeting place in the event of an emergency.
- Practice the plan so that everyone is ready, just in case.
For more home tips on fire safety this spring, check out our blog on The 6 Most At-Risk Fire Areas of Your Home.
This article is furnished by California Casualty, providing auto and home insurance to educators, law enforcement officers, firefighters, and nurses. Get a quote at 1.866.704.8614 or www.calcas.com.
by California Casualty | Auto Insurance Info, Homeowners Insurance Info, Safety |
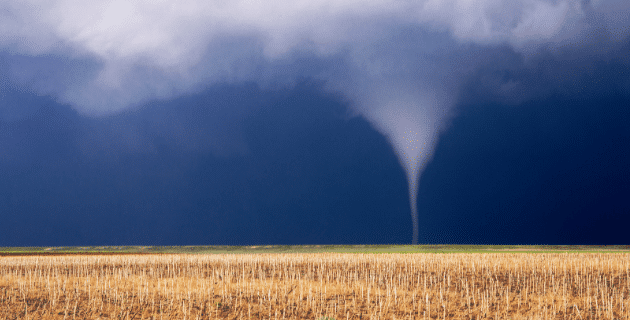
There’s a reason why a tornado strikes immediate fear for those in its path. These violent storms can flip cars, uproot trees, and destroy entire properties. Their powerful winds can even lift objects hundreds of feet off the ground and leave complete devastation in their wake.
Here’s what you need to know to keep your home, your vehicle, and your family safe from tornadoes and high winds.
What is a tornado?
A tornado is a spinning, funnel-shaped cloud usually formed as part of a thunderstorm. Tornadoes can be over a mile wide and as much as 50 miles long. Their narrow funnel shape extends from sky to ground with winds that can reach speeds up to 300 mph. (To put that in context, the average car can be moved by a 90-mph wind.)
While certain regions of the country have been dubbed “Tornado Alley,” it’s not true that tornadoes are prone to occur in those places. Tornadoes can occur anywhere and anytime and have been reported in all 50 states.
How do we predict tornadoes?
Tornados, and their paths, are notoriously difficult to predict. Even meteorologists who study the weather don’t know for sure how they form. However, the National Weather Service is able to track conditions that can contribute to tornadoes—and issue tornado watches and warnings as needed.
A tornado watch means to prepare for severe weather. A tornado warning means that a funnel cloud has been reported by spotters or indicated by radar.
What are the warning signs of a tornado?
By the time you see warning signs, that means a tornado is well on its way. You’ll need to act fast. Here are just some signs to look for:
-
- Large hail without rain
- Dark or greenish sky
- An approaching cloud of debris
- A loud roar like that of a freight train
- How do you prepare for a tornado?
You can take the steps to protect your home, your car, and your family right now.
1. Sign up for severe weather alerts. You can get critical and timely information from local media broadcasts and the emergency alert system on your TV or desktop and mobile devices. In addition, your local utility company, township, city, or state may offer free alerts. Check with your electric or gas company, and with city hall or municipal government.
2. Develop a family disaster plan. Your plan of action will identify where you and your family will shelter in place, and what to do if you get separated. It also will address any special needs of family members and your pets.
3. If there is not a safe space in your home to wait out a tornado, research local public shelters. For example, if you live in a mobile home, tornadoes can easily turn over mobile homes. Plan to go to a public shelter.
4. Gather emergency supplies in case you need to shelter in place. Keep them together in an easily accessible place. Include water, nonperishable food, and medication. Pack a first aid kit.
5. If there is a tornado watch, store items like outdoor furnishings that could become flying debris. Make sure cars are parked well away from trees.
How do you stay safe during a tornado?
If you’re home…
-
- Go immediately to a safe place such as a basement, storm cellar, center hall, or small interior room in your home. Choose the lowest floor possible and avoid windows. Also, avoid places where heavy items like refrigerators may be directly above you. If a tornado strikes, it could come crashing down.
- For added protection, get under a table. Cover yourself with thick padding such as blankets or even a mattress. This will help in case the ceiling falls in.
- If the power goes out, use flashlights rather than candles if you need a light. An open flame can create a fire hazard if gas lines are damaged by severe weather.
- Have a weather radio or your phone tuned into local weather. Tornadoes can be accompanied by flooding. Know when the tornado is gone and it is safe to emerge.
If you’re driving…
-
- Do not try to outrun a tornado in a car. Pull over.
- Tune into your local weather radio station, or if you are traveling, call the weather emergency number listed on the signs along the highway.
- Park in a low, flat location. Avoid bridges or overpasses.
- If you can, leave your car and get to safety inside a sturdy building.
- If you cannot find adequate shelter, then stay in your car with your seat belt buckled. Put your head down below the windows. Cover your body with a coat or blanket and your head with your arms.
What do you do after a tornado?
Once it is safe to venture out, it’s time to inspect the damage. Wait until daylight and make sure to look around safely. Stay clear of fallen power lines. Stay out of damaged buildings. Make a plan to clear away debris and downed trees from your yard.
If your home, car, or property suffered damage from the tornado, you will want to take the following steps:
-
- Secure your property from further damage.
- Take photos to document what has happened.
- Alert your insurance company, determine if you are covered for the damage, and file a claim.
You have home and car insurance for a reason. Put it to work if you need it. Make sure you and your family are fully protected in the event of a tornado, and any damage that follows, such as flooding. Call a California Casualty agent today at 1.866.704.8614 or visit our website www.calcas.com.
This article is furnished by California Casualty, providing auto and home insurance to educators, law enforcement officers, firefighters, and nurses. Get a quote at 1.866.704.8614 or www.calcas.com.
