by California Casualty | Helpful Tips |
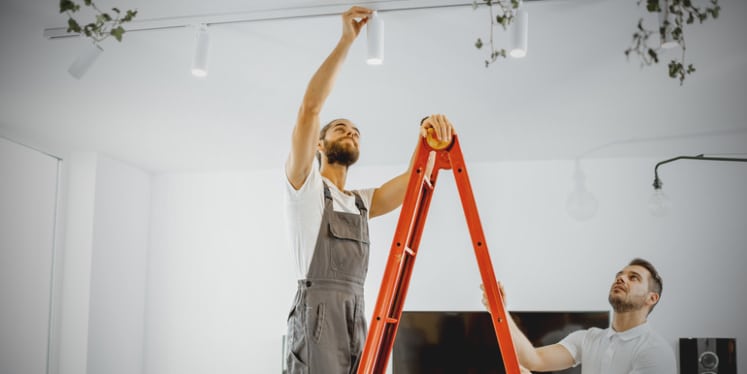
Want to instantly make your home brighter, safer, and more welcoming? A few simple lighting upgrades can do just that. Whether you’re creating a cozy atmosphere in the living room, brightening up your kitchen workspace, or making sure hallways and staircases are well-lit to prevent accidents, improving your home’s lighting can make all the difference. Not only does good lighting boost mood and productivity, but it also enhances safety and adds value. Ready to see your home in a whole new light? Read on.
Enhance your natural light.
Sunlight is free, and there are ways to maximize how much light is naturally in your home. Make sure your windows are clean as a first step. Then try some of these tips.
- Use sheer curtains on your windows rather than heavy drapes. Try curtains or blinds that can be pulled back or opened wide to let the light in.
- Paint your walls lighter colors and your ceilings white. You’ll be surprised at how much that can lighten up a space.
- Place mirrors in hallways or corners to reflect the natural light coming in your windows. Other glossy surfaces have a similar effect, so consider adding silky fabrics, wallpaper with a sheen, or glass tables and objects.
- Make sure nothing is blocking your windows inside or out. Move furniture. Trim bushes. Clear the way for more sunshine.
Consider the type of lighting.
Not all lighting is the same. Knowing the types will help you determine which works best for each space in your home.
- Ambient describes general lighting. This is usually the main source of light, when you flip the light switch as you enter a room. It is a foundation for the lighting of your rooms. You can then add lighting as you see fit.
- Task lighting illuminates an area for a specific task. These are typically brighter lights for seeing clearly as you are cooking or while you’re in the bathroom. Task lighting could also be the desk lamp that you use for your home office or a table lamp for reading while the rest of the room is lit by ambient light.
- Accent lighting draws attention to pieces of art or an architectural feature of a room. It draws the eye in that direction.
- Decorative lighting offers the finishing touch to your home’s décor. This type of lighting typically includes wall sconces, chandeliers, hanging pendant lights, and floor and table lamps.
Pay attention to the bulbs.
Bulbs range in brightness and in color—and different choices can really change the feel of a room. Energy efficiency is also a factor in light bulb selection, as it can save you money over time. There are a lot of choices on the market so do your research for the right bulbs for your home.
- Warm white light works best for relaxing. Look for bulbs that are 2000 Kelvin (K) to 3000 K.
- Cool bright light looks the most like daylight. Look for bulbs that are 4500 K and above.
- Neutral light or bright white light, ranging from 3100 K – 4500 K, is for areas that require focus: kitchens, home offices, and bathrooms.
- Bulbs are measured by lumens and watts. The more lumens a bulb has, the brighter the light will be. The more watts a bulb has, the more energy it will use.
- Incandescent bulbs used to be the industry standard. They are not as energy efficient as other kinds of bulbs. Halogen light bulbs use less energy. Fluorescents are popular for kitchens and offices. LED bulbs are longer lasting and energy efficient. Smart versions of LED bulbs can be adjusted remotely for brightness and timing.
Pro Tip: Chances are you have three or four different types of light bulbs with different color temperatures throughout your home (and possibly even in the same room). Replace them with one kind for a more cohesive look.
Layer your lighting.
You will benefit from having several types of lighting in each room, so you have multiple options for different moods and tasks.
- Consider the activities that will take place in the room and the need for lighting. Use the ambient light as the base.
- Include brighter lights for tasks, which can be turned off or dimmed when you do not need them.
- Add an accent lamp on the table or floor for softer and more flattering lighting. Try a new lampshade. Light colored shades help diffuse light. Dark colored shades will concentrate it.
Pay attention to placement.
You can use lighting to help define your space by strategically placing it throughout the room, at different levels – on a table, floor, and hanging from the ceiling.
- Consider LED strips under cabinets to illuminate counters.
- For larger rooms, cluster the lighting to break the space into cozier areas.
- To make a room appear wider, place lamps in the corners.
- Point your light fixtures toward walls and ceilings, which can diffuse harsh light and reduce glare.
Install motion sensor lights.
Motion sensor lights enhance home safety by automatically lighting dark areas when movement is detected.
- Install them in hallways and stairwells, which are prime places for slip, trip and fall accidents.
- Use plug-in night lights with motion sensors.
- Battery operated LED light strips are available if you don’t have outlets in these spaces.
- Motion sensor lights are also effective outside your home. A sudden light can alert you to movement on your property and deter intruders.
Use smart lights and dimmers.
Smart lights and dimmers offer customizable, energy-efficient lighting solutions that adapt to your mood, schedule, and lifestyle with just a tap or voice command.
- With smart options, you can set up routines for changing lighting throughout the day and evening.
- You can control your lighting from anywhere via an app, adjusting for color and brightness.
- Dimmers also are available with manual switches. Dimming lights helps you save on your energy bill.
Add exterior fixtures for safety.
Exterior lights provide visibility around entry points, driveways, and walkways outside your home to enhance security.
- Walk your perimeter at night. Identify the dark spaces you want to illuminate.
- Try sconces for a side door or garage door.
- Landscape lighting is effective for a walkway and is available in solar and battery powered options.
- Consider smart lighting solutions for the outside that can be controlled remotely from inside or wherever you happen to be.
Your home is one of your greatest investments. Make sure to protect it with the right insurance.
This article is furnished by California Casualty, providing auto and home insurance to educators, law enforcement officers, firefighters, and nurses. Get a quote at 1.866.704.8614 or www.calcas.com.
by California Casualty | Auto Insurance Info, Helpful Tips, Safety, Travel |
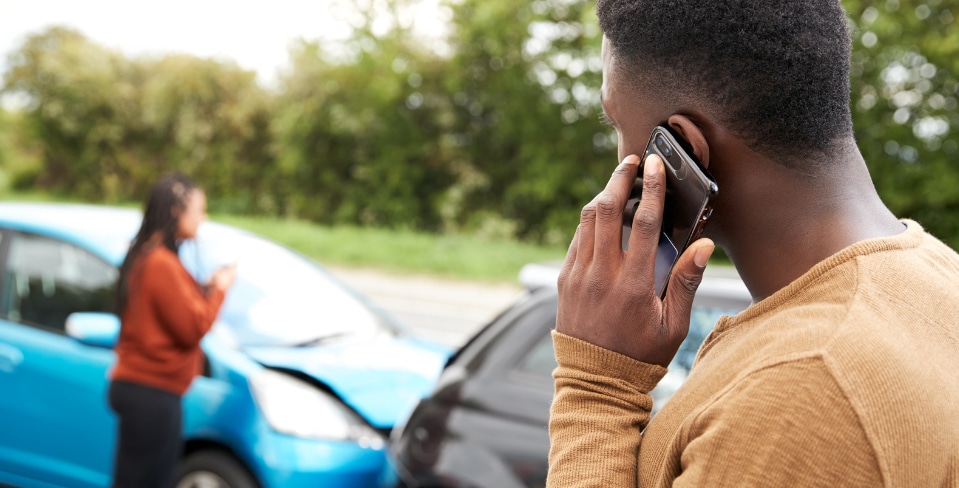
The car ahead suddenly collides with another vehicle, forcing you to brake hard to avoid the crash. Your heart races, adrenaline kicks in, and as the dust settles, you realize you’re not just a passerby—you’re a witness. But what happens next? Knowing your role in that critical moment can make all the difference.
While it’s not a legal requirement to stop at the scene of an accident, many people do. As a witness, you’re often the first to arrive and can play a crucial role in calling for help. You may also provide key information that helps clarify what happened and determine liability. If you witness an accident, here are the steps to follow.
Find a place on the side of the road near the accident that is about 100 feet away. Stay
away from broken glass, leaked fuel, downed power lines, and other hazards. You don’t want to put yourself or your car in danger. Once you’ve parked, shut off your car and put on your flashers.
2. Call 9-1-1.
Don’t assume someone else is doing it—unless you see and hear them doing it. Notify the police about the accident, which can be more serious than it looks. Be prepared to give your location. Look for the nearest cross street, a mile marker, or nearest off ramp. The operator will ask how many people need help, and if they are conscious, breathing, or bleeding. Now is the time to step out of your car to check.
3. Exit safely if you can.
Only leave your vehicle if it is safe to do so. Be careful of cars whizzing by and of debris on the road, including broken glass and twisted metal. Be aware of smoke, odd smells or fluids that could signal a potential fire danger. Your safety is your priority.
4. Offer comfort and, if needed, first aid.
Approach the vehicles with the accident victims. Ask if they are okay. Let them know that first responders are on their way. Importantly, do not move an injured individual unless there is an immediate danger of fire. You can bind wounds and stanch bleeding; ask the 9-1-1 operator for direction if you’re unsure.
5. Stabilize the scene.
Make sure all vehicles are in park and turned off. If cars are still on, and fuel is leaking, that could cause a fire. If you need to, and if you can, move the damaged car off the road. Otherwise, set up warning flares (only if there are no fuel leaks) or traffic triangles. You can keep these in your trunk for just this purpose.
6. Document the accident.
The victims may not be able to take photos of the crash. Go ahead and do so and add notes so you will remember what happened. Get contact information so you can get the pictures to the people involved in the accident. Pay special attention if it was a hit and run. Any details you remember could help police track down that car.
7. Talk to the police.
When the police arrive on the scene, they will want to talk with you. Simply share the facts. Don’t speculate on fault if you are unsure who caused the accident. Do not feel pressured to answer every question and do not guess at the answers. “I’m not sure” and “I don’t know” are valid responses. It’s possible that you may be called to testify in a court of law. Don’t ignore a subpoena if you get one. That is against the law, and you could be fined or go to jail.
Some final thoughts…
- Witnessing any kind of accident is upsetting. Seeing a fatal accident can be traumatic. Make sure to talk to your pastor, doctor or a therapist to help process the experience.
- Did you see the accident occur or did you come by after it happened? If you didn’t see it, then you’re not a witness. You can still stop and help but let the police know that you do not have any information on the crash.
- Finally, make sure your own vehicle is protected with the right insurance. This will help add peace of mind if you should get in an accident.
This article is furnished by California Casualty, providing auto and home insurance to educators, law enforcement officers, firefighters, and nurses. Get a quote at 1.866.704.8614 or www.calcas.com.

by California Casualty | Helpful Tips, Safety |
It’s the perfect time of year to open the windows and enjoy the fresh air. Yet open windows can be a hidden danger for kids. It’s easier than you may think for young ones to slip through and fall. Fortunately, window accidents are preventable with the right safety measures. This season, keep your home and windows secure for your little ones.
What makes windows dangerous?
Children are naturally curious. They like to climb and explore. Window screens are designed to keep bugs out, but not hold children in. Even a small child has the strength to push out a screen. Children under the age of 5 are especially at risk if this happens. Their heads make up a larger percentage of their bodies as compared to adults, so they are likely to fall headfirst.
Some windows are more enticing or easier to access for young kids:
- Windows with deep windowsills or built-in window seats
- Windows that overlook a play area or place of interest to a child
- Windows that are near furnishings where children can climb to reach them
- Windows that do not have safeguards and do not lock
Types of Windows
You want to be concerned about any type of window that can open.
- Single hung windows have a bottom sash that opens.
- Double hung windows have bottom and top sashes that open.
- Bay windows often have side angled panels that can open.
- Casement windows swing open to the side, often using a hand crank.
- Awning windows swing up in a similar way to casement vehicles.
- Horizontal sliding windows open by sliding to the side.
- Picture windows generally do not open.
Window Safety Devices
You can buy safety devices that limit or block window openings at your local hardware or home store and online. Look for ones that are compliant with ASTM International specifications. ASTM stands for the American Society for Testing and Materials, and it establishes standards for a wide range of products, including window fall prevention devices. Place these devices on every window that can open, including first floor windows. That still can be a significant fall for a young child.
Window Guards
Window guards block the opening of a window. There are two basic kinds, each of which needs to be properly fitted.
- Fall prevention window guards use closely spaced bars that are secured to the window frame. Made of durable material such as steel, these guards may be installed with screws or bolts. They usually have a release mechanism for quick access to disable them.
- Fall prevention screens are different from standard window screens that protect from bugs. These screens are designed to withstand as much as 60 lbs. of pressure or more.
Window Stops
Window stops restrict windows from opening fully. Make sure to set them so windows open a maximum of 4 inches.
Pro Tip: Once you install a safety device, practice removing it, so you’ll know how to do so if you need to exit via the window in an emergency.
Window Cords
Young children also can be entangled and strangled by window cords. Remove the cords or keep them well out of reach.
- Retrofit old cords with cord stops or cut looped cords and replace with tassel ends.
- Switch to cordless blinds for your window treatments.
Other Window Safety Tips
- Close and lock windows when an adult is not in the room to supervise.
- If you have windows that can open at the bottom and the top, open them only at the top to help prevent falls.
- Move furniture and cribs away from windows so kids cannot climb on them. Make sure that furniture is a minimum of 3 feet from windows.
- Keep your eyes on children when the windows are open. Make sure they do not get too close.
- Teach children not to play near windows, not to lean on windows, and to always ask permission before opening a window.
- Regularly inspect and repair broken windows as soon as possible.
- If you have a hard surface outside underneath your windows, consider adding soft grass, bushes or other landscaping that could cushion a fall. This could ultimately help to lessen an injury.
- Open, unsecured windows can also be a danger to pets. Keep your fur babies safely away from open windows and balconies.
- Discuss window safety with your child’s daycare, babysitter and family members. Make sure everyone is aware of the safety precautions to take.
This article is furnished by California Casualty, providing auto and home insurance to educators, law enforcement officers, firefighters, and nurses. Get a quote at 1.866.704.8614 or www.calcas.com.
by California Casualty | Auto Insurance Info, Helpful Tips, Safety, Travel |
There are four things standing between you and the pavement when you drive—your tires. Keeping them in good shape is key to staying safe on the road. Whether you’re gearing up for a long drive or just your daily commute, knowing how to check your tire pressure is a small step that can make a big difference.
That’s because the right tire pressure can have some far-reaching impacts:
- A smoother ride and better handling
- Better fuel efficiency
- Improved stopping distance
- A longer lifespan for your tires
What’s the right pressure?
If you drive a passenger car, your tire pressure is likely between 32 to 35 pounds per square inch (psi). SUVs and trucks require a higher psi. Here’s how to find the exact number:
- Open your driver’s side door.
- Look along the doorjamb for a sticker. It should display the pressure (including whether you need specific pressures for front and rear tires and your spare).
- You can also find the recommended pressure in your owner’s manual.
- Importantly, do not go by the number that is on the sidewall of your tires. That is the maximum pressure allowed.
Dangers of Overinflating or Underinflating Tires
You want the right amount of pressure in your tires, not too much and not too little.
- Overinflating causes the center of the tire’s tread to wear faster. It also decreases traction and your tire’s ability to absorb impacts.
- Underinflating causes the outer edges to wear faster. Your car may pull or drift to the side.
- Both overinflation and underinflation cause uneven wear, which reduces your tires’ lifespan. At the very least, it will require you to purchase a new set sooner than normal; at the worst, it could cause a
Start with the Right Tools
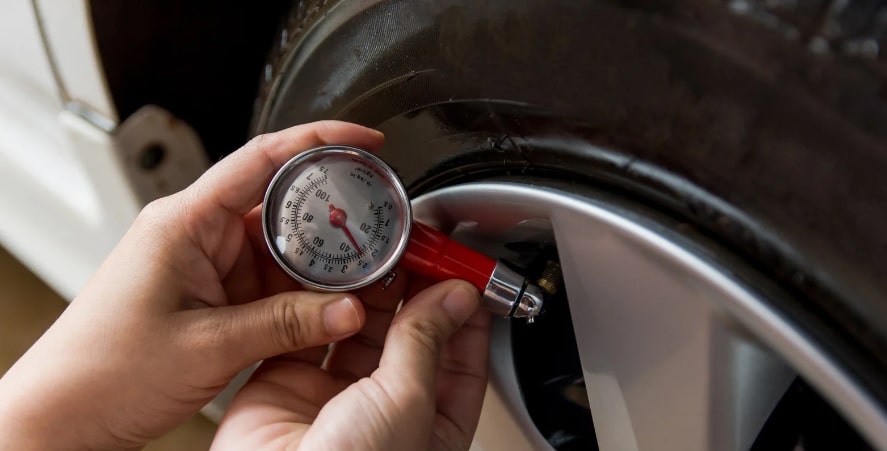
Now that you know the basics about tire pressure, you’ll want to gather the right tools. You need a tire pressure gauge to start. While you could use one built into an air machine at a gas station, those aren’t always the most accurate. It’s always good to have your own, which you can use at home and anywhere. You can purchase a gauge at an auto supply or hardware store. You will likely have a choice of three kinds:
- Stick gauge: Usually the most inexpensive option, this type of gauge resembles a pen. It has a small bar that pushes out to show the reading.
- Dial gauge: This type of gauge has a round dial that looks like a clock face or compass. The needle will stop at the number to show the reading.
- Digital gauge: This gauge has an LCD display showing the pressure in numbers. However, it needs batteries to operate and when they run out, you will need to replace them.
Optional but handy:
You can buy a portable air compressor to allow you to fill your tires anywhere and not just at a gas station’s air compressor kiosk. These vary from manual hand-operated or foot pumps to those you can plug into your car’s battery or a 12V power port. You will pay more for one with a built-in gauge, which can be helpful. If you are considering a purchase, look for one where you can put in the proper pressure and the unit will shut off when it reaches that number.
How to Check Pressure
You should check your tires’ pressure monthly or whenever there are changes in weather that could affect them.
- Start with a “cold” tire which is when a vehicle has been parked for 3 hours or more, or one that has been driven less than a mile at moderate speed. Tires heat up when they’re driven and that will increase the air pressure, and you won’t get an accurate reading.
- Remove the screw-off cap on your tire’s air valve. Put it someplace safe where you will not lose it.
- Place your tire gauge over the valve and push it into the stem. If you hear air escaping, continue to press it in until that stops.
- Check the reading on your tire gauge. Note that some gauges need to be in the tire’s valve for the reading; others may be removed.
- If the reading matches the recommended pressure, screw the cap back on. If not, take the next steps to add air or take it out.
- Repeat for each tire.
- If you can access your spare, do it for that one as well. It will be helpful to have a spare ready to go should you need to change a tire.
How to Add Air
You can find air compressors at most gas stations, and they are often free or a minimal charge.
- Park so the tire in need is closest to the machine so the cord will reach.
- Read the directions on the compressor before paying (if there is a cost). Once you pay, you should hear the machine turn on.
- Remove the screw-on cap on the tire valve. Put it somewhere safe.
- Press the hose nozzle on the stem of the valve. You should see the tire inflating and the numbers on the air machine going up.
- If you hear a hissing noise, you’re letting air out. Push the nozzle in to attach it properly.
- Check the pressure with your gauge.
- Repeat until you have the right number. Replace the cap.
If you had to drive a few miles to get to a gas station with air, your tires will be hotter than normal. Remember your base “cold tire” reading and calculate the difference between that and the ideal pressure. Add that amount. (For example, your tires needed to be 33 psi but were only at 31 psi in your driveway, you will want to add 2 psi.) Then, check again later after the tires have been sitting for 3 hours to make sure it’s the right amount.
How to Remove Air
You don’t need an air machine to let air out. You just need a flathead screwdriver.
- Take the cap off the valve.
- Press the end of the screwdriver into the center of the valve stem.
- Hold it for a few seconds. Listen for air escaping.
- Check the pressure and repeat as necessary.
Pressure Changes by Season
As the weather changes, you will notice corresponding changes in your tire pressure. That’s because air expands as it gets hotter, which raises the pressure. It contracts as it gets colder, which lowers it. In cold weather, tire pressure can decrease about 1 psi for every 10-degree drop in temperature. That’s why it’s important to check your tire pressure when the weather changes, in extreme heat and cold, and adjust as needed.
Note that your car’s tire pressure light activates when there’s a temperature change as well as a small leak. The light goes on when the pressure is about 25% below the recommended level.
A Word About Air vs. Nitrogen
When it comes to keeping your tires inflated, you have a choice: air or nitrogen. If you have nitrogen in your tires, you will need to revisit a nitrogen provider to fill your tires. You will not be able to fill them at air kiosks at a gas station.
Keeping the right tire pressure will help extend the life of your tires. Keeping your vehicle well maintained will help extend its life. Finally, protect it with the right insurance coverage. This will give you peace of mind for your journeys ahead. Safe travels.
This article is furnished by California Casualty, providing auto and home insurance to educators, law enforcement officers, firefighters, and nurses. Get a quote at 1.866.704.8614 or www.calcas.com.

by California Casualty | Helpful Tips, Homeowners Insurance Info |
When it comes to house hunting, preparation is key. Whether you’re a first-time buyer or an experienced one, the right tools can make all the difference. From capturing details to measuring spaces, here’s the gear you need to ensure a smooth and successful search for your new home.
Tape Measure
While you can use an app on your phone to measure a space, it will be less accurate than using a traditional metal tape measure. You can buy one at any hardware or big box store. Before you go house hunting, make sure to measure your furniture so you’ll know whether it will be right for the homes you are touring. For your potential new home, here are some considerations.
- How wide are the door openings? Will your furniture fit through?
- Measure the rooms where you will be bringing furniture. Do you have sufficient space to arrange them the way you’d like?
- Measure the appliance spaces if you are bringing your own washer-dryer, refrigerator, etc. to ensure they will fit.
Camera/Phone and Notepad
You don’t want to rely on photos from the listing. Those are staged. Speak to your agent and ask if you can take photos. You also don’t want to rely on your memory. Use your phone or a notepad to take notes. You also can make quick sketches.
- Jot down things you like and don’t like about each home.
- Sketch out floorplans. Mark locations of windows and doors for future reference.
- Take photos of the house and rooms from different angles.
- Pro tip: Bring along printouts of online listings so you won’t have to write everything down.
A Level
Homes are never completely level. They settle over time. However, you shouldn’t find sloping floors, warped walls or cabinets that do not appear straight. You can buy a pocket level, a measuring tool that shows whether a surface is perfectly parallel.
- These tools typically have a bubble of air suspended in a vial of liquid. When a surface is level, the bubble will be within the guidelines. There are digital and laser levels, too, which are more expensive.
- Place your pocket level along the floor, on counters, or anywhere else that should be a horizontal surface.
- Look for the space between the doors and the floor as they swing out. Is the gap wider at any point?
- Floors that are not level could signal larger structural problems. Do your due diligence if you are buying a home in that condition.
Moisture Meter
Moisture problems aren’t always obvious and can be hidden. Bring along a moisture meter and you can measure the amount within the home. You can buy these meters at a hardware or big box home store. Choose one without pins so that you won’t put holes into a home you might not be buying.
- Moisture meters usually go from 1 (dry) to 100 (wet). Anything at 17 or above is a cause for concern. It could indicate water damage and leaks.
- The moisture meter must contact the surface to provide an accurate reading. There should be no visible moisture on the surface being tested.
- Place your meter flat against a surface such as wood or drywall. Try it in different places as you may find varying moisture levels.
- Pro Tip: Go house hunting after it rains. You’ll see where water collects around the house and in the gutters, and you may observe moisture or leaks inside.
Outlet Tester
This handy tool checks that each contact in the outlet is connected to the correct wire. It can identify several common wiring errors. You can buy a standard receptacle tester that plugs into an outlet or a non-contact voltage tester. Always be careful when performing tests on a live outlet.
- Plug your tester into an outlet. Repeat for several outlets throughout the home.
- A series of lights on your outlet tester will light up. Read the key code to determine what the lights mean. In some cases, an alarm will sound.
- If you do get a concerning reading, that means there are likely issues with the wiring in the house.
- You can use that additional anticipated expense to bring the price down, or you may choose to walk away from the potential problem.
Water Pressure Gauge
With low water pressure, showers and laundry will be longer and more frustrating. Low pressure also could signify a problem with the plumbing. Bring along a water pressure gauge to check out whether this is an issue in your potential purchase.
- If the water comes from a municipal utility, you can use an outdoor hose spigot near where water enters the house. If water is from a well, use a faucet close to the tank.
- For the most accurate reading, make sure water isn’t being used elsewhere in the house, such as with laundry or dishwashers.
- Do not test from a hose. Make sure your pressure gauge screws directly onto the spigot or faucet and that the seal is tight.
- Turn the water on all the way and read the gauge. A normal reading is from 40-80. Anything outside that range is cause for concern.
Flashlight
Even well-lit homes have dark corners and areas that aren’t easily seen. If you’re considering a purchase, you want to see everything—the good and the bad. Bring a pocket-sized flashlight or use the light on your phone to peek into dark areas.
- Look under appliances, in corners, dark basements, etc.
- Look for spiders, mold and any potential problem areas.
- A mirror can help you peek around corners.
- Pro Tip: Bring a UV flashlight and shine it on carpets to reveal places where pets have made messes.
Looking for a new home is an exciting time. Should you have questions about protecting your new investment, don’t hesitate to reach out to an agent for the right policy.
Happy house hunting!
This article is furnished by California Casualty, providing auto and home insurance to educators, law enforcement officers, firefighters, and nurses. Get a quote at 1.866.704.8614 or www.calcas.com.

by California Casualty | Finances, Helpful Tips |
Imagine finding a contractor to repair your roof after a damaging storm, only to discover that you’ve been duped by a scammer. It’s a situation no one wants to face, yet contractor scams are on the rise, leaving unsuspecting homeowners with unfinished projects and empty wallets. Before you embark on your next project, whether it’s a home renovation or repairs following a disaster, it’s important to know the warning signs so you don’t become the next victim.
What exactly is a contractor scam?
You expect a contractor to provide professional repairs or updates to your home. However, when they make promises but they don’t deliver on them, that’s a scam. They intentionally mislead you. They might do a job that is substandard, overly expensive or they may not do the job at all. If your area is hard hit by a wildfire, tornado, hurricane, extreme weather or other disaster, be aware. Scammers posing as contractors may try take advantage of the situation.
Types of Scams
Pushy, door-to-door contractors
Beware of contractors who show up at your door, unsolicited. That’s the first red flag. When they are high-pressure salesmen, you know something is wrong. They can be very convincing, but don’t fall for discounts that only apply if you hire them on the spot. If you didn’t ask for their quote, chances are they are not the right contractor for you.
Out-of-state contractors
Some contractors chase storms to look for easy money. Be suspicious of anyone out-of-state who is offering a quote on work. Be especially careful of contractors working out of their vehicle rather than an office. An out-of-state contractor can be hard to contact if you have issues or work isn’t completed. Choose a local contractor instead.
Unlicensed and uninsured
Scammers may tell you they don’t need to be licensed to do the work. That’s not the case. Your state likely has requirements a contractor must meet. They need to be licensed, and they should be able to show you a license from the state contractor’s board. Double check the number that they show you with the board; scammers can sometimes present inactive licenses. A contractor should also have proof of insurance. If they don’t, that means you could be paying for expensive mistakes that they make.
No references and/or bad reviews
Ask for photos of previous work and customers you can contact. If a contractor cannot provide that, then it’s likely they are not legitimate. Also do a search online for the contractor’s name along with the word “scam” or “complaint.” Read the reviews. Check with the Better Business Bureau to see if there are complaints filed. You might find reasons not to hire this contractor.
No written contract
You should know in writing what work will be done for what price. When contractors don’t provide a written contract before work starts, that’s not professional. You should always thoroughly read the contract, including the fine print. Don’t sign it if you have any concerns. Never sign a blank contract.
Payment requires in full at the start
Don’t deal with a contractor who asks for payment in full upfront. Sometimes contractors require a deposit, but full payment should never be provided before work is done. Know that you can negotiate a reasonable downpayment; some states even limit how much that can be. Contact your state consumer protection agency to find out more.
Unusual forms of payment
Beware of payment requests for wire transfers, gift cards, payment apps, insurance checks, cryptocurrency or cash. Don’t borrow money from a lender they know. Scammers love these types of payments because they are almost impossible to get back. Beware of scammers who offer to help you qualify for FEMA relief for a fee. FEMA doesn’t charge fees, and you are better off doing that on your own.
Cost quotes on places you cannot see
Don’t let an unknown contractor inspect your roof and then tell you what must be done. Ask for pictures of places you cannot easily access, such as crawl spaces, ducts, your roof, etc. Then verify that those images are of your home. If it is a cost quote on an area that you cannot see, get several quotes from those you trust.
Promise of immediate repairs
If something sounds too good to be true, it probably is. Don’t believe a contractor who promises immediate repairs. There’s usually a timeline for quality work. Make sure the contractor you choose doesn’t cut corners by skipping steps to get repairs done right away.
Frequent unexpected expenses
Whenever there’s a construction repair job, there’s a chance of unexpected expenses. Your contractor may find mold, for example, when they work on your home. However, when there are frequent unexpected expenses or expensive ones, get a second opinion. You may find that these unexpected expenses aren’t real ones at all.
Low-grade materials
Make sure the material listed on the estimate is the material being used. Contractors can switch out low grade materials to save money and sacrifice quality.
No one on the job
If no one is on the job during working hours, that’s a big red flag. It could be that your contractor is using subcontractors that arrive after their day jobs. Or it could be that no one will show up to do your work at all.
Protect Yourself from Scams
You can take precautions to help prevent falling victim to a contractor scam. Here are some guidelines.
- Contact your home insurer. When your home is damaged from extreme weather or other disasters, your insurer will need to survey the damage before you get it repaired. They will help you prepare a claim and identify reputable contractors. Before you hire anyone, verify your insurance coverage. Don’t rely on a contractor to tell you what is covered.
- Get multiple quotes from local contractors. That way you’ll know if the price is in the ballpark. Remember that the lowest bid is not always the best. That contractor may be cutting corners. Also make sure you are comparing apples to apples. Pro Tip: use the BBB Get a Quote tool at https://www.bbb.org/get-a-quote.
- Do your research. Check references and ask for photos. Verify your contractor’s license and insurance. Read online reviews and look up your contractor on the Better Business Bureau.
- Get a written contract. Make sure it includes the contractor’s name, address, phone, license number, an estimated start and finish date, a payment schedule, the scope of work and cost of labor and materials. Make sure it also includes a written statement of your right to cancel the contract within three business days if you signed it in your home or in a location other than the contractor’s permanent place of business. Make sure it has no blank spaces that a contractor could fill in later.
- Guard your money. Never pay a deposit that is more than 25% of the total cost and never pay anything until materials are delivered to your home. Don’t sign over insurance checks to contractors. If you have any questions, contact your insurance agent. Don’t make the final payment until the job is complete.
- If you suspect a scammer, report them. You can report scams to the Better Business Bureau, the National Center for Disaster Fraud, and the Federal Emergency Management Agency (FEMA). You can also consult StopFraud.gov.
Your home is one of your greatest investments. Make sure it is covered with the right insurance.
This article is furnished by California Casualty, providing auto and home insurance to educators, law enforcement officers, firefighters, and nurses. Get a quote at 1.866.704.8614 or www.calcas.com.
