
by California Casualty | Auto Insurance Info |
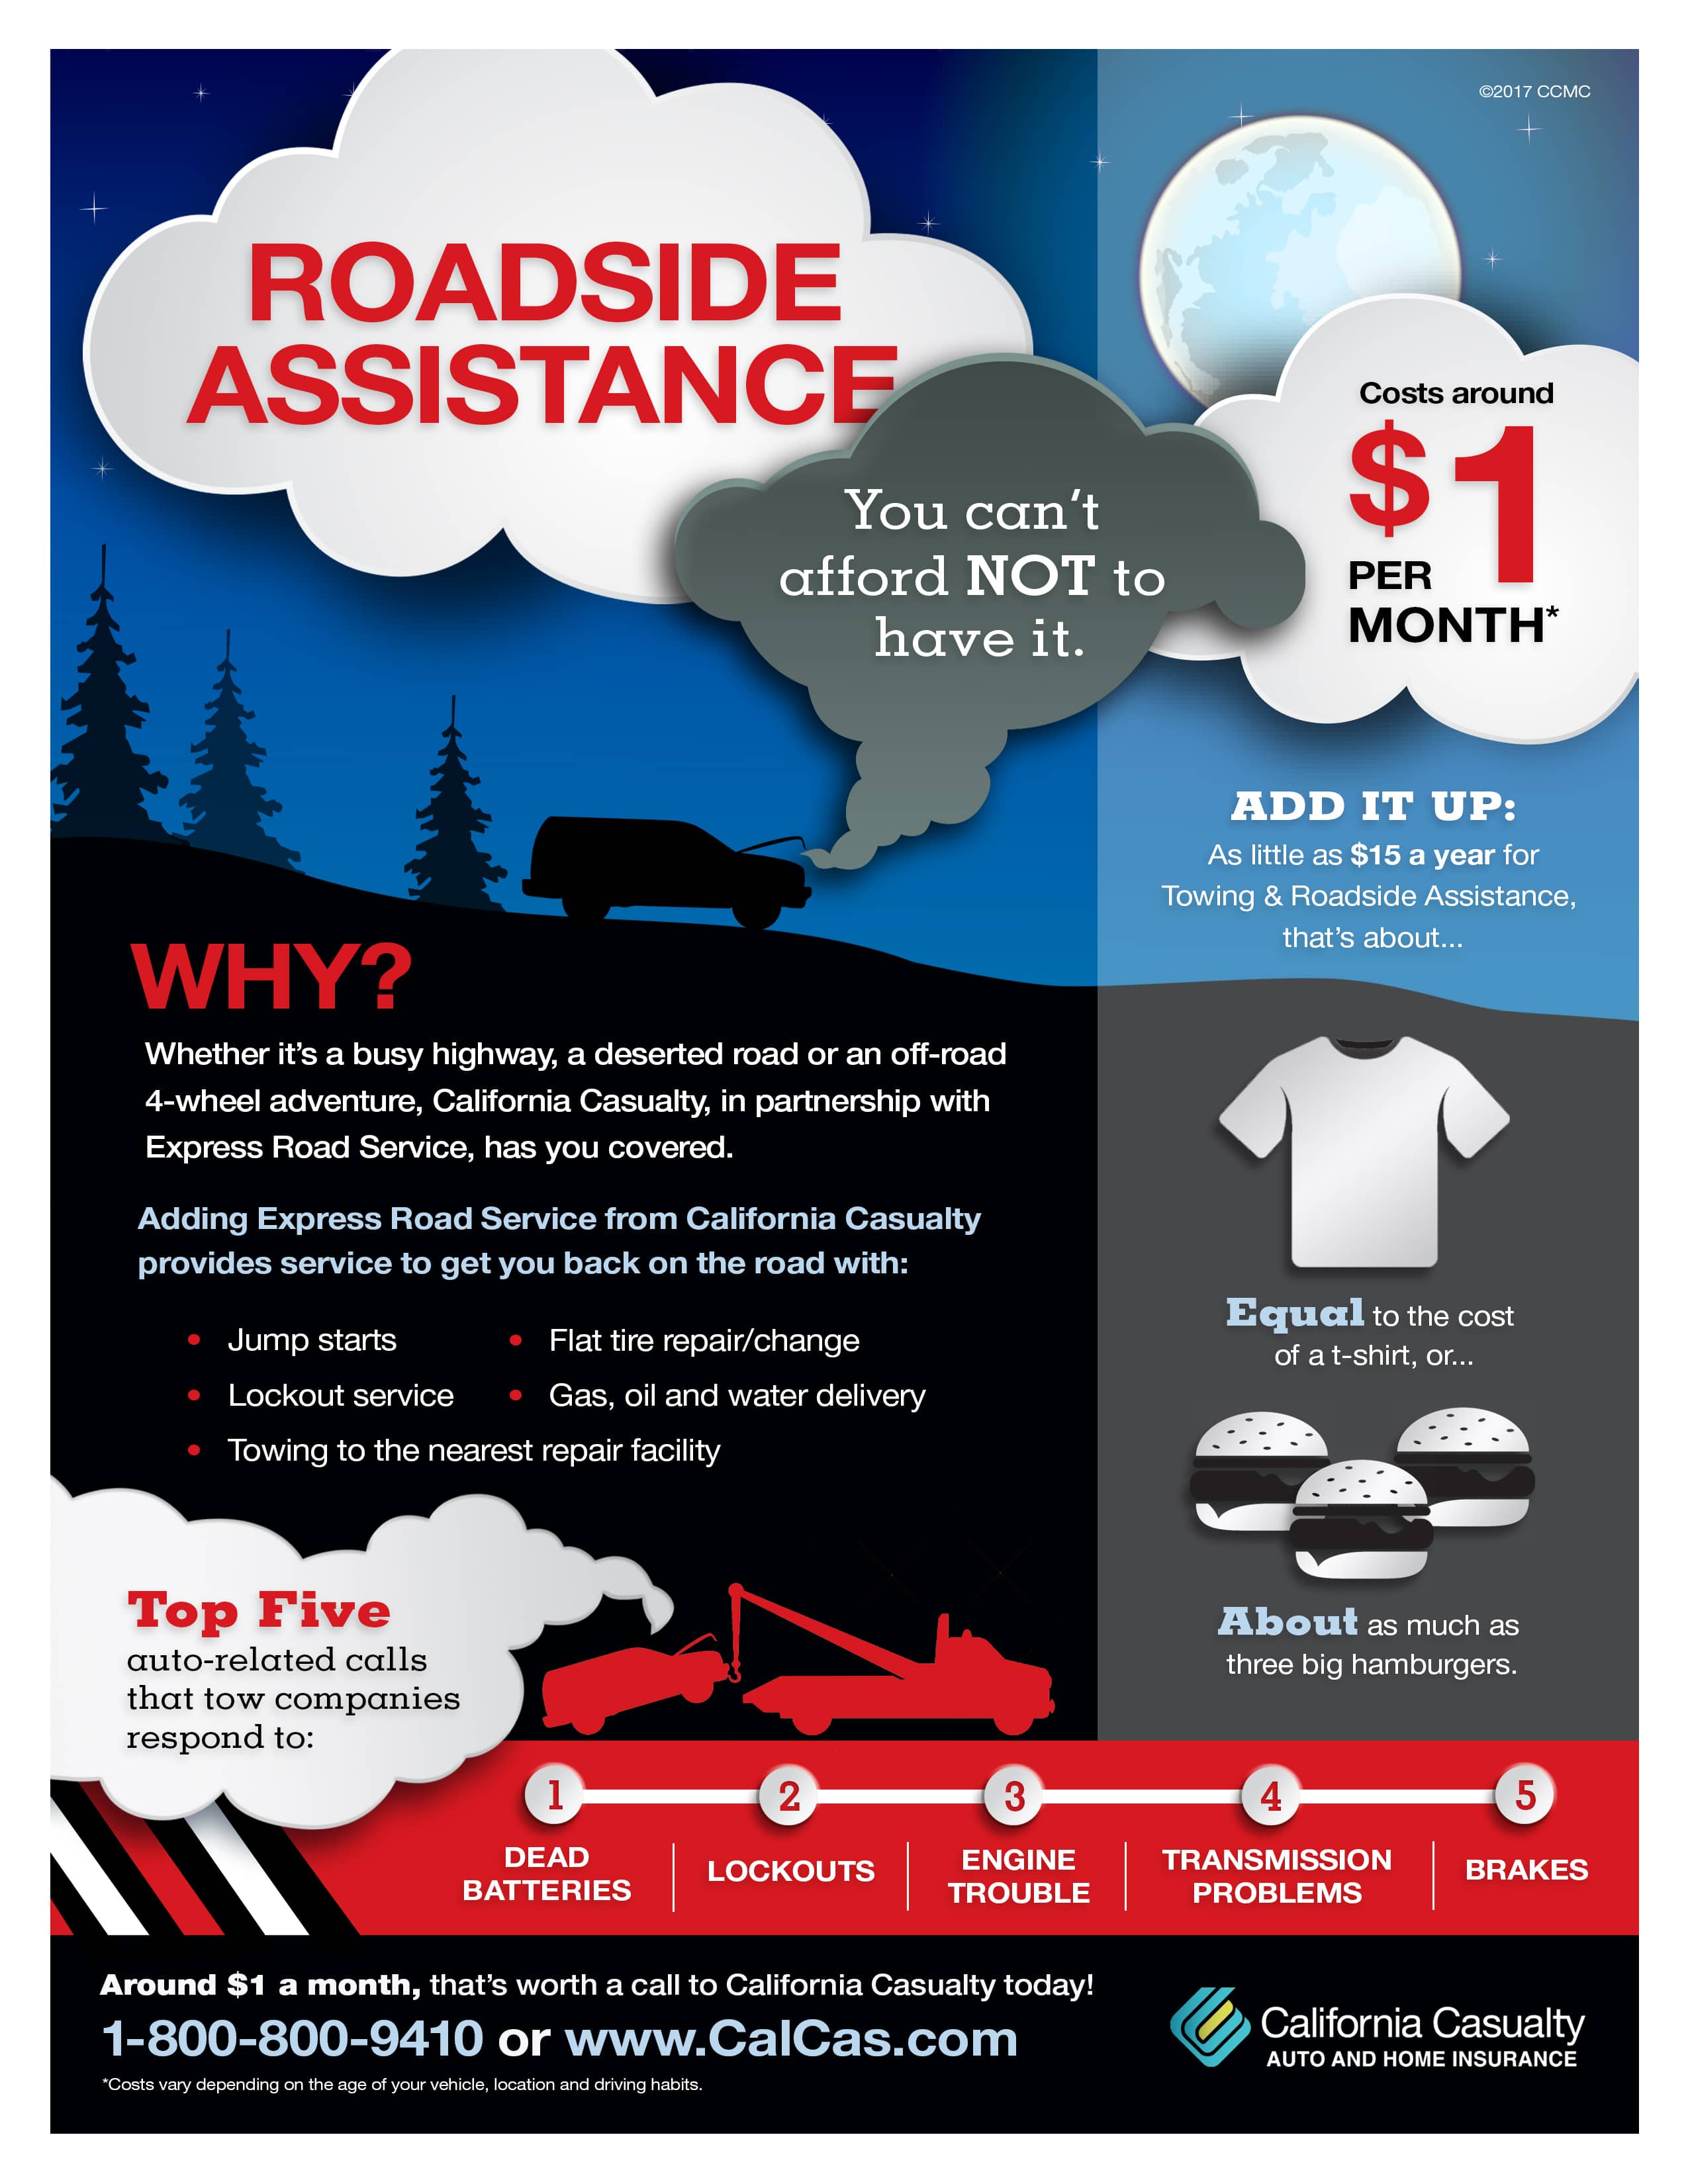
Breaking down on a busy street or highway can be dangerous. Roadside assistance is an add-on coverage that’s at your service 24/7 to help you get back on the road safely if you are left stranded due to an accident or car problems.
Whether you run out of gas, a tire blows out, or you are experiencing any other kind of car or engine trouble, roadside assistance has your back. Instead of spending money on an expensive tow, you can rest assured knowing that you are covered when you choose to add it on to your auto insurance policy.
Plus, when you add roadside assistance to your coverage you will pay as little as around $1 a month. This is a coverage you can’t afford to NOT have!
What Will Roadside Assistance Cover?
When you add- on Express Road Service to your California Casualty auto policy, you will be covered if you need assistance with
- Jump starts
- Lockouts
- Tire repair or change
- Gas, oil, and water delivery
- Towing to the nearest repair facility
And you won’t even have to remember to make additional payments to keep roadside assistance. Your cost of coverage will be rolled into your monthly premium to help make payments more convenient for you.
Talk to your insurance agent to understand what is covered. Ask about additional services and the exclusions and limitations when adding roadside assistance to your policy.
Why Do I Need It?
Roadside assistance offers you fast, reliable service available to you when you need it most. Here’s why everyone should add this coverage on to their auto insurance policy.
- Affordability. With annual prices as low as $1 dollar a month, you won’t even feel like you’re paying for additional coverage. Rates at these prices can’t be beaten even by other big-name clubs or associations like AAA.
- 24/7 hour service. No matter if your car breaks down at 12 a.m. or 12 p.m. you will never be stranded, roadside assistance will come to you at any time of day or night to help service or tow your vehicle.
- Peace of mind. If your car is older, or starts having mechanical issues you can have peace of mind driving to your destination (no matter how far) knowing that roadside assistance is a phone call away.
- Towing. Car tows are very common and can be costly if you do not pay for roadside assistance. The average cost for a car tow without roadside coverage is $109.
- Teen Driver Safety. If your family has a teen driver on the road, as parents you can breathe easier when handing over the keys knowing your young driver can call roadside assistance for help if the unexpected were to happen.
If you have an auto policy without roadside assistance, what are you waiting for? Call and add-on this cheap and essential coverage today at: 1.800.800.9410
This article is furnished by California Casualty, providing auto and home insurance to educators, law enforcement officers, firefighters, and nurses. Get a quote at 1.866.704.8614 or www.calcas.com.
by California Casualty | Auto Insurance Info |
Express Road Service from California Casualty is just another way we’re there for you when you need us. Check out these amazing benefits for around $1/month.
by California Casualty | Auto Insurance Info |
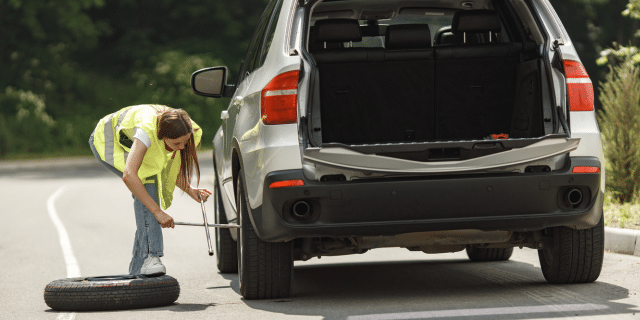
Nothing throws a wrench in your day like the sudden thump-thump of a flat tire. But instead of panicking or waiting for roadside assistance, imagine confidently pulling over, grabbing your tools, and getting back on the road in no time. With a little know-how and a few easy steps, you can change a flat tire like a pro—and we’re here to show you how.
Step 1: Pull Over Somewhere Safe
At the first sign of a flat, slow down and carefully pull over to a safe location. Aim for a flat, firm surface away from traffic—never on grass, dirt, blind spots, or curves. If it’s nighttime, look for a well-lit area to work more safely. Turn off your engine, engage the parking brake, and switch on your hazard lights.
Step 2: Gather Your Tools and Supplies
You’ll need a few essentials to get the job done:
You might also find it helpful to have:
- Wheel wedges
- Tire pressure gauge
- Flathead screwdriver
- Portable tire inflator
- Flashlight (for nighttime)
- Gloves (to protect your hands)
Most of these tools can be found in a compartment under the rear cargo area—check your owner’s manual for specifics. It’s a good idea to keep these items, along with jumper cables and other emergency supplies, in your trunk or car storage.
Important: Some newer vehicles don’t come with spare tires. Instead, they may have run-flat tires or a spray sealant and inflator kit. In these cases, you will not be changing a tire. With run-flats, the tire’s reinforced sidewalls will allow you to drive for a short distance at a lower speed to a shop where you can get your tire replaced. If you have a spray sealant and inflator kit, follow those directions for the temporary tire repair, and again, drive to a place for a replacement.
Step 3: Loosen the Lug Nuts
Use the lug wrench to loosen the lug nuts (turn counterclockwise), but don’t remove them yet. Do this while the car is still firmly on the ground for better leverage. If they’re on tight, you may need to use your body weight. If your lug nuts are hidden behind hubcaps, use a flathead screwdriver to pop off or unscrew the hubcaps. Always check your manual if you’re unsure.
Note: If you have wheel locks, you will need to use your wheel lock “key” (adaptor) to loosen the specialized lug nuts.
Step 4: Position the Jack
Find your car’s designated jack points—typically near the wheels under the frame—and place the jack on the metal portion of the car. Jacking up in the wrong spot can damage your vehicle or cause it to become unstable. If you have them, this is the time to put wedges or chock blocks behind the wheels for added support. If you’re lifting the front of the car, put the block behind the back tire. For lifting the back of the car, put the block in front of the front tire. Choose the opposite corner of where you’re going to lift.
Once the jack is in place, slowly raise the car until the flat tire is about an inch or two off the ground. Never crawl under the vehicle while it’s supported only by a jack. (Need a refresher on jacking up a car? Check out our blog on how to use a jack!)
Step 5: Remove the Lug Nuts and the Flat Tire
Now that the car is elevated, remove the loosened lug nuts completely. Keep them safe—an upturned hubcap works perfectly as a container. Give the flat tire a firm pull to remove it from the wheel hub.
Step 6: Put on the Spare Tire
Line up the spare tire with the wheel studs. Make sure the valve stem (where you add air) is facing outward toward you. Place the lug nuts back on, tightening them by hand to hold the spare in place.
Step 7: Lower the Vehicle and Tighten the Lug Nuts
Carefully lower the vehicle back to the ground and remove the jack. Then, use the lug wrench to firmly tighten the lug nuts in a crisscross (star) pattern to ensure even pressure. Consult your manual if you’re unsure about the pattern.
Step 8: Check Your Tire Pressure
Use your tire gauge to check the spare’s pressure—and while you’re at it, check the other tires too. If needed, stop by a gas station for a quick top-off or use a portable air compressor if you have one handy. If you have nitrogen-filled tires, you’ll need to head to a shop that offers nitrogen.
Step 9: Pack Up Your Tools
Make sure you return all your tools and supplies to their proper storage locations, so you’ll be ready next time.
Step 10: Remember: The Spare Is Temporary
If you’re using a smaller “donut” spare, drive carefully. Stay under 50 mph and get your tire professionally replaced as soon as possible. Even if you have a full-sized spare, it’s still smart to replace it quickly and reset your vehicle’s emergency kit. It’s also a good idea to periodically check your spare’s condition and pressure. (You’ll find the recommended PSI in your owner’s manual).
How to Help Avoid a Flat Tire
While you can’t always prevent a flat, you can minimize your risk by following these tips:
- Inspect Your Tires Regularly: Check for signs of wear, punctures, and bulges.
- Maintain Correct Tire Pressure: Follow the recommended PSI found in your owner’s manual or inside the driver’s side door.
- Rotate Your Tires: Every 5,000 to 8,000 miles helps ensure even wear.
- Avoid Road Hazards: Steer clear of potholes, debris, and rough surfaces when possible.
- Don’t Overload Your Vehicle: Excess weight strains your tires and increases the risk of blowouts.
Finally, protect yourself and your vehicle with the right insurance for added peace of mind. Safe travels.
This article is furnished by California Casualty, providing auto and home insurance to educators, law enforcement officers, firefighters, and nurses. Get a quote at 1.866.704.8614 or www.calcas.com.
by California Casualty | Auto Insurance Info, Travel |
Spring break is right around the corner, and for many travelers, renting a car is part of the adventure. Whether you’re heading to the beach, exploring a national park, or visiting family, a rental car provides the freedom to go wherever your journey takes you. But with rental costs fluctuating and unexpected fees lurking, how can you save money while still enjoying a stress-free ride? Read on to learn more.
1. Book early to lock in the best rates.
Rental car prices can skyrocket as demand increases, especially during peak travel seasons. The earlier you book, the better your chances of securing a lower rate. Many rental companies allow free cancellations, so you can reserve now and rebook if prices drop.
Pro Tip: Once you reserve your car, set a weekly calendar reminder to check if the rate has dropped. Then, as long as there are no fees, you can cancel and rebook.
2. Compare prices across multiple platforms.
Don’t settle for the first price you see. Use comparison websites like Expedia, Kayak, or Priceline to check rates across different rental companies. Also, visit rental agency websites directly—sometimes they offer exclusive discounts not available on third-party platforms.
3. Shop coupons and specials.
Many rental companies offer online coupons. Try sites like AutoSlash to do a search for those discounts. Also, if you bundle car, hotel and airfare, you can get additional savings. If you’re driving long distances, check out the weekly rate, which often averages out to be cheaper per day. See if there is a cost to returning the car early. Ask if there is a discount if you prepay. Just keep in mind that paying in advance could mean it’s nonrefundable.
Pro Tip: Follow social media accounts for car rental companies or sign up for their newsletters to get a heads up on specials.
4. Leverage membership discounts.
Are you a member of AAA, AARP, or a teacher’s union? Maybe you belong to a warehouse club or are a frequent flyer. These organizations negotiate for better rates on rental cars and provide discounts to their members. Additionally, some credit cards offer rental car benefits, including discounts and insurance coverage, which can help you save even more.
5. Avoid airport pickups.
Picking up your rental car at the airport might be convenient, but it often comes with higher fees. Airports have high demand for vehicles, which can drive up rates. Consider renting from a location a short distance away—many off-airport locations offer lower rates, and the savings could outweigh the cost of a quick rideshare or shuttle ride. Make sure to check that there is accessible transportation there before you book. Also find out if you can return the car to the airport without additional fees.
6. Choose economy cars and fuel-efficient models.
Opting for a smaller, fuel-efficient car not only saves you money on the rental itself but also helps reduce gas costs. Unless you absolutely need an SUV or a luxury model, stick with an economy or compact vehicle to maximize savings. Plus, since economy cars are typically the cheapest and the most likely to be booked, there’s a chance they may not be on the lot, and you’ll be upgraded.
7. Stick to one driver.
Rental car companies usually charge a fee to add a second driver. Some companies waive that fee if you are married or have a domestic partnership. You do need to show driver’s licenses with the same home address. Others will waive the fee for a spouse if you join their membership program. Sometimes, your membership in organizations such as AAA or Costco can get you a free additional driver too.
8. Be smart about insurance.
Rental companies often push expensive insurance coverage at the counter, but you may not need it. Check if your personal auto insurance or credit card offers rental coverage—many policies do. Just be sure to confirm the details in advance to avoid unnecessary charges. This also goes for rental car insurance, which can be an add-on to your travel insurance policy.
9. Skip the extras.
Rental companies love to upsell add-ons like GPS navigation, satellite radio, and roadside assistance. Most of these extras are unnecessary—use your smartphone for navigation, stream music via Bluetooth, and check if your existing auto insurance or credit card includes roadside assistance. If you’re traveling with a small child and need a car seat, bring your own or borrow one from a friend at your destination. That can save you as much as $10 per day.
10. Understand the fuel policy.
The “prepay for fuel” option might sound convenient, but it often leads to overpaying for gas. Instead, opt for the “return with a full tank” policy and fill up at a nearby gas station before dropping off the car. Just be sure to keep your receipt in case there’s a dispute.
11. Watch out for hidden fees.
Read the fine print carefully. Some companies charge extra fees for additional drivers, young drivers, early returns, or late drop-offs. Understanding these fees upfront can help you avoid unexpected costs.
12. Consider alternative car rentals.
Traditional rental companies aren’t the only option. Services like Turo and Getaround let you rent cars from private owners, often at lower rates than corporate agencies. There are also car sharing clubs which require a monthly fee. Just be sure to check the terms, insurance coverage, and reviews before booking.
Remember, whether you’re renting for a weekend getaway or a weeklong road trip, having the right insurance coverage is essential. Before you hit the road, check with your insurance provider to ensure you’re fully protected. Safe travels from all of us here at California Casualty!
This article is furnished by California Casualty, providing auto and home insurance to educators, law enforcement officers, firefighters, and nurses. Get a quote at 1.866.704.8614 or www.calcas.com.

by California Casualty | Auto Insurance Info, Helpful Tips, Travel |
You’re ready to hit the road, but your car has other plans—stuck in a snowbank with tires spinning. Before your frustration gets out of hand, take a deep breath. With the right techniques and a little patience, you can free your vehicle and get back on track. Here’s your step-by-step guide to escape the snow’s icy grip without breaking a sweat—or your car!
1. Stay Safe and Assess the Situation
Before doing anything, ensure you’re safe. Turn on your hazard lights and assess the situation. Are other vehicles nearby? Make sure you’re visible to others and have enough space to work around your car safely.
2. Clear the Exhaust Pipe
Check your car’s tailpipe for snow and ice. A clogged exhaust can cause dangerous carbon monoxide to back up into the vehicle’s cabin. Clearing it is a critical safety step before you start working to free your car.
Use a shovel or any sturdy tool to remove snow around the tires, under the car, and along the path you want to travel. Clearing as much snow as possible will make it easier to gain traction and move forward.
4. Try Melting the Snow
If the snow around your wheels is packed and icy, try sprinkling salt or a de-icing agent. Be cautious, as salt can cause rust on your vehicle, and some chemicals may be harmful to pets and the environment.
5. Add Traction
Improve your grip by spreading dry materials like sand, kitty litter, or even your car’s floor mats under the tires. These items can provide the friction needed to get your car moving.
Pro Tip: Lower your window slightly to listen for spinning wheels as you press on the gas. If you hear them spinning, it’s not working.
6. Choose the Right Driving Technique
Depending on your type of vehicle, you will want to take advantage of its strengths.
-
-
- 4-Wheel Drive: If your vehicle has a 4-wheel drive option, turn it on to deliver power to all wheels. Use a low gear in an automatic to reduce wheel spinning.
- Front-Wheel Drive: Turn your steering wheel left and right repeatedly to find a patch of traction.
- Manual Transmission: Start in second gear to reduce wheel spin and increase grip.
7. Turn Off Traction Control
Your traction control system can prevent your wheels from spinning, which helps in skids but can hinder your efforts when stuck. Temporarily disable it to give your wheels the power they need to move.
8. Rock Your Vehicle
Gently rock your car by shifting between forward and reverse gears. Apply light gas pressure—avoid flooring it—and stop if it’s not working after a few tries to prevent transmission damage.
9. Let Air Out of Your Tires
In extreme cases, slightly deflate your tires to increase surface contact and improve traction. Only do this if you’re near a place to reinflate them, as driving on underinflated tires can be dangerous.
10. Call for Roadside Assistance
If all else fails, it’s time to call for help. Roadside assistance professionals have the tools and expertise to safely free your vehicle.
After You’re Unstuck
Once your car is free, pull over in a safe spot and inspect your tires. Spinning wheels can pack snow and ice into the treads, making steering difficult. Use a snow scraper to clear them and restore proper grip. Don’t forget to turn your traction control back on before resuming your drive. Follow winter driving safety tips to prevent any future issues.
Be Prepared for the Future
Getting stuck in deep snow can damage your car’s transmission, battery, or drivetrain. Get your car checked out if you have been stuck in deep snow.
In addition, prepare for any future incidents. Keep a winter emergency kit in your vehicle, including:
- Ice scraper and snow brush
- First aid kit
- Flashlight and flares
- Blankets
- Tire pressure gauge
- Car jack
- Cell phone charger
- Kitty litter or sand for traction
Finally, make sure your vehicle is protected for winter with the right insurance. This will help add peace of mind. Safe travels.
This article is furnished by California Casualty, providing auto and home insurance to educators, law enforcement officers, firefighters, and nurses. Get a quote at 1.866.704.8614 or www.calcas.com.
