by California Casualty | Auto Insurance Info |
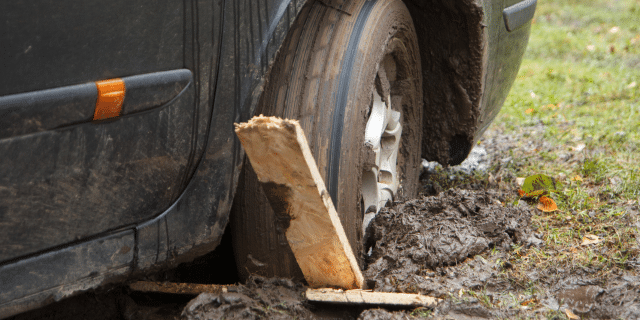
Stuck in the mud? Whether you veered off the beaten path or got caught in an unexpected downpour, finding your car’s tires spinning in place can be frustrating. But don’t hit the panic button just yet—getting unstuck is easier than you may think. Before you call for a tow, try these techniques to free your vehicle and get back on solid ground.
Why Vehicles Get Stuck in Mud
There are a few common reasons why your car might end up trapped in the mud:
- The ground is too soft or wet. After heavy rain or in naturally muddy areas, the ground may not provide enough support for your vehicle’s weight.
- Your tires don’t have enough tread. Worn-out tires struggle to grip the surface, making it easier to get stuck.
- You over-revved the engine. Spinning the wheels too aggressively can dig them deeper into the mud instead of propelling the car forward.
Different Types of Mud and Their Challenges
Not all mud is the same. Different types of mud can affect a vehicle differently:
- Clay-heavy mud: This mud is extremely sticky and can cake onto tires, reducing grip.
- Sandy or silty mud: This type of mud drains water faster but can create deep ruts.
- Deep standing water with mud: This mud can flood engine components, making escape trickier.
Steps to Get Your Vehicle Free
1. Stay Calm and Assess the Situation
The first thing to do is stay calm. You’ve got this. The first step is to see if you’re able to take care of the problem, or if you need to call for help. If it’s safe to do so, step out of the vehicle and check how deep your tires are stuck. This will help you determine the best method to get unstuck.
2. Clear the Mud Around Your Tires.
Do you carry a shovel in your car? If not, you might want to add one to your car emergency kit. If you have access to a shovel or trowel, use it to dig the mud away from your tires as much as possible. If not, move on to the next step.
3. Create Traction Under Your Tires
Your tires need something solid to grip. You want to give them some traction. Look around and see what you have that might be able to do so.
- Place floor mats, car carpets, sand, gravel, towels, or non-clay kitty litter under your tires. (You can also keep some of this in your car safety kit for future emergencies.)
- You can even try rocks, twigs, or branches if available.
- Position the traction aids in front or behind the tires, in the direction you’re trying to move.
4. Adjust Your Steering Angle
It could be that your tires are in a rut. By turning your steering wheel slightly, it can allow your tires to find a fresh patch of ground with better traction. Do that as a next step, before you apply the gas.
5. Gently Accelerate
You may be anxious to get out of there but don’t press too hard on the gas pedal. That can make the situation worse by causing the wheels to spin. Apply slow, steady pressure to see if your tires can gain traction.
6. Try the Rocking Method
If your car is still stuck, gently shift between drive and reverse to create momentum. This rocking motion can help you inch your way out. Try it a few times but stop if it’s not working so you won’t cause damage to the transmission.
- If your vehicle has winter mode, a differential lock or four-wheel drive, engage it for extra power.
- If you have a manual transmission, start it in second gear to reduce wheel spin.
- If you drive a rear-wheel drive car, shift some weight to the back (such as moving heavy items to the trunk) for better traction.
7. Consider Deflating Your Tires
Letting out a small amount of air increases the tire’s surface area, improving grip. Be careful not to over-deflate—aim to maintain at least 20 PSI to avoid driving on dangerously low tires once you’re out. Make sure to reinflate as soon as possible.
8. Call for Help If Needed
If none of these methods work, it’s time to call in the professionals. A tow truck can safely get your car out. Once your vehicle is free from the mud, inspect it for any damage. Check the tires especially for cuts or bulges. Get your car washed and consider a vehicle checkup if you are concerned.
Prevent Future Mud Problems
It’s not always possible to avoid an emergency like getting stuck in the mud, but these tips can help.
- Drive carefully. Navigate muddy roads with caution and avoid areas that could have deep mud, especially during heavy rains.
- Maintain your vehicle. Check your tires to make sure they have good tread. Replace them as needed.
- Carry essential tools. Keep a shovel, floor mats and other essentials in your car for emergencies.
Finally, protect your vehicle with the right insurance for added peace of mind.
This article is furnished by California Casualty, providing auto and home insurance to educators, law enforcement officers, firefighters, and nurses. Get a quote at 1.866.704.8614 or www.calcas.com.

by California Casualty | Helpful Tips, Homeowners Insurance Info |
Imagine catching a leaky roof before it becomes a flood or spotting a crack in the foundation before it threatens your home’s stability. A yearly home maintenance inspection empowers you to identify small issues early, saving you time, money, and headaches. With a simple checklist and a little effort, you can keep your home in tip-top shape and avoid costly surprises down the road. Use this list as your guide to stay ahead of potential problems.
Gather Your Supplies
- Binoculars (for roof inspection)
- Flashlight (for inspecting dimly lit spaces)
- Ladder (to reach roofs, gutters, and higher areas)
- Electrical tester (to check outlets and circuits; ask your local hardware store for guidance)
- Moisture meter (to detect hidden dampness)
- Screwdriver set (for tightening fixtures and covers)
- Smartphone or camera (to document areas of concern)
- Notepad and pen (for notetaking and listing repairs that need to be made)
- Conduct a visual inspection of your roof from the ground with binoculars. If necessary, climb the ladder to get a closer look.
- Look for missing or damaged shingles, rusted or damaged flashing around vents, chimneys, or skylights.
- Check for signs of moss or algae and debris accumulation.
- Clear any debris from clogged gutters and downspouts. Check that your gutters, gutter guards, and downspouts are in good condition.
- Make sure the downspouts direct water away from your foundation.
- Look under your roof from inside the attic for water stains, wet insulation, or visible leaks.
Exterior: Siding, Windows, and Doors
- Inspect siding for cracks, warping, or peeling paint.
- Look for crumbling stucco, brick, or loose mortar.
- Check where two materials (like siding and brick) meet. These areas are prone to water infiltration.
- Examine caulking and weather stripping for cracks or gaps. Check seals for drafts or moisture buildup.
- Test windows and doors to ensure they open and close smoothly without sticking.
Foundation and Grading
- Walk the perimeter of your home. Check that the ground slopes away from the foundation to prevent puddles of standing water.
- Look for cracks, bulges, or other structural concerns. Small hairline cracks are normal, but large gaps or shifts require professional attention.
- Monitor retaining walls for signs of leaning or crumbling.
Walls, Ceilings, and Floors
- Inspect interior walls and ceilings for discoloration, bubbling paint, or peeling wallpaper.
- Look for cracks above doors or windows, which could indicate the foundation settling.
- Check floors for unevenness, soft spots, or squeaks.
- Look for stains or damage that may signal underlying issues.
- Pay extra attention to beams, joists, and trusses for structural damage.
Basement, Attic, and Crawl Spaces
- Look for signs of moisture or mold. Check walls and floors for dampness or mildew.
- Ensure attic insulation is intact and not blocking vents.
- Make sure there are no signs of pests.
- Examine floor joists and roof supports for sagging, cracking, or insect damage.
- Verify that crawl spaces are free of standing water and adequately ventilated.
HVAC System
- Test heating and cooling systems. Turn them on to check for unusual sounds or odors.
- Replace air filters and clean vent covers.
- Inspect the furnace and air conditioning units for rust, leaks, or wear.
- Verify that bathroom and kitchen exhaust fans vent to the exterior and are free of debris.
Electrical System
- Test outlets with an electrical tester.
- Inspect the electrical panel for scorch marks, loose wires, or burning smells.
- Replace batteries in smoke and carbon monoxide detectors and test that they work.
- Secure loose outlet covers and check visible wiring for fraying or damage.
Plumbing System
- Check faucets, showerheads, and toilets for leaks, drips or corrosion.
- Check for loose handles or connections.
- Test water pressure and observe how quickly sinks and tubs drain.
- Inspect under sinks and around toilets for water stains, dampness, or mold.
Appliances
- Garbage disposal: Clean thoroughly and check for blockages.
- Water heater: Flush to remove sediment and extend its lifespan.
- Refrigerator and freezer: Clean coils and empty drip trays.
- Fire extinguishers: Check the pressure gauge and expiration date.
If you’re not comfortable doing a home inspection yourself, consider hiring a professional home inspector. This typically costs about the same as when you hire an inspector to check out a home you’re going to buy. When you are ready to make repairs, and you cannot do them yourself, make sure to hire a reputable contractor.
Finally, your home is one of your greatest investments. Be sure to protect it with the right insurance for added peace of mind.
This article is furnished by California Casualty, providing auto and home insurance to educators, law enforcement officers, firefighters, and nurses. Get a quote at 1.866.704.8614 or www.calcas.com.

by California Casualty | Auto Insurance Info, Safety |
It’s a moment every driver dreads: the sudden thud, the jolt of your car, and the sinking realization that you’ve hit an animal. Your heart races, and questions flood your mind—what should you do next? Knowing how to respond calmly and responsibly in this situation can make all the difference. Let’s break down the steps to take if you find yourself in this unfortunate situation.
Honk and brake.
You see a deer—or a raccoon, coyote or other animal. Your first instinct might be to swerve. Think twice, as it could put you directly into oncoming traffic or cause you to crash into the trees. The best thing to do is sound your horn and hit your brakes. The hope is the animal will be startled and run, or that you’ll slow down enough to lessen the impact. The only time you should swerve is for animals, like moose, that weigh 1,000 lbs. or more.
Pull over to the side of the road.
Hitting an animal can be nerve-wracking. Do your best to remain calm. You’ll want to pull over safely to the side of the road as soon as possible. Turn on your hazard lights. Put up flares if you have them so you’re visible to other drivers. If it’s dark and the animal is lying on the road, you can point your headlights toward it, so the animal is visible to other motorists.
Check yourself and your passengers for injuries.
You just experienced a collision. Check yourself and your passengers for injuries, and if anyone needs immediate medical attention, call 9-1-1. Otherwise, attend to any pressing injuries using your first aid kit.
Call the police.
Report the accident to the police. (In some areas, there are fines for not reporting collisions with animals who are 55 lbs. or more.) You will want to let them know if the animal is obstructing the road and is a danger to other drivers. The police will file a report which you can use when you submit an insurance claim.
When it’s safe, get out of your vehicle.
The only times you shouldn’t exit your vehicle is if you hit a predatory animal like a mountain lion or bear, or if conditions outside are dangerous. When you feel comfortable, get out of your car and survey the scene. Carry a light so that any approaching vehicles will be able to see you.
Do not approach the animal.
Take stock of the animal from a safe distance but do not approach. If the animal is hurt, it could be afraid, dangerous and unpredictable. Do not try to move the animal; wait for police or wildlife control assistance. If you hit a farm animal or a family pet, there may be a tag or other identification. This will allow you to contact the owner. Owners of farm animals that are not correctly corralled could be charged with negligence and could be required to pay for your damages.
Take photos of any damage.
Collisions with animals could cause significant damage to your vehicle, including dents you can see and issues you cannot. Take pictures of any damage to your car’s body or bumper. Also take photos of the area around the accident. Make notes about what happened, including road conditions, exact location, date, time, and any other details that tell the story.
Contact your insurance company.
If your car is damaged, you may want to file a claim with your insurance company. You will need comprehensive coverage for collisions with animals. This is an optional addition to your standard vehicle insurance policy. If you don’t have this coverage, you may want to consider adding it.
Take your car to a reputable auto body shop.
You had an accident, and you want to make sure there’s no damage below the surface that you cannot see. If you have a diagnostic scan tool, you can use it to pinpoint issues and know whether your car is safe to drive. You will want to get your car checked out with your trusted mechanic to make sure everything is still working well.
Reduce Your Risk of Hitting an Animal.
You can take steps to reduce your risk of hitting an animal in the future. Follow these guidelines.
- Animals are more active at dusk and dawn. Be alert during these hours.
- Pay attention to animal crossing signs. These are areas where animals are likely to be.
- Look for movement along the side of the road. That could indicate an animal nearby.
- Be careful when roads are slippery, and visibility is reduced.
- Use your brights to see farther at a distance, if other cars are not coming the opposite direction.
- Ask your passengers to watch out for animals too. Another set of eyes is always helpful.
- Avoid distractions that could take your attention away from the road.
Finally, make sure your vehicle is protected with the right insurance. This will help your peace of mind should you get into an accident. Safe travels.
This article is furnished by California Casualty, providing auto and home insurance to educators, law enforcement officers, firefighters, and nurses. Get a quote at 1.866.704.8614 or www.calcas.com.
by California Casualty | Helpful Tips, Homeowners Insurance Info |
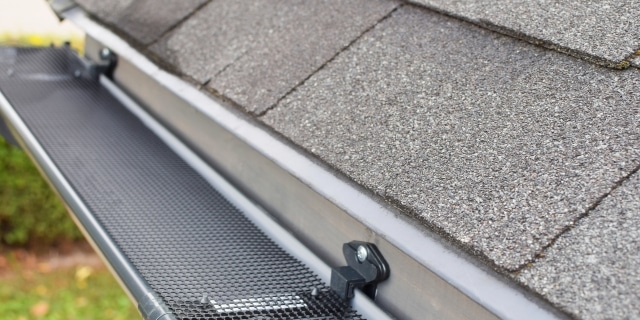
Those beautiful autumn leaves you’ve been admiring are not so pretty when they’re clogging your gutters. Acorns, leaves, branches, and other debris have a way of piling up, leading to blockages that can cause water damage and costly repairs. Enter gutter guards—a practical solution that keeps debris out while letting rainwater flow freely. Here’s a quick guide to gutter guards, including why autumn is the best time to check and clean your own gutters.
What exactly are gutters?
Gutters are channels along the edge of your roof that direct water away from your home. They include downspouts that bring water down to the ground, moving it at least 5-10 feet away from the foundation. When gutters get clogged, they no longer work the way they should. Water could stay pooled in the channels or move in ways that negatively affect your home. Clogged gutters can lead to expensive problems: soil erosion, basement flooding, structural damage, roof damage, siding damage, and foundation issues. A buildup of debris could also increase the risk of a fire. Luckily, there is an easy way to protect your gutters from getting clogged – gutter guards.
Types of Gutter Guards
There are many different types of gutter guards. Some can be self-installed, and others require a professional. Below is a brief description of the main kinds along with their pros and cons. (Check the warranty on your shingles before you install a gutter guard that requires attaching directly to shingles with screws or nails as that could potentially void it.)
Screen Guards
This is like a window screen for your gutters. The screen keeps out debris while the holes let the water pass through.
Pros: These guards are affordable and can be self-installed.
Cons: Dirt and small debris can still pass through the screen and get in your gutter. These guards need to be removed and cleaned at least once a year.
Micro-mesh Guards
Micro-mesh guards are like screen guards, but with holes that are much tinier. They are particularly good at keeping out pine needles and dirt, which can slip through larger openings. These guards are usually made of stainless steel and other durable materials.
Pros: Micro-mesh guards are low maintenance, and long lasting. They are easy to clean and should be cleaned every 3-12 months.
Cons: They require professional installation.
Reverse-Curve Guards (Surface Tension Guards)
These guards are attached beneath the shingles, and they go over the gutter and curve back a little. The curve creates a hood, so debris doesn’t get into the gutter, but the unique design lets the water seep through.
Pros: These are long-lasting and low maintenance guards.
Cons: Reverse-curve guards require professional installation. They also are highly visible and could affect your home’s aesthetic.
Brush Guards
These guards are made of stiff brushes that point up inside your gutters. The bristles catch debris as the water passes through.
Pros: They are easy to install and remove for cleaning.
Cons: These guards require frequent cleaning. Small debris can get caught in the brushes’ bristles, and these guards can be tough to clean as a result.
Foam Guards
This triangular-shaped foam fits inside your gutter to prevent leaves and other debris from lodging there. It’s usually made from polyurethane and has a spongy texture that allows water to flow through. Some foam guards restrict water flow more than others.
Pros: These are affordable and easy to install. They are good at blocking large debris.
Cons: Small debris can enter through gaps between the foam and gutter walls. The foam also can break and is susceptible to mold due to dampness. These need to be replaced every 1-2 years, depending on weather conditions in your area.
DIY vs. Professional
Should you install your own gutter guards or hire a professional? Here are some things to consider.
Choose DIY gutter guards and install them yourself if:
- You want or need to save money.
- You’re generally handy and comfortable on a ladder.
- Your roof is easy to access.
- You like the choices available for DIY. You can find most at your local home improvement store.
Hire a professional to install your gutter guards if:
- You have the budget for professional installation, and you prefer the convenience.
- You want a warranty to show the installation was done correctly and that will address potential future issues.
- You want a higher quality gutter guard than is available DIY.
- Your roof is unusually steep or is difficult to access.
- You have concerns about doing it yourself.
Before the Installation
The best time to install gutter guards is late summer and early fall. This helps prepare for the large volume of leaves that start coming down during the season. Before the installation, you will want to clean and check your gutters.
Cleaning your gutters is part of fall home maintenance. It helps to ensure that your home is ready for winter storm season and severe weather. Here’s a quick overview of how the process is done.
- Gather your supplies: a bucket for debris, trowel or gutter scoop, garden hose with spray nozzle, latex or waterproof gloves to protect your hands from wet debris, safety eyewear, and a sturdy ladder.
- Start at the downspout. Use your gloved hand or a trowel to remove leaves, twigs and packed material.
- Then go up to roof level on your ladder. Use your gloved hand to clear large debris like leaves or twigs. Use the trowel for compacted debris.
- Remove and clean the downspout strainer.
- Flush the downspout and the gutter with water from your hose.
- Look for leaks, making sure water flows freely through the downspout. You will want to repair any issues before you add gutter guards.
- Inspect your gutter for rust spots or peeling paint which could show signs of deterioration. Again you will want to address any issues and potentially replace those parts before adding the guards.
- Look for mold or mildew near the foundation which could mean water is getting in there. That could signal a larger problem.
Ready to start the project?
Once you have clean gutters without any issues, you are ready to protect them with gutter guards. Measure your gutters so that you will be able to purchase the right length of gutter guards. If you’re doing a DYI installation, make sure to fully read and understand the instructions. Watch tutorials and online customer reviews for a heads up on potential mistakes. Know that installing gutter guards can take anywhere from a couple of hours to a couple of days. If you’re choosing a professional installation, make sure to get several estimates and ask for references to avoid scams.
Your home is your greatest investment. Keep it fully protected for added peace of mind.
This article is furnished by California Casualty, providing auto and home insurance to educators, law enforcement officers, firefighters, and nurses. Get a quote at 1.866.704.8614 or www.calcas.com.

by California Casualty | Helpful Tips, Homeowners Insurance Info |
When it comes to house hunting, preparation is key. Whether you’re a first-time buyer or an experienced one, the right tools can make all the difference. From capturing details to measuring spaces, here’s the gear you need to ensure a smooth and successful search for your new home.
Tape Measure
While you can use an app on your phone to measure a space, it will be less accurate than using a traditional metal tape measure. You can buy one at any hardware or big box store. Before you go house hunting, make sure to measure your furniture so you’ll know whether it will be right for the homes you are touring. For your potential new home, here are some considerations.
- How wide are the door openings? Will your furniture fit through?
- Measure the rooms where you will be bringing furniture. Do you have sufficient space to arrange them the way you’d like?
- Measure the appliance spaces if you are bringing your own washer-dryer, refrigerator, etc. to ensure they will fit.
Camera/Phone and Notepad
You don’t want to rely on photos from the listing. Those are staged. Speak to your agent and ask if you can take photos. You also don’t want to rely on your memory. Use your phone or a notepad to take notes. You also can make quick sketches.
- Jot down things you like and don’t like about each home.
- Sketch out floorplans. Mark locations of windows and doors for future reference.
- Take photos of the house and rooms from different angles.
- Pro tip: Bring along printouts of online listings so you won’t have to write everything down.
A Level
Homes are never completely level. They settle over time. However, you shouldn’t find sloping floors, warped walls or cabinets that do not appear straight. You can buy a pocket level, a measuring tool that shows whether a surface is perfectly parallel.
- These tools typically have a bubble of air suspended in a vial of liquid. When a surface is level, the bubble will be within the guidelines. There are digital and laser levels, too, which are more expensive.
- Place your pocket level along the floor, on counters, or anywhere else that should be a horizontal surface.
- Look for the space between the doors and the floor as they swing out. Is the gap wider at any point?
- Floors that are not level could signal larger structural problems. Do your due diligence if you are buying a home in that condition.
Moisture Meter
Moisture problems aren’t always obvious and can be hidden. Bring along a moisture meter and you can measure the amount within the home. You can buy these meters at a hardware or big box home store. Choose one without pins so that you won’t put holes into a home you might not be buying.
- Moisture meters usually go from 1 (dry) to 100 (wet). Anything at 17 or above is a cause for concern. It could indicate water damage and leaks.
- The moisture meter must contact the surface to provide an accurate reading. There should be no visible moisture on the surface being tested.
- Place your meter flat against a surface such as wood or drywall. Try it in different places as you may find varying moisture levels.
- Pro Tip: Go house hunting after it rains. You’ll see where water collects around the house and in the gutters, and you may observe moisture or leaks inside.
Outlet Tester
This handy tool checks that each contact in the outlet is connected to the correct wire. It can identify several common wiring errors. You can buy a standard receptacle tester that plugs into an outlet or a non-contact voltage tester. Always be careful when performing tests on a live outlet.
- Plug your tester into an outlet. Repeat for several outlets throughout the home.
- A series of lights on your outlet tester will light up. Read the key code to determine what the lights mean. In some cases, an alarm will sound.
- If you do get a concerning reading, that means there are likely issues with the wiring in the house.
- You can use that additional anticipated expense to bring the price down, or you may choose to walk away from the potential problem.
Water Pressure Gauge
With low water pressure, showers and laundry will be longer and more frustrating. Low pressure also could signify a problem with the plumbing. Bring along a water pressure gauge to check out whether this is an issue in your potential purchase.
- If the water comes from a municipal utility, you can use an outdoor hose spigot near where water enters the house. If water is from a well, use a faucet close to the tank.
- For the most accurate reading, make sure water isn’t being used elsewhere in the house, such as with laundry or dishwashers.
- Do not test from a hose. Make sure your pressure gauge screws directly onto the spigot or faucet and that the seal is tight.
- Turn the water on all the way and read the gauge. A normal reading is from 40-80. Anything outside that range is cause for concern.
Flashlight
Even well-lit homes have dark corners and areas that aren’t easily seen. If you’re considering a purchase, you want to see everything—the good and the bad. Bring a pocket-sized flashlight or use the light on your phone to peek into dark areas.
- Look under appliances, in corners, dark basements, etc.
- Look for spiders, mold and any potential problem areas.
- A mirror can help you peek around corners.
- Pro Tip: Bring a UV flashlight and shine it on carpets to reveal places where pets have made messes.
Looking for a new home is an exciting time. Should you have questions about protecting your new investment, don’t hesitate to reach out to an agent for the right policy.
Happy house hunting!
This article is furnished by California Casualty, providing auto and home insurance to educators, law enforcement officers, firefighters, and nurses. Get a quote at 1.866.704.8614 or www.calcas.com.
