by California Casualty | Homeowners Insurance Info |
You probably don’t think much about the air you breathe in your home, but maybe you should. That air can be filled with tiny debris- including dead skin cells, pollen, dirt, and bacteria, and breathing too of it much over time could be unhealthy. Fortunately, your home’s air filters trap these particles, helping keep your whole family healthy.
What exactly is floating in the air?
-
- Dust – We see it on our tables and abandoned trinkets on our mantle, but where does dust come from? The bulk of dust varies home to home, but basically dust is ‘anything that can flake off’ including dead skin cells, pet fur, food, dirt, pollen, pieces of books, carpet upholstery, debris from outside, etc. If not properly cleaned, mold, bacteria, and dust mites are all likely to inhabit dust and pollute your air.
- VOCS – Your furniture, your belongings, and the building materials in your walls also give off gases. These are known as VOCs, volatile organic compounds. They are floating in the air and affect your air quality. You probably also are breathing in gases released from cooking and cleaning. In addition, pollutants can travel in from outside. You might even have mold if there is humidity in your home.
You won’t necessarily smell or see any of these, and exposure to these particles is pretty much unavoidable. Over time, these compounds can build up in your system and lead to illness. That’s why air filters are so important. They can trap alot of the unhealthy particles. (They won’t however trap mold. You will need a separate treatment to get rid of the source of the moisture and remove the mold.)
What are air filters?
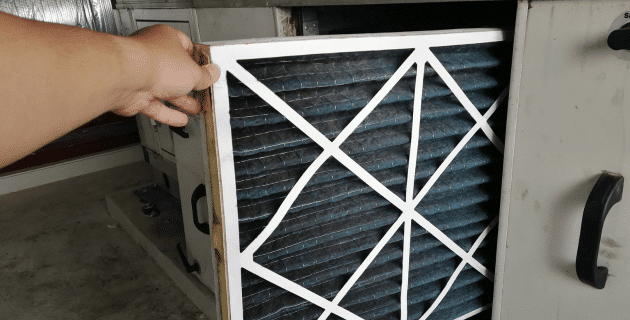
Air filters resemble rectangular cardboard frames filled with a material that looks and feels like pleated or woven coffee filters. When air is forced through the filter, the particles become trapped in the material. You’ll find air filters in your heating and cooling system, and as part of your furnace. Typically, a house will have one or two intake vents that require an air filter but you may have more depending upon the number of floors.
One size does not fit all.
Air filters come in different standard sizes and thicknesses. The measurements are printed right on their frames. Check the size of your vent openings so you’ll know which ones to buy. Air filters work best when they fit snugly. That way air goes through it and doesn’t leak around it. However, you should not have to bend or crush the filter to make it fit. While filters range from about one to five inches in thickness, most HVAC systems are built for one-inch thicknesses.
What are air filters made of?
Air filters are made from various materials, which allows them to collect different-sized particles. Most filters are disposable but there are some that are considered permanent and can be cleaned and used again. Here’s what you might find at your local hardware store:
-
- Disposable fiberglass: The most common type, this collects bigger particles.
- Disposable pleated: This is made of cotton or polyester, and is able to pick up large and small particles. It is the most affordable.
- Disposable electrostatic: This type has electrically charged fibers to collect smaller particles. It is slightly more expensive than the disposable pleated.
- Permanent electrostatic: This type is washable and can be reused. While you need to clean it regularly, you also will need to replace it every 6-8 years. It’s more expensive than disposable filters.
- High efficiency pleated: This type is thicker than many others, as much as 4-5 inches, which doesn’t work for a lot of systems. It can trap the smallest particles, and is more expensive.
How good are they at trapping particles?
Air filters come with a rating scale that tells how well they trap particles. This rating is called MERV, short for Minimum Efficiency Reporting Value. MERV ratings were established by the American Society of Heating, Refrigeration, and Air Conditioner Engineers.
-
- MERV 1-4 provides the basic level for the lowest cost.
- MERV 6-8 offers good filtration and is most commonly used in homes.
- MERV 9-12 is above average and can trap smaller particles.
- MERV 13-16 offers the highest quality and removes particles as small as 0.3 microns.
It’s important to note that the higher the MERV rating, the lower the airflow. That means your system will have to work harder, which could be more expensive and also lead to a shorter system lifespan. Consult a professional HVAC technician to provide a recommendation for your system and needs.
How to change your filters
Changing an air filter is quick and easy. Follow these steps. Use a ladder if the vent you are trying to reach is high up.
-
- Turn off your furnace.
- Locate the filter compartment. Remove the door or service panel.
- Slide the old filter out and put the new one in.
- Use a rag to clean any dust on the vent.
- Repeat with intake vents throughout your home.
- Turn your furnace back on.
What if your filter looks clean when you go to change it?
-
- Check and make sure it’s fitting well with no gaps.
- Make sure it’s not upside down. Arrows should point toward the fan or your system.
- Try a filter with a higher MERV rating to catch more.
How often should you change your filters?
A clean air filter makes your heating and cooling system more efficient. This can save you money, as much as $9-$22 a month. Manufacturers usually recommend changing your air filter every 60-90 days. However, if you have pets or allergies, you may want to replace them more frequently. Create a calendar alert so you will know when to change yours.
Pro Tip: Hold your filter up to the light. If you can’t see light through it, it is time to change it.
In addition, you may want to add pet-friendly plants that also help with indoor air quality. Finally, make sure to protect your home with the right insurance for added peace of mind. After all, your home is your greatest investment.
This article is furnished by California Casualty, providing auto and home insurance to educators, law enforcement officers, firefighters, and nurses. Get a quote at 1.866.704.8614 or www.calcas.com.

by California Casualty | Homeowners Insurance Info |
If you’re like most people, you can’t go a day—much less a couple of hours—without your cell phone or laptop. They’re an integral part of our lives. That’s why we want to keep them safe, and if something happens to them, we want to make sure we can get a replacement without spending a fortune.
That’s where insurance comes in. Renter’s insurance protects your personal belongings like cell phones and laptops. However, the protection only extends to certain situations and at certain levels. Here’s what you need to know.
Personal Property Coverage
The part of renter’s insurance that protects your cell phone and laptop is personal property coverage. Personal property coverage covers your possessions for certain risks called “perils.” (See the next section for the list of covered perils.) If your laptop and/or phone are stolen, or damaged by fire/smoke or other covered “perils,” your policy will pay for them, minus your deductible.
With personal property coverage, you choose the amount of coverage based on how much your stuff is worth. The good thing is that your possessions are insured whether they’re at your place or away from it. So, if you’re traveling with your phone or laptop, they’re still covered for those named perils. However, there are limits for these items when they are in your car, so it’s recommended that you not leave them there to avoid broken car windows and theft.
Covered Perils
The list of covered perils can vary based on your policy. Common covered perils include: fire, lightning, smoke damage, explosion, windstorm or hail, riot or civil commotion, theft and vandalism. If it’s not listed on your policy, it’s not covered.
Wear and tear and negligence are not covered by renter’s insurance. Therefore, if your phone or laptop is old, if you misplaced it, or you caused the damage, it won’t be covered.
Replacing Your Phone or Laptop
Your policy will specify either actual cash value or replacement coverage for your personal property. Actual cash value is the amount the item is worth, minus depreciation for its age. It will probably not be enough to replace the item. Replacement value is the amount that you would need to purchase a similar make and model. It will cost a little more for a policy that provides replacement coverage.
Deductibles
A deductible is the amount that you are responsible for, before the policy pays anything. So, before you get reimbursed for your possessions, you pay the deductible out of your pocket. Your deductible could be $250, $500 or more. You have a choice on the amount of the deductible. The lower the deductible, the more expensive the policy.
In the case of your cell phone, it’s possible that the deductible may be close to the cost of replacement. If your deductible is $500 and the cost of a new phone is $550, it may not make sense to file a claim. You’d only get $50 from the insurance company, and it’s likely that filing a claim can raise your future premiums.
Policy Limits
Your policy does not have a limit for how much it will pay for a laptop, cell phone or personal electronics, unless they are left in your car. In that case, the maximum your policy will pay for all of the electronics combined is $1,500. If your electronics are worth more, consider adding extra coverage to your policy.
Personal vs. Work
Personal electronics, including laptops and phones, will be covered by your renter’s policy. However, for work laptops and phones, there is coverage on the renter’s policy for business property. Business property on premises is limited to $2,500, and $1,500 away from the house but not in a car, and similarly at Starbucks or the library.
If you own your laptop and phone, and you use them for your home business, you need to insure them for that purpose. You can do that with a home business endorsement to your policy. If your employer owns the laptop or phone, they will likely determine who replaces or repairs them. Your insurer can add an endorsement called Special Computer Coverage that will provide the computer with open perils (covered unless excluded). This is only for computers and not cell phones.
When You File a Claim
You can file a claim for any of the covered perils. If your phone or laptop is stolen, you will need to file a police report. Your insurer will then order a copy. If your phone or laptop is damaged, you will need photos of the damage. Your insurance company will request the date of purchase, and where you bought your electronics. If you have photos of the owner’s manual, that can help prove that you own the computer or phone. A claims adjuster will talk you through the process. It typically takes weeks so you will need to make arrangements for a temporary replacement for your phone or laptop.
A Final Word
Not all renter’s insurance is the same. Some policies cover more than others and costs vary. Check with your insurance provider to find out the options.
Renter’s insurance is surprisingly affordable. For as little as $10 a month, you can get a renter’s policy at California Casualty. The cost varies depending upon the coverages you choose, the deductible, your financial responsibility score, and multipolicy discount. Even your location can have an impact. Areas with higher crime rates will have higher insurance rates.
This article is furnished by California Casualty, providing auto and home insurance to educators, law enforcement officers, firefighters, and nurses. Get a quote at 1.866.704.8614 or www.calcas.com.

by California Casualty | Homeowners Insurance Info |
You’ve bought your dream home and it’s time to get it insured. You want to choose the right coverage to fully protect your investment. While you have a basic idea of what home insurance probably covers, you may not know the particulars.
A homeowner’s policy is actually a “package” of coverages. It protects your home from specific events that can damage your property, and provides additional living expenses if you are unable to live there due to an insured loss. It also protects your personal belongings. In addition, your homeowner’s policy covers you for lawsuits or liability claims that might otherwise be your responsibility if you accidentally injure other people or damage their property. Here’s the breakdown from A to Z (or in this case, F).
Coverage A: Dwelling
Dwelling coverage refers to the structure of your home. This includes the roof, walls, floorboards, cabinets, and bath fixtures. The easiest way to think about it is that if you could tip your house upside down, the dwelling is everything that remains attached.
What is covered: This insurance covers open perils. That means a loss is covered unless it’s excluded by your policy. Coverage A generally covers direct physical loss due to fire/smoke, lightning, windstorms and hail, explosions, vandalism and theft. If one of these perils destroys your home, your insurance provider will pay to rebuild it up to your policy limits.
What is not covered: If it is listed as an exclusion, it is not covered. Typically, natural disasters such as flooding and earthquakes are not covered by dwelling coverage. You can add these coverages with a separate policy or an endorsement added to your property policy.
Coverage B: Other Structures
If your pool is in the ground or installed permanently above the ground on your property, it is covered under Coverage B – Other Structures. This is an insurance term describing a detached structure on your property. Other structures include pools, fences, gazebos, sheds, etc. However, if your pool is above-ground but portable, it is considered part of your personal property and covered by Coverage C – Personal Property insurance.
What is covered: This insurance covers open perils. That means a loss is covered unless it’s excluded.
What is not covered: Typical exclusions include flood, earthquake, or wear and tear. For other structures, the coverage limit is generally set at 10% of your home’s coverage limit. That means if your home is insured for $200,000, the coverage limit for your detached garage would be $20,000. For an additional premium, you can add an endorsement to increase your coverage.
Coverage C: Personal Property
Personal property coverage protects your possessions, such as furniture, clothes, sports equipment, and other personal items. Again, if you could tip your home upside down, everything that would fall out is considered personal property. This coverage protects these items whether they are in your house or off-premises.
What is covered: If your possessions are stolen, or damaged by fire/smoke or any of 16 covered “perils,” your policy will pay for them subject to your deductible. For personal property coverage on a homeowner’s policy, you typically get 50 or 75% of Coverage A, the total amount of coverage for your home. You may choose replacement cost or the actual cash value (ACV) for reimbursement. ACV is the amount the item is worth, minus depreciation for its age. It will cost a little more for a policy that provides replacement cost.
What is not covered: There are dollar limits for certain items, such as jewelry, firearms, animals, cars, planes. See your policy for a full list. You may choose to purchase additional coverage to ensure your valuables are fully insured.
Coverage D: Loss of Use
If your home is damaged in a covered loss, it may not be livable. If that’s the case, you would need to stay somewhere else. Loss of Use, also called Additional Living Expense, covers you for any necessary increase in living expenses, such as lodging, food, and gas.
What is covered: Your policy will provide a flat percentage toward living costs, usually 30% of the Coverage A amount.
What is not covered: Some states have time limits on when you can use this coverage. Payment will be for the shortest time required to repair or replace the damage, or if you permanently relocated, the shortest time required for your household to settle elsewhere.
Coverage E: Personal Liability
Personal Liability protects you if a claim is made or a suit brought against you for bodily injury or property damage caused by an occurrence to which coverage applies. Liability covers you at your place or anywhere in the world.
What is covered: If you are found liable, the policy will pay up to its limit of liability for damages for which an insured is legally liable. This can include medical expenses, lost wages, pain and suffering, and permanent scarring. The policy also provides a defense in court, if needed, for the policyholder. This is at the insurance company’s own expense.
What is not covered: You are only covered up to your policy’s limit. Coverage starts at $100,000 but should be increased to a minimum of $300,000. You want to consider how much the home and all of your assets are worth and select an amount up to $1,000,000. If you have a pool, hot tub, trampoline or other attractive nuisance which is likely to attract children, consider adding an umbrella policy for additional coverage.
Coverage F: Medical Payments & Other
If you are not liable, but your guest was injured through his/her own fault, then Coverage F – Medical Payment to Others may cover your guest’s medical bills.
What is covered: Under Coverage F, the insurance company will pay the necessary medical expenses to a person injured on the insured location with the permission of an insured, or off the insured location if the injury is caused by the activities of an insured or caused by an animal owned by an insured.
What is not covered: You and your family are not covered. This is only for guests, and they are only covered up to the limit of your policy.
A Word About Deductibles
Generally, the higher your deductible, the lower the cost of your insurance premium. Since the deductible is the amount your insurance provider will subtract from an insurance payout, you’ll want to select a deductible that you’re comfortable paying out-of-pocket after a loss.
Common Home Endorsements
You may add specific endorsements to your homeowner’s package of policies for additional coverage. Here are some of the most popular ones.
Scheduled personal property (SPP) Coverage is for items that have higher values above your personal property coverage limits. This includes heirlooms, watches, jewelry, instruments, and furs. SPP offers much broader coverage for your precious items – if you misplace a set of earrings, they are covered; if a diamond falls out of a ring, or a guitar breaks, they’re covered. There is no deductible if the covered items are stolen, lost, or damaged. Insurance pays the lowest of the four options: repair, replace, actual cash value or the amount of insurance.
A Water Back Up and Sump Discharge or Overflow Endorsement covers two potential losses: (1) if the sewer backs up into your home via the sewers or drains or (2) if your sump pump overflows or discharges. The amount of coverage and the deductible vary by states. The endorsement comes with a maximum amount of coverage ($5,000 or $10,000) and its own deductible ($250, $500 or $1,000).
Home Day Care Coverage: This extends your liability coverage to those in your care. Most states require you to have it for licensing, and parents also may request to see proof of this coverage.
Refrigerated Property Coverage: When there is a power outage, the food in your refrigerator could spoil. A standard homeowner’s policy may cover the costs of replacing some of the food. A refrigerated property policy provides additional coverage. A refrigerated property policy adds up to $500 of coverage for property, such as meat that spoils because of a power outage or equipment failure.
Special Computer Coverage: Consider a special computer coverage option to ensure you are covered for your devices: desktop computers, laptops, tablets and smart phones. With this coverage, you will receive more money for your devices if they are damaged than with traditional homeowner’s.
Permitted Incidental Occupancies: If you have a home-based business, this endorsement increases the coverage for your business property. This includes furniture, equipment, and supplies.
Ordinance or law coverage helps you bring your home up to current building codes for repairs and/or rebuilding.
Identity fraud coverage covers the expenses associated with identity theft.
Remember that you can ask for ways to lower your home insurance costs when you purchase a policy. You may be eligible for group discounts. There are discounts if you have a burglar/fire alarm. There also is a cost savings and convenience of paying in full with most policies.
This article is furnished by California Casualty, providing auto and home insurance to educators, law enforcement officers, firefighters, and nurses. Get a quote at 1.866.704.8614 or www.calcas.com.

by California Casualty | Auto Insurance Info, Finances, Homeowners Insurance Info |
It may not seem like a big deal, but forgetting to make an auto or home insurance payment or having a lapse in coverage can have serious repercussions.
Let’s say you don’t drive that much anymore, so you miss an insurance payment or two, but then you get into an accident… If your premium goes unpaid, your insurance policy is void. Meaning, your insurance company is not obligated to rewrite your policy. You’ll be left without coverage and will likely have a higher rate when you do find a new carrier because the lapse has now left you labeled as “high risk”.
Your cancel notice gives you the date that payment must be received by, and if that date occurs with no payment, the system will automatically cancel your policy. Once you’re canceled, your carrier will not take you back unless they are required by law.
Let’s dive further into more facts and answer some questions every vehicle or homeowner should know about their coverage.
Home insurance is required if you have a mortgage.
While home insurance isn’t required by law, your lender will require you to be insured if you have a mortgage. Your policy will need to cover wind, hail, fire, and vandalism. The lender will be named as an additional insured. Should you file a claim for damage or loss, the insurance company will issue a two-party check naming you as the insured along with the mortgage company.
If you fail to pay your home insurance, you could have a lapse in coverage. Your policy will cancel, which is a violation of your mortgage agreement, and there will be no coverage in the event of a loss or claim. Also, the homeowner’s insurance is a package, which covers the home, other structures, your personal property, additional living expenses, and provides personal liability. You will lose all of that if the policy cancels.
Car insurance is required by law.
In every state except New Hampshire, you’re required to have car insurance. You have to have minimum coverage in case you get in an accident, though what you are required to carry does vary by state.
When you register your car, you submit proof of insurance. When you buy a car, you can’t leave the lot without signing up for insurance. It’s just along the way that you might accidentally, or on purpose, miss a payment and cause your insurance to lapse.
What is a lapse?
You pay for a specific time period on your insurance. It may be six months, a year, or another timeframe. In all cases, you will have a start date and an end date. As long as you are paying the bills on time, all is well.
If, however, you miss a payment, your coverage lapses. A lapse in coverage can be as short as one day or it can be much longer. Like other bills that you may be late in paying, there may be a grace period and a late fee. Unlike other services, however, you might face more severe consequences including government-mandated ones, if the lapse goes too long.
What happens when you drive without insurance?
If your insurance premium goes unpaid for long enough, your insurer will cancel your policy. Insurance helps with the financial responsibility if you get into an accident. Because it is usually required by law, there are additional consequences if you don’t have it. Here’s a summary of what you can expect if you let your insurance lapse.
-
- If you’re in an accident, you would be fully responsible for any damages or injuries.
- Depending upon the state where you live, you may be limited in the amount that you can sue the at-fault driver.
- Your insurance company may cancel your policy and alert the Division of Motor Vehicles.
- Your license and registration may be revoked, and you would be responsible for paying daily fines to the Division of Motor Vehicles. You may also have to pay a fine to reinstate your license and registration.
- Once you are reinsured, you may need to carry an SR-22 form with you for three years, showing proof that you have the minimum required insurance.
- You may have difficulty getting insurance again, as you’re now considered a risk. If you do get insurance, your insurer can raise your rates. Drivers with a coverage lapse of 30 days or more saw an average premium increase of 35%.
- Your car could be repossessed if it is leased or if you are paying a loan.
- Your credit score may drop, which can affect your ability to get a loan or credit card. The lapse will remain on your credit report for up to 7 years.
What happens if your home insurance is canceled?
If you lapse in payments for your home insurance, and as a result, your policy is canceled, your mortgage lender will be informed in writing.
-
- Your lender can force you into a more expensive policy, called forced-placed insurance. This insurance only covers the loan amount for the mortgage company. There is no coverage for your belongings or personal liability. Therefore, if the house costs more to rebuild than the remaining loan amount, it won’t be covered.
- If you don’t agree to the insurance, your lender can send your loan into default. This presents a risk of losing your home to foreclosure.
- Your credit score will drop as a result.
- Without insurance, whether or not you have a mortgage, you are responsible for 100% of the costs for any damage to your home if something unexpected happens.
What should you do if you have a lapse in coverage?
-
- Once you realize your policy has been canceled or you’ve missed a payment call your insurance company and see what can be done.
- Find out if they are able to rewrite your policy. Pay whatever fines are needed. Many companies may charge extra or interest fees on the remaining balance but California Casualty only charges a small monthly fee.
- If you cancel over a certain number of days, you will be looked at as a brand-new customer and have to meet all underwriting guidelines. You may lose certain discounts or benefits for customer loyalty.
- If you’re unable to make your insurance payment, let your insurer know. They may be able to adjust the policy to lower your cost.
- Your insurer may deny you coverage. In that case, you will need to shop around for a new policy. Be honest with the new company. They will be able to check to see if your coverage has lapsed in the past. Be prepared to pay a higher premium because of it.
- After you get insurance again, contact your state’s Division of Motor Vehicles to update your insurance information. Make sure that your registration and license are still valid.
- Similarly, update your mortgage lender if your home insurance has been affected.
- If you’ve changed insurance companies, and you owe your old insurance company any money, make sure to pay it. They will likely pass it along to a debt collection agency if you do not.
How can you prevent a lapse?
The best way to avoid any lapse in coverage is to set up a system so you will pay your premium
on time.
-
- Pay the premium in full if you are able to do so. Consider using your credit card for your annual insurance payment to get extra credit card award points. There is a cost savings and convenience of paying in full with most policies. At California Casualty, if the state allows, both auto and home policies offer this type of savings.
- Set up automatic payments such as an EFT from your checking account or a payroll deduction, if offered or available.
- Set a reminder on your phone or calendar for your premium due date.
- Make sure you know the end date of your policy. From 30-60 days prior to the renewal, California Casualty sends out a renewal policy for the insured to review. Schedule a time with an agent to review your policy to see if you need any updates before the renewal takes place.
- If you switch insurance companies, make sure to time the start date of your new policy with the end date of your old policy so there is no lapse.
- Talk to your insurer about options if you are not driving for an extended period of time. For example, you may be deployed overseas. You still may want coverage since your car would remain at risk for damage due to weather or vandalism, and it could be stolen. However, you can suspend coverage for a time period, including while you are deployed or on sabbatical. This may not be an option if your car is leased or you’re paying off a loan.
This article is furnished by California Casualty, providing auto and home insurance to educators, law enforcement officers, firefighters, and nurses. Get a quote at 1.866.704.8614 or www.calcas.com.
by California Casualty | Helpful Tips, Homeowners Insurance Info, Safety |
If you’ve ever accidentally set off the smoke alarm, you know how loud it can be. But that loud beeping is actually a good thing. Smoke detectors give us that important warning to get safely away in case of a fire. Some detectors do double duty and also alert to carbon monoxide.
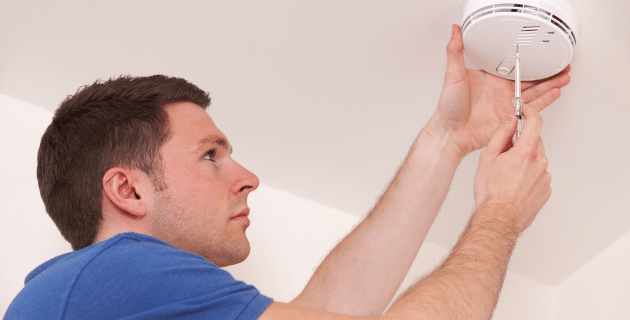
However, don’t assume your smoke detectors are working if you’ve installed them once and then never touched them again. Batteries wear out, and detectors have a lifespan of only about 10 years. That’s why it’s important to test yours regularly and there is no better time than when you are spring cleaning.
Two types of detectors
You may have a battery-powered smoke detector or yours may be hard-wired. They look the same from the outside but they’re a little different.
-
- A hard-wired detector is connected to your home’s electrical power with a cable that runs behind your wall or ceiling. They usually have a battery backup in case the power goes out. It is recommended that these detectors are installed by a professional electrician.
-
- The battery-powered detector snaps into a plastic base that is screwed onto the ceiling or wall. In many newer models, batteries are non-removable and come with a 10-year warranty.
Follow these steps
Both types of smoke detectors have a test button that allows you to check if they are working. Test your smoke detectors at least twice a year, once in the spring and once in the fall, and replace them as needed.
Step 1: Let family members know you’ll be testing.
A smoke alarm could cause family members to think there is a real emergency, so let them know that you are going to run a test. Since the sound could frighten small children and pets, you may want to test while they are not around. In addition, if your smoke detector is connected to an alarm company, notify them or you could have the fire department show up at your door.
Step 2: Position someone away from the detector.
Ask a family member or friend to stand on another level of the house, to make sure the alarm is heard. You want to make sure that the warning is heard downstairs in the basement and upstairs, in case someone might be there when it sounds.
Step 3: Press and hold the test button.
You may need to stand on a chair or a ladder to reach the button on your detector. You can use a broom handle if you are able to reach it that way. Note that it may take a few seconds to start. You will hear a loud siren. If there is no sound or a weak one, the batteries and/or the detector need replacement. Make sure to repeat this test with every smoke detector in the house or apartment.
Pro Tip: Some smoke detectors can go into programming mode if you hold the button too long. Wait for the detector to return to normal before testing it.
Step 4: Try this way to check your detector’s sensor.
The test button checks that your detector is powered. However, it doesn’t check the smoke sensor. You can do so with an aerosol spray that you can purchase for a few dollars at a hardware store. Follow the directions on the can to spray the “smoke.” This is a safer way to check the sensor than lighting matches. After the test, you can use a handheld vacuum to remove the material from the detector.
Pro Tip: Some detectors have a button to push to stop the alarm. Find out if yours has one before you run this test.
Other important tips
-
- If you have a detector where you have to change the batteries, you should replace them twice a year. (When we change the clocks is a great time to do that.) If your smoke detector is older than 10 years, you should replace it even if it is working.
-
- Dust and dirt build-up can affect your detector. Keep your detectors clean.
-
- Don’t paint your detector to match your décor. That can interfere with their ability to detect smoke.
-
- Make sure you have enough detectors in your home or apartment. You should have one in your kitchen, but 10 feet away from cooking to avoid false alarms. You also will want to place them inside every bedroom and outside each sleeping area, on every level of your home, and in places where you keep flammable substances like the garage.
You want to be fully prepared in case of a fire, and not just with smoke detectors. Talk with your insurer about your home and property to ensure that you are fully covered.
This article is furnished by California Casualty, providing auto and home insurance to educators, law enforcement officers, firefighters, and nurses. Get a quote at 1.866.704.8614 or www.calcas.com.

by California Casualty | Homeowners Insurance Info |
Your house may be warm and cozy, but chances are your water pipes aren’t. When temperatures dip too low, those pipes are in danger of freezing and bursting. If that happens, you’re in for a hefty bill…
Causes of burst pipes
Winter is a common season for frozen pipe bursts. That’s because water expands when it freezes. So, when the water in your pipes becomes ice, it takes up more space and pushes against the sides of your metal or plastic pipes. That pressure continues to build up. When it reaches the breaking point, a pipe can burst and send water flowing.
Pipes can also burst for other reasons. This includes corrosion, as pipes rust and weaken over time. Tree roots can interfere with outside pipes. Shifting soil from construction around your home has a similar effect. Finally, clogs from toilet paper and hair can be large enough to cause pipes to burst.
What to do if your pipes burst
You want to take quick action if a pipe has burst in your house. Here’s what to do.
1. Turn off the main water supply. This will keep the water from flowing uncontrollably. If you live in an apartment building, you won’t have access to the main shutoff valve. Contact your landlord right away so he or she can take action. (Pro Tip: Most main water shutoff valves are located close to your water heater or furnace.)
2. Shut off the power. This will help ensure that you don’t get electrocuted through highly charged water that has come in contact with your electrical system.
3. Call a plumber. When pipes burst, it’s best to let a professional handle the problem. If you know that water has affected your electrical system, call an electrician as well.
4. Drain the pipes. You want to get the water out of your pipes to avoid more freezing, bursting, and leaking. With the water main still off, turn on all the cold taps and let the water run. Then turn off your hot water heater and turn on the hot taps. Let the water run. Finally, flush all the toilets.
5. If you turn on the water and only a trickle comes out, you may still have a frozen pipe. Keep the faucet on. As you defrost the ice ball, you want water to be able to flow freely. Use a hair dryer to safely thaw the pipes. Move it around to reach as many places as possible. Alternatively, wet some towels in hot water and place them across the pipes. Replace them as they cool. Do not use an open flame to warm your pipes. That could cause a fire or damage the pipes.
6. Assess the damage. Figure out where the broken pipe is. A plumber can help you to do this.
7. Contact your insurance agent. They will advise you on how to file a claim, and also what the policy may cover. They will send a representative out to inspect the damage.
8. Clean up any standing water. A wet/dry vacuum will pull water from carpets. Dehumidifiers also can help. You will need to clean the area thoroughly. Consider a professional repair that can help prevent future costly problems like mold.
How to prevent frozen pipes
You can take steps to prevent your pipes from freezing and bursting. Follow this checklist.
1. Pipes most likely to freeze are outside or in unheated areas of your home like basements, attics, crawl spaces, garages, and cupboards. These include outdoor hose bibs, swimming pool supply lines, water sprinkler lines, and pipes close to the outside of the house.
2. Add insulation to these places, such as your attic, basement or crawlspace. You can cover your pipes with insulation, too. You can find it at your local hardware store. Measure the length of the pipe and cut the insulation foam to size. Wrap the pipe with insulation. Seal the seam with tape.
3. Consider heat tape which is not tape at all but a type of wiring. It looks like an extension cord that plugs into a wall and then wraps around the pipe. If you use heat tape, make sure it is designated for water pipes and properly installed. Check the tape monthly while in use. Remove it if there are cracks, bite marks, or signs of deterioration.
4. Caulk the cracks in your walls and foundation to keep cold air out. Ask a professional contractor to make sure that your basement is appropriately sealed.
5. Remember to turn off outdoor water faucets in winter. Disconnect your garden hoses. Drain water from sprinkler and swimming pool lines. Do not put antifreeze in these lines, as it is environmentally harmful and dangerous to people, pets, and wildlife.
6. When temperatures are very cold outside, turn a faucet on cold and let it drip to a trickle. This keeps water flowing and helps prevent freezing. (Pro Tip: Put a bucket underneath to collect that water and use it to water your plants.)
7. Open kitchen and bathroom cabinet doors to allow heat to circulate. Just make sure to relocate or safeguard any chemicals that could be hazardous to children or pets.
8. Set up fans to blow heat into colder rooms. Or use space heaters. You can add a space heater to a room where pipes are exposed; however, use caution. Make sure it’s plugged into an outlet with a ground fault circuit interrupter to prevent electric shock. Do not use an extension cord and only use the space heater when you are home.
9. Keep your thermostat set to the same warm setting day and night. If you plan to be away from home for any length of time, make sure that the thermostat is set to at least 55 degrees Fahrenheit to help protect against frozen pipes.
10. Consider relocating your pipes if you continually have issues with freezing.
Your home is one of your greatest investments. Protect it with the right insurance.
This article is furnished by California Casualty, providing auto and home insurance to educators, law enforcement officers, firefighters, and nurses. Get a quote at 1.866.704.8614 or www.calcas.com.
