
by California Casualty | Auto Insurance Info |
You don’t have to wait for your auto policy to expire to change insurance companies. However, you do need to make sure you’re fully covered without any gaps in insurance. We’ve compiled some guidelines to help you decide if a change is right for you.
When should you think about changing policies?
While you don’t need a reason to change your auto insurance, there are some times when it makes sense for you to revisit your policy—even if you don’t change insurance companies. You may end up modifying your current policy to meet your evolving needs. For example:
-
- If you’ve had a major life change, such as getting married or divorced, you may need more or less insurance.
- If you’ve moved to a new zip code or state, the new location could affect your premium.
- If you’ve become a homeowner, you can bundle your auto and home and save money.
- If you’ve gone from working out of the home to remote work, your annual mileage may be less.
- If you’ve bought a new car, you will want to check insurance policy options.
- If your teenager is about to get his or her license, that will add to your policy.
- If your credit score has improved, you may qualify for a lower rate.
- If you’re unhappy with your current insurer, you can consider a change.
- If you’re approaching your renewal date, you can terminate a contract without cancellation fees.
Follow these steps to make the change.
Step 1: Consider your coverage options.
Figure out how much coverage you need. If you depend upon your care, you want to make sure that you have enough to replace it if necessary. Also, check your state laws. Some states will require you to have certain car insurance. If you lease or finance a car, your lender or lessor will require you to purchase collision and comprehensive insurance.
Step 2: Compare quotes from multiple insurers.
Get quotes from several insurers, and make sure you are comparing the same coverage, limits and deductibles. Sometimes policies are cheaper because they don’t have the same coverage. This is also a good time to contact your current insurer to find out about discounts, or other ways to lower your cost. California Casualty offers discounts to nurses, educators, and first responders.
Step 3: Check for penalties and perks.
If you’re in the middle of your policy contract, there may be a penalty for canceling. Make sure you figure that into the decision to switch. You also will want to look for the perks, or little extras, that are offered. Some insurers offer inexpensive roadside assistance or accident forgiveness for qualified customers. Some have smartphone apps or are available 24/7 online.
Step 4: Do your research.
You want to know how your new insurer handles claims, and whether they have a good customer service rating. It may not be worth a lower price if it’s going to be a hassle dealing with the new company. Check out your insurer with the Better Business Bureau, JD Power, or the National Association of Insurance Commissioners.
Step 5: Make sure there’s no gap in coverage.
Car insurance lapses can be expensive, especially if you have an accident on the day in between. If you cancel one policy, make sure the other one is already in place. Your new insurance company can provide proof of insurance to your old company. However, they cannot cancel your policy. You need to do so. You’ll receive a refund for any unused portion. There may be a cancellation fee.
Pro Tip: Also remember to cancel automatic payments to your old insurer with your bank or credit card.
Step 6: Notify your insurer and lender.
Make sure to officially cancel your policy with your old insurer. Otherwise, your insurer will think you simply stopped paying your bill, and you could be liable for charges. Some insurers require 24 hours before canceling, so make sure you are aware of the terms. Also let your lender or lessor know about your new insurance if you are leasing or financing your car.
Step 7: Replace your insurance ID.
Once you make the change, ask for a digital copy of your insurance card. You can also order a printed card. Remember to place your new insurance card in your car’s glovebox.
Finally, if you have an open claim, wait to make a change.
You may not be able to change insurers if you have an open claim with your current insurance company. The claim has to be paid and closed. Also, the rate quoted from your new insurance company may not take into account that most recent claim. If that’s the case, you could have a big increase when you renew with the new company, or even be responsible for a retroactive fee.
Get started with a free quote today at mycalcas.com/quote.
This article is furnished by California Casualty, providing auto and home insurance to educators, law enforcement officers, firefighters, and nurses. Get a quote at 1.866.704.8614 or www.calcas.com.
by California Casualty | Homeowners Insurance Info |
You probably don’t think much about the air you breathe in your home, but maybe you should. That air can be filled with tiny debris- including dead skin cells, pollen, dirt, and bacteria, and breathing too of it much over time could be unhealthy. Fortunately, your home’s air filters trap these particles, helping keep your whole family healthy.
What exactly is floating in the air?
-
- Dust – We see it on our tables and abandoned trinkets on our mantle, but where does dust come from? The bulk of dust varies home to home, but basically dust is ‘anything that can flake off’ including dead skin cells, pet fur, food, dirt, pollen, pieces of books, carpet upholstery, debris from outside, etc. If not properly cleaned, mold, bacteria, and dust mites are all likely to inhabit dust and pollute your air.
- VOCS – Your furniture, your belongings, and the building materials in your walls also give off gases. These are known as VOCs, volatile organic compounds. They are floating in the air and affect your air quality. You probably also are breathing in gases released from cooking and cleaning. In addition, pollutants can travel in from outside. You might even have mold if there is humidity in your home.
You won’t necessarily smell or see any of these, and exposure to these particles is pretty much unavoidable. Over time, these compounds can build up in your system and lead to illness. That’s why air filters are so important. They can trap alot of the unhealthy particles. (They won’t however trap mold. You will need a separate treatment to get rid of the source of the moisture and remove the mold.)
What are air filters?
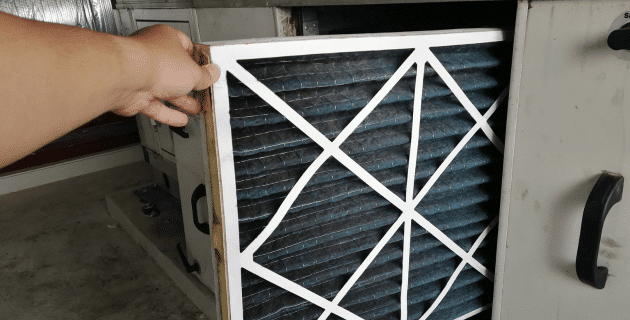
Air filters resemble rectangular cardboard frames filled with a material that looks and feels like pleated or woven coffee filters. When air is forced through the filter, the particles become trapped in the material. You’ll find air filters in your heating and cooling system, and as part of your furnace. Typically, a house will have one or two intake vents that require an air filter but you may have more depending upon the number of floors.
One size does not fit all.
Air filters come in different standard sizes and thicknesses. The measurements are printed right on their frames. Check the size of your vent openings so you’ll know which ones to buy. Air filters work best when they fit snugly. That way air goes through it and doesn’t leak around it. However, you should not have to bend or crush the filter to make it fit. While filters range from about one to five inches in thickness, most HVAC systems are built for one-inch thicknesses.
What are air filters made of?
Air filters are made from various materials, which allows them to collect different-sized particles. Most filters are disposable but there are some that are considered permanent and can be cleaned and used again. Here’s what you might find at your local hardware store:
-
- Disposable fiberglass: The most common type, this collects bigger particles.
- Disposable pleated: This is made of cotton or polyester, and is able to pick up large and small particles. It is the most affordable.
- Disposable electrostatic: This type has electrically charged fibers to collect smaller particles. It is slightly more expensive than the disposable pleated.
- Permanent electrostatic: This type is washable and can be reused. While you need to clean it regularly, you also will need to replace it every 6-8 years. It’s more expensive than disposable filters.
- High efficiency pleated: This type is thicker than many others, as much as 4-5 inches, which doesn’t work for a lot of systems. It can trap the smallest particles, and is more expensive.
How good are they at trapping particles?
Air filters come with a rating scale that tells how well they trap particles. This rating is called MERV, short for Minimum Efficiency Reporting Value. MERV ratings were established by the American Society of Heating, Refrigeration, and Air Conditioner Engineers.
-
- MERV 1-4 provides the basic level for the lowest cost.
- MERV 6-8 offers good filtration and is most commonly used in homes.
- MERV 9-12 is above average and can trap smaller particles.
- MERV 13-16 offers the highest quality and removes particles as small as 0.3 microns.
It’s important to note that the higher the MERV rating, the lower the airflow. That means your system will have to work harder, which could be more expensive and also lead to a shorter system lifespan. Consult a professional HVAC technician to provide a recommendation for your system and needs.
How to change your filters
Changing an air filter is quick and easy. Follow these steps. Use a ladder if the vent you are trying to reach is high up.
-
- Turn off your furnace.
- Locate the filter compartment. Remove the door or service panel.
- Slide the old filter out and put the new one in.
- Use a rag to clean any dust on the vent.
- Repeat with intake vents throughout your home.
- Turn your furnace back on.
What if your filter looks clean when you go to change it?
-
- Check and make sure it’s fitting well with no gaps.
- Make sure it’s not upside down. Arrows should point toward the fan or your system.
- Try a filter with a higher MERV rating to catch more.
How often should you change your filters?
A clean air filter makes your heating and cooling system more efficient. This can save you money, as much as $9-$22 a month. Manufacturers usually recommend changing your air filter every 60-90 days. However, if you have pets or allergies, you may want to replace them more frequently. Create a calendar alert so you will know when to change yours.
Pro Tip: Hold your filter up to the light. If you can’t see light through it, it is time to change it.
In addition, you may want to add pet-friendly plants that also help with indoor air quality. Finally, make sure to protect your home with the right insurance for added peace of mind. After all, your home is your greatest investment.
This article is furnished by California Casualty, providing auto and home insurance to educators, law enforcement officers, firefighters, and nurses. Get a quote at 1.866.704.8614 or www.calcas.com.

by California Casualty | Homeowners Insurance Info |
You’ve bought your dream home and it’s time to get it insured. You want to choose the right coverage to fully protect your investment. While you have a basic idea of what home insurance probably covers, you may not know the particulars.
A homeowner’s policy is actually a “package” of coverages. It protects your home from specific events that can damage your property, and provides additional living expenses if you are unable to live there due to an insured loss. It also protects your personal belongings. In addition, your homeowner’s policy covers you for lawsuits or liability claims that might otherwise be your responsibility if you accidentally injure other people or damage their property. Here’s the breakdown from A to Z (or in this case, F).
Coverage A: Dwelling
Dwelling coverage refers to the structure of your home. This includes the roof, walls, floorboards, cabinets, and bath fixtures. The easiest way to think about it is that if you could tip your house upside down, the dwelling is everything that remains attached.
What is covered: This insurance covers open perils. That means a loss is covered unless it’s excluded by your policy. Coverage A generally covers direct physical loss due to fire/smoke, lightning, windstorms and hail, explosions, vandalism and theft. If one of these perils destroys your home, your insurance provider will pay to rebuild it up to your policy limits.
What is not covered: If it is listed as an exclusion, it is not covered. Typically, natural disasters such as flooding and earthquakes are not covered by dwelling coverage. You can add these coverages with a separate policy or an endorsement added to your property policy.
Coverage B: Other Structures
If your pool is in the ground or installed permanently above the ground on your property, it is covered under Coverage B – Other Structures. This is an insurance term describing a detached structure on your property. Other structures include pools, fences, gazebos, sheds, etc. However, if your pool is above-ground but portable, it is considered part of your personal property and covered by Coverage C – Personal Property insurance.
What is covered: This insurance covers open perils. That means a loss is covered unless it’s excluded.
What is not covered: Typical exclusions include flood, earthquake, or wear and tear. For other structures, the coverage limit is generally set at 10% of your home’s coverage limit. That means if your home is insured for $200,000, the coverage limit for your detached garage would be $20,000. For an additional premium, you can add an endorsement to increase your coverage.
Coverage C: Personal Property
Personal property coverage protects your possessions, such as furniture, clothes, sports equipment, and other personal items. Again, if you could tip your home upside down, everything that would fall out is considered personal property. This coverage protects these items whether they are in your house or off-premises.
What is covered: If your possessions are stolen, or damaged by fire/smoke or any of 16 covered “perils,” your policy will pay for them subject to your deductible. For personal property coverage on a homeowner’s policy, you typically get 50 or 75% of Coverage A, the total amount of coverage for your home. You may choose replacement cost or the actual cash value (ACV) for reimbursement. ACV is the amount the item is worth, minus depreciation for its age. It will cost a little more for a policy that provides replacement cost.
What is not covered: There are dollar limits for certain items, such as jewelry, firearms, animals, cars, planes. See your policy for a full list. You may choose to purchase additional coverage to ensure your valuables are fully insured.
Coverage D: Loss of Use
If your home is damaged in a covered loss, it may not be livable. If that’s the case, you would need to stay somewhere else. Loss of Use, also called Additional Living Expense, covers you for any necessary increase in living expenses, such as lodging, food, and gas.
What is covered: Your policy will provide a flat percentage toward living costs, usually 30% of the Coverage A amount.
What is not covered: Some states have time limits on when you can use this coverage. Payment will be for the shortest time required to repair or replace the damage, or if you permanently relocated, the shortest time required for your household to settle elsewhere.
Coverage E: Personal Liability
Personal Liability protects you if a claim is made or a suit brought against you for bodily injury or property damage caused by an occurrence to which coverage applies. Liability covers you at your place or anywhere in the world.
What is covered: If you are found liable, the policy will pay up to its limit of liability for damages for which an insured is legally liable. This can include medical expenses, lost wages, pain and suffering, and permanent scarring. The policy also provides a defense in court, if needed, for the policyholder. This is at the insurance company’s own expense.
What is not covered: You are only covered up to your policy’s limit. Coverage starts at $100,000 but should be increased to a minimum of $300,000. You want to consider how much the home and all of your assets are worth and select an amount up to $1,000,000. If you have a pool, hot tub, trampoline or other attractive nuisance which is likely to attract children, consider adding an umbrella policy for additional coverage.
Coverage F: Medical Payments & Other
If you are not liable, but your guest was injured through his/her own fault, then Coverage F – Medical Payment to Others may cover your guest’s medical bills.
What is covered: Under Coverage F, the insurance company will pay the necessary medical expenses to a person injured on the insured location with the permission of an insured, or off the insured location if the injury is caused by the activities of an insured or caused by an animal owned by an insured.
What is not covered: You and your family are not covered. This is only for guests, and they are only covered up to the limit of your policy.
A Word About Deductibles
Generally, the higher your deductible, the lower the cost of your insurance premium. Since the deductible is the amount your insurance provider will subtract from an insurance payout, you’ll want to select a deductible that you’re comfortable paying out-of-pocket after a loss.
Common Home Endorsements
You may add specific endorsements to your homeowner’s package of policies for additional coverage. Here are some of the most popular ones.
Scheduled personal property (SPP) Coverage is for items that have higher values above your personal property coverage limits. This includes heirlooms, watches, jewelry, instruments, and furs. SPP offers much broader coverage for your precious items – if you misplace a set of earrings, they are covered; if a diamond falls out of a ring, or a guitar breaks, they’re covered. There is no deductible if the covered items are stolen, lost, or damaged. Insurance pays the lowest of the four options: repair, replace, actual cash value or the amount of insurance.
A Water Back Up and Sump Discharge or Overflow Endorsement covers two potential losses: (1) if the sewer backs up into your home via the sewers or drains or (2) if your sump pump overflows or discharges. The amount of coverage and the deductible vary by states. The endorsement comes with a maximum amount of coverage ($5,000 or $10,000) and its own deductible ($250, $500 or $1,000).
Home Day Care Coverage: This extends your liability coverage to those in your care. Most states require you to have it for licensing, and parents also may request to see proof of this coverage.
Refrigerated Property Coverage: When there is a power outage, the food in your refrigerator could spoil. A standard homeowner’s policy may cover the costs of replacing some of the food. A refrigerated property policy provides additional coverage. A refrigerated property policy adds up to $500 of coverage for property, such as meat that spoils because of a power outage or equipment failure.
Special Computer Coverage: Consider a special computer coverage option to ensure you are covered for your devices: desktop computers, laptops, tablets and smart phones. With this coverage, you will receive more money for your devices if they are damaged than with traditional homeowner’s.
Permitted Incidental Occupancies: If you have a home-based business, this endorsement increases the coverage for your business property. This includes furniture, equipment, and supplies.
Ordinance or law coverage helps you bring your home up to current building codes for repairs and/or rebuilding.
Identity fraud coverage covers the expenses associated with identity theft.
Remember that you can ask for ways to lower your home insurance costs when you purchase a policy. You may be eligible for group discounts. There are discounts if you have a burglar/fire alarm. There also is a cost savings and convenience of paying in full with most policies.
This article is furnished by California Casualty, providing auto and home insurance to educators, law enforcement officers, firefighters, and nurses. Get a quote at 1.866.704.8614 or www.calcas.com.

by California Casualty | Educators |
Your teachers and educational support professionals are at the forefront, expertly balancing student needs with administrative demands and navigating the educational landscape with grace and skill. They give their all, day in and day out, and you want to make sure they feel supported. Here’s how you can help cultivate a culture of fulfillment and growth.
1. Prioritize the physical and emotional well-being of your staff.
When your staff feels well mentally and physically, they are able to do their best work. On the flip side, when they are burnt out, they have trouble meeting the bare minimum. You can create a school culture that prioritizes mental and physical health.
-
- Tap into your staff’s reasons for going into education. Highlight the reasons during staff meetings and professional development. Remind them by celebrating their successes and supporting them through challenges.
- Encourage staff to practice self-care. Bring in self-care experts for professional development sessions. Organize an after-school yoga session. Provide healthy snacks in the faculty room. Create a library of digital resources on self-care.
- Reduce stressors that can lead to drama. Address issues sooner rather than later. Get rid of competitiveness. Set up teacher mentors. Facilitate an atmosphere of teamwork.
- Don’t overload teachers with responsibilities. Allow catch-up days where you don’t plan formal programming.
2. Be visible and available.
Supportive administrators are accessible and approachable. They are a common presence throughout the school. Faculty and staff have opportunities to interact with them on a daily basis.
-
- Walk the hallways during high traffic times. Be seen by students and staff. Engage them in conversation during recess and lunch.
- Make it a point to greet faculty and staff by name, so they know that you know who they are. Personally welcome new staff, including substitutes.
- Maintain an open-door policy at your office, or if you cannot, post times when you will have open-door office hours. Be accessible before and after school.
- Drop into the teacher lounge and ask how teachers are doing.
3. Respect educators’ time.
Educators and support professionals have a lot on their plate. There’s often more work than hours in the school day. Understanding that your staff’s time is valuable will help guide you in managing staff responsibilities and expectations.
-
- Submit meeting agendas at least 24 hours in advance. This will allow your staff to have time to review it so they can appropriately respond in a meeting.
- Do you have straightforward information to share at a meeting? Send an email instead. Just because a faculty meeting is on the calendar doesn’t mean you have to have one.
- Have a “ditch” meeting. Discuss the activities/responsibilities that can be eliminated. This will allow your staff to focus on priorities.
- Ask for staff input on professional development days. Work with them to schedule meaningful programming that helps them in their jobs.
4. Communicate effectively.
Good communication is important. It ensures that teachers and educational support professionals have the information that they need to get the job done. It also builds relationships and eliminates inefficiencies.
-
- Create a weekly schedule that goes to all staff. Email the schedule early on Monday morning with the most important information and documents hyperlinked. These can include department meeting reminders, agendas, school events, links for teachers to join a testing session, etc. (Pro Tip: Make it a Google doc and you can provide live updates as things change.)
- Add faculty birthdays at the bottom of the weekly schedule to celebrate your staff and their milestones.
- Build in time for peer collaboration. This type of communication gives teachers a chance to share best practices, and gives new teachers the chance to learn.
- Write a handwritten note to staff members to celebrate achievements and to thank them for their service.
5. Provide resources and tools.
Teachers repeatedly spend their own money for classroom supplies. Investing in high-quality curriculum and providing resources for classrooms goes a long way toward supporting teachers and staff.
-
- Find free resources and tools, and educator discounts, and regularly share them with your staff. Ask staff to do the same.
- Seek sources of funding for educational supplies and programs from grants, PTA fundraisers, community donations, etc.
- Work with the local library to borrow/access items from books to technology.
- Post classroom wish lists on the school website so parents and others may donate.
6. Support your teachers’ decisions.
One of the most difficult times for a teacher is when administrator support is lacking when they make difficult decisions on grading or behavior. When parents go over the teacher’s head to the principal, it’s important that the administrator supports the teacher’s decision. Siding with the parent undermines the teacher’s authority.
-
- Meet with the teacher privately to ascertain the extent of the complaint and the reasons that the teacher made the decision.
- Determine ahead of time whether any concessions can be made, with the teacher’s support.
- Meet with the teacher and parent and discuss the situation and possible resolutions.
7. Ensure evaluations are meaningful.
Teacher evaluations can be a source of stress but they don’t need to be. The ultimate goal is to help teachers maximize their effectiveness. Administrators and teachers can get the most out of them when they are done with understanding on both sides.
-
- Pre-game with the teacher. Share the evaluation tool. Discuss the upcoming lesson and what you’ll expect to observe. Ask the teacher if there’s anything that he/she wants you to pay special attention to.
- Send your completed evaluation as soon as possible following the lesson.
- Choose just a few high-impact points that the teacher can focus on for improvement. Provide concrete examples of what he or she can do.
- Make sure to mention the positives. Praise teachers for what they are doing right.
- Do not copy and paste from one teacher’s evaluation to another. Not only could it backfire, but each individual assessment also deserves its own evaluation.
8. Listen and incorporate feedback.
Good listening skills will go a long way in managing staff and helping meet their needs. Teachers and educational support professionals have a lot to share. Tap into their “inside track” as the educators on the front lines.
-
- Ask for feedback on everything from schedules to curriculum to discipline. Then, listen and take notes.
- Discover the “pain points”—the things that are not working well — so that the school may address them.
- Allow teachers to be part of the decision-making process and you will get their buy-in. You also will get some creative and practical solutions.
This article is furnished by California Casualty, providing auto and home insurance to educators, law enforcement officers, firefighters, and nurses. Get a quote at 1.866.704.8614 or www.calcas.com.

by California Casualty | Auto Insurance Info |
If your windshield wipers are leaving long streaks and making loud squeaks, they’re trying to tell you something. They’re ready to be replaced.
Your wipers are not meant to last forever. The rubbery blade wears down over time. Squeaks, streaks, and smears happen when the blades don’t make proper contact with the glass. That causes dangerous driving conditions and potential accidents when you can’t see clearly through your windshield.
You generally have to replace your wiper blades every 6-12 months. Look for these signs that your blades are ready for replacement:
• Worn edges
• Cracks, tears, and missing pieces
• Stiffness in the rubbery part (inability to flex)
• Squeaking or chattering
• Streaks on your windshield
If your wipers are leaving streaks but not making sounds, you can clean the blades, which are the rubbery part of your wiper. Dip a rag or paper towel into rubbing alcohol. Wipe it along the blades, and the windshield. This can help extend the life of your blades for another month or two before you have to replace them.
How to replace your wipers
Step #1: Get the right wipers for your vehicle.
Windshield wiper blades come in many different sizes so it’s important to get the right ones. Your vehicle may even use two different lengths of front wiper blades. (Don’t forget your rear one, too.) One way to find the right size(s) is read your car’s manual. You also can go to an auto parts store in person or online to get assistance. The online sites will often have you type in your car’s make and model.
Once you find the right size, you’ll have other choices to make. Conventional and synthetic rubber blades are usually the cheapest. They will break down over time with exposure to the sun’s UV rays. If you are looking for longer-lasting blades, consider silicone, which is more expensive. There are options for sturdy winter wipers, flat blades, and hybrid blades, too. The difference is that with the conventional kind, you can replace just the rubbery blade. With the others, you have to replace the whole piece.
Many national auto parts stores will install the wipers that you just bought there, sometimes for no additional charge.
Step #2: Get the wipers in position.
You’re ready to start the replacement. Turn the car on and give your windshield a squirt of wiper fluid to lubricate it. Then, turn on the wipers just so you can get them into position. When the two blades are pointed upward toward your roof, turn your car off. Get out of your car and pull the wipers forward so they’re standing upright at 90 degrees.
Step #3: Place a towel on the glass.
Wiper blades are spring-loaded. That means that they can snap back against the windshield. Once you expose the metal wiper arm, this could result in a cracked windshield. To protect against that, cover your windshield with towels. Alternatively, you could wrap the metal hook of the wiper arms with a rag once you detach the blades.
Step #4: Detach the blades.
There are two basic types of traditional wiper connections: tab and pin type. There is a slightly different installation process for each type.
Look for the spot on the wiper where the blade attaches to the arm. There may be a tab where the blade connects. If you don’t have a tab, you may have a pin-type connector. If in doubt, check your vehicle’s user manual for blade removal steps.
• For tab connectors, use your finger to push the tab outwards or inwards. As you push, grab the blade and pull it down parallel to the arm. You should be able to pull it all the way out. You may need to tug a bit if there’s built-up debris.
• For pin-type connectors, you will need to pull the tab up, and pull the pin out. Use a small flathead screwdriver to lift the connecting pin. You should then be able to slide the blade off.
Step #5: Install the new blades.
Remove the new blades from their packaging and then proceed depending upon the type of connection.
• For tab connectors, look for a tab suspended in the middle of a long rectangular hole. Slide the arm hook up and over the tab. Pull the blade up until you hear a snap.
• For pin-type connectors, look at the new blade and look for a small hole in the body. Pull the black tab up slightly. Align the hole with the pin on the wiper and it will snap into place.
Step #6: Clean the windshield.
You’ve got new wipers so you’ll want to make sure your windshield is clean, too. Lift the blades up so they are off of the windshield. Use automotive glass cleaner, a clean and dry microfiber cloth, and a little elbow grease. Alternatively, you can use water, dishwashing liquid, and a few drops of vinegar. Dry your windshield with a clean microfiber cloth. Put your blades back down and you’re ready to go.
If you just want to replace the rubber inserts
You can replace the entire windshield wiper assembly (as described above) or you can simply buy new blade inserts if they are available for your vehicle. This can save you money; however, it is a bit more complicated to replace just the rubber and may require tools. Consult your car’s manual for details.
Replacing wiper blades is part of good car maintenance. And as always, don’t forget to protect your vehicle with the right insurance for added peace of mind.
This article is furnished by California Casualty, providing auto and home insurance to educators, law enforcement officers, firefighters, and nurses. Get a quote at 1.866.704.8614 or www.calcas.com.
