
by California Casualty | Helpful Tips |
We love the idea of decluttering. Doing it, however, is another story. Luckily, there’s help. Follow this guide for inspiration and ideas on easy ways to declutter your home this season.
Benefits of decluttering
The older you are, the more stuff you accumulate, from mugs and books to clothes and souvenirs. Holidays and birthdays bring in even more items. After a while, you run out of places to put things. They go into boxes where they often are forgotten and certainly not enjoyed. Getting rid of the clutter not only frees up space. It reduces stress. There is less to clean and organize, and more time to relax. Plus, decluttering helps you enjoy the possessions that you have in a space that feels clean and comfortable.
Set your expectations.
Remember that the clutter didn’t arrive in a day. Don’t expect it to be gone so quickly. Schedule time each week to focus on this task until it is done. Try to incorporate the habits from the decluttering process to keep your home clutter-free in the future.
View your home as if you were a first-time visitor.
You need a game plan. One easy way is to walk your home as if you’re seeing it for the first time. Use that perspective to decide what spaces you would like to declutter.
- Draw a map of all the rooms. In each room, mark the clutter hotspots you want to tackle.
- Give each spot a grade from 1 to 3, where 3 is the most cluttered and 1 is the least. This will help you allocate the right amount of time to those areas.
- Use the map as your decluttering guide.
Throw out the trash.
Tackle the easiest part of decluttering first. Grab a trash bag and throw away anything that is obviously broken or that is actual garbage. Do this step before you dive into decluttering.
Set aside the time.
Set a timeline for what you will tackle first. It’s fine to start small so that you will feel accomplished. Looking at one cleaned space can inspire you to do more.
- Choose a timeframe that is doable. You will be able to adjust as needed, once you figure out how much time it really takes to declutter.
- Take a “before” photo so you’ll know how much you accomplished.
- Set a timer and begin work.
- Applaud yourself when you are finished the session.
- Don’t forget to take an “after photo” so you can see your progress.
Use the organizing triangle.
Separate your items into three piles: keep, trash, or donate. Some people add a fourth box for “undecided.” For paper, the piles are slightly different: file, trash, or recycle. You can use boxes to organize the piles.
- The “keep” pile should have the things that are meaningful to you and/or things that you use.
- The “donate” pile should include things that are useful but that you no longer use or that do not fit you anymore.
- The “trash” pile should be the items that you no longer need and that are not in good enough condition to be donated.
- Don’t keep something in case you need it in the future. Give yourself permission to buy it again if you might need it. (This may not apply to seasonal items and special occasion wear.)
- At the end of each session, immediately find a place for the items you are keeping. Consider storing similar items with each other.
- For documents or other paper products that you’d like to keep, consider a digital filing system. Block out time to do that as part of the decluttering process.
Sort your clothes by what you wear.
You can use the organizing triangle for your clothes, or you could use the following system that naturally sorts the clothes in your closet by whether you wear them.
- Face all your hangers in one direction.
- Every time you wear something, face the hanger the opposite direction.
- Check after a few months and you’ll easily see what you don’t wear. Donate those clothes.
- For drawers, you can fold your clothes a different way when you place them back (e.g. roll them vs. folding them flat).
- After a while, you’ll see which clothes you don’t wear and can donate them, too.
Tidy up by category.
It might be easier to declutter by the type of item versus by room or space. Gather all the similar items into one area. This is an easier way to get rid of duplicates and determine how many items you really need.
- Start with clothes. Decide how many pants you need, choose your favorites, and donate the rest. Repeat with tops. You’ll want to account for work and casual wardrobes, and special occasions.
- Repeat the process with your shoes, boots, and footwear.
- Next look at your books. Organizing expert Marie Kondo recommends keeping less than 30 books. Choose the ones that inspire you, your favorite stories, and the ones you want to reread.
- Go through your kitchen tools. If you can’t remember the last time you used a kitchen item, it’s time to donate it.
- End with sentimental items. By now you’re used to the decluttering process, which could make it easier to distinguish which special items you truly want to keep. Make sure you have a place for them. If you’re keeping them in a box, then you’re not enjoying them.
Enlist some help.
Getting help can be the inspiration that you need. Not only do many hands make light work, but you can also get another person’s perspective.
- Get help from a friend or family member. Ask them to suggest some big items to throw or give away.
- You can hire a professional organizer. This could be useful if you’re not making progress or if you’ve gotten to a point and can’t get past it.
- Rent a dumpster. You can get rid of larger household items that way.
Cut down on future clutter.
Here are some ways that you can continue to keep your home clutter-free.
- Use those Amazon boxes that bring new things into your house to donate the same number of things to go out of your home. Do it as soon as you get something new: one in, one out.
- Sort through your mail at the recycling bin so you can immediately toss what is not needed.
- Keep a box in your closet. Every time you try something on, and you don’t feel good in it, toss it in the box for future donations.
- Give away one item each day. By the end of the year, you’ll have given away 365 things.
- Set a timer and commit to 20 minutes each day, or week, to stay on top of the clutter. You’ll be surprised at how much you can accomplish.
Finally, make sure your home is covered by the right homeowner’s or renter’s insurance to protect your possessions now and for years to come.
This article is furnished by California Casualty, providing auto and home insurance to educators, law enforcement officers, firefighters, and nurses. Get a quote at 1.866.704.8614 or www.calcas.com.

by California Casualty | Safety |
A motorcycle helmet is more than a fashion statement. It’s what stands between you and serious injury, or even death, in an accident. Not only that, but helmets also offer important protection against flying debris, pesky bugs, gusty wind, noise, and the ever-unpredictable weather.
There’s an art and a science to picking the right motorcycle helmet. Here’s what you need to know.
First, ask yourself these questions.
- What type of motorcycle riding do you do?
- What material do you want around your head?
- How much of your head do you want covered?
- How much money do you have to spend?
If you primarily ride on pavement, you’ll want a full-face, modular, or dual sport helmet. If you go off-road, you’ll need a dirt helmet. If you do a little of both, you’ll want to consider a dual-sport helmet that can handle the speed of the highway and the flying debris of gravel roads. You’ll also need to decide how much of your head you want covered. Helmets range from full-face to the top of your head. The more coverage, the more protection your helmet can offer.
Helmet shells are made of a variety of materials. These include hard plastic, carbon fiber, carbon Kevlar, and woven fibers with hard shells. Some materials are more costly than others. Helmets can range from a couple of hundred dollars to thousands. The price also depends on features like built-in communications for riding in a group. Just remember that double the price doesn’t necessarily mean double the safety.
Choose a helmet style.
Full-face helmets cover your entire head and face. They are made to offer full protection for street use, highway riding, and racing. The downside is that these helmets can get hot. They also may have a smaller field of vision than a dual sport helmet. Full-face helmets may be fitted with removable face shields or have vents that open and close to address these issues.
Dirt helmets are designed for off-road use. They are typically lighter than full-face helmets, offering more ventilation. They have a peak like a baseball cap that protects from sun. Instead of a closable shield, they have an opening where you can fit pair of motocross goggles.
Dual sport helmets are where road helmets meets dirt styles. They offer the comforts of road travel with the practical elements for off-road rides. There’s a larger field of vision than full-face helmets. The visor cuts down on sun glare.
Open face helmets protect your head and ears but not your face. They provide more visibility and ventilation than full-face and dual sport. There are even some open face helmets that have shields that can be snapped on. The downside is that, without a shield, your face is exposed to the elements. An upside is that you can eat and drink without taking your helmet off.
Modular helmets are a cross between full-face and open face helmets. The chin bar is hinged so that it can be flipped up out of the way. You can drink and it with it on. However, the chin bar must be down when you ride. Modular helmets are good for hot climates where a full-face helmet gets too hot after a short ride.
Dome Helmets/Skull Caps cover just the top of a rider’s head. While lighter and allowing more airflow, they lack serious protection. They don’t protect the ears, face, or chin.
Determine your head shape and size.
The shape of your head is different from the shape of your face, and just like faces, heads have different shapes and sizes. Knowing yours will save you a lot of time when finding the perfect fit.
The three basic head shapes are:
- Long oval where the head is longer front-to-back than it is side-to-side.
- Intermediate oval where the head is slightly longer front-to-back than side-to-side.
- Round oval where the head is about the same front-to-back and side-to-side.
To find out your head shape, take a selfie from above your head or ask a friend to do it. If your head looks long and thin like a wide football, you probably have a long oval. If it resembles a slightly squashed soccer ball, you probably have an intermediate oval. If your head looks more like a soccer ball, you probably have a round oval.
To find out your head size, measure your head with a cloth tape measure:
- Start the end of the tape about an inch above your eyebrows.
- Circle it around so it goes above your ears and meets at the front, like you are wearing a headband.
- That is your side-to-side measurement. Take the measurement in inches as well as centimeters as some brands use the metric system.
Try helmets on for size.
Now that you know your size and head shape, and the type of helmet that you want, you’re ready to try some on. Find your measurement on the size chart. Try different models and brands for the best fit possible. Some may be better for your head shape.
- A well-fitting helmet should fit snugly.
- Hold the helmet by the chin straps and roll your helmet onto your head from front to back. Don’t pull it straight down onto your head.
- Once it’s on, try to roll the helmet forward off your head. You should not be able to do so.
- Hold the helmet at the sides and try to move it up and side to side. The helmet should move your scalp and cheeks along with it.
- Wear the helmet for as long as possible. There should be no pressure points or hot spots.
- After trying it on, take it off and note any red spots or sore spots.
Check the safety certifications.
Helmets in the U.S. must be DOT-approved and manufactured according to safety guidelines. To qualify for DOT certification, they must pass four tests: impact test, penetration test, retention strap test, and peripheral vision test. DOT-approved helmets have a sticker at the back that includes the manufacturer/brand name, model number, and certification number.
Look for organizations like Snell that also test helmets. Snell is a third-party independent nonprofit standard and testing organization. They test in addition to DOT, but manufacturers must pay them to do so. The Economic Commission for Europe (ECE) and the European Safety Commission FIM also do additional testing. The more testing, the more assurance that your helmet meets safety requirements. However, additional testing also can raise the price of a helmet.
Pro Tip: Beware of imposters who sell novelty helmets with fake DOT labels. These helmets will be less than an inch thick and weigh a pound or less. By contrast, reputable helmets weigh about 3 pounds.
When to replace your helmet
Motorcycle helmets wear out after use. You should replace yours every 3-5 years or if your helmet sustains any damage. For added peace of mind, protect yourself with the right motorcycle insurance so that if you do get into an accident, you’re fully covered.
With the right helmet and the right gear, you’re ready to hit the road. Safe travels.
This article is furnished by California Casualty, providing auto and home insurance to educators, law enforcement officers, firefighters, and nurses. Get a quote at 1.866.704.8614 or www.calcas.com.
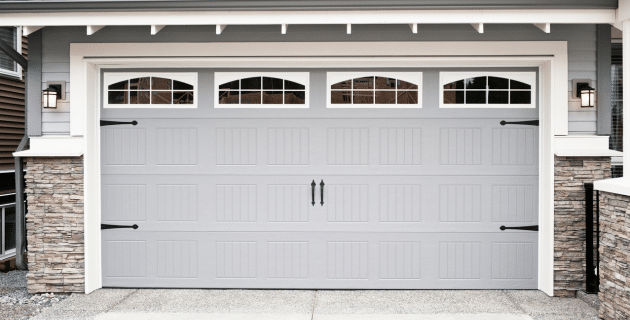
by California Casualty | Homeowners Insurance Info, Safety |
It’s relatively easy to break into a garage. Thieves can do it in a matter of seconds, and grab your tools, sports equipment, and other high-value items before you know it. Fortunately, you can take steps to protect your garage from a break-in. Follow these tips to make your garage door more secure.
Tip #1: Light the way.
Thieves lurk in the shadows. Add motion-activated flood lights around your garage. The sudden blaze of light is sure to startle a burglar and could scare him away. It also could alert neighbors or passersby to their activity, which could deter them as well.
Tip #2: Cover your windows.
You probably store high-value items in your garage, including your vehicle. Don’t broadcast that fact to everyone. Use interior curtains or blinds to cover your windows. You also can use an adhesive window film. Windows also are easy to break. Consider garage door windows with panes that are too small to use to enter.
Tip #3: Trim your landscaping.
Make sure there are no bushes near your garage where thieves can hide. You want your neighbors and every passerby to be able to see what’s going on. Pro Tip: Plant thorny shrubs under garage windows to discourage thieves from getting in that way.
Tip #4: Reinforce your service door.
If your garage has a service door that leads to the outside or inside of your home, make sure it’s secure. Most garage service doors can be broken with a well-placed, solid kick. Reinforce your door with a strike plate, using 3-inch screws to secure it.
Tip #5: Add a layer of protection with a lock.
Many garages use keyless locks which open the door with a keypad, fingerprint reader, or remote control. Alternatively, you can use a deadbolt or padlock, which require keys. You can even use a combination of locks, such as a garage door lock bar which stops the door from being raised, in combination with another type of lock for added security. Choose the one(s) that works for your budget and your needs. Pro Tip: Keep the keypad clean. A thief can look at the dirty keys to guess your garage door code.
Tip #6: Update your remotes.
If your garage door remote is old, chances are it is easy to hack. Thieves can use a code grabber that copies your signal. Then they can send it to your garage door to open it. Newer remotes use a rolling code, which slightly changes the signal that your remote sends every time. That’s a good reason to update your garage remotes to a newer model.
Tip #7: Don’t clip your garage remote to your car visor.
It’s like giving thieves a key to your home. They can just break into your car to get your remote. Consider using a smart garage door opener from your smartphone or attach your remote to your keychain so it’s always with you.
Tip #8: Close your garage door.
It may seem simple but sometimes we forget to close our garage doors. Don’t tempt thieves by leaving yours open. Consider an automatic door closer that will shut the door after a specified amount of time. You also may wish to invest in a garage door monitor, which displays whether the garage door is open or closed.
Tip #9: Protect your garage’s emergency release cord.
The emergency release cord is designed to open the garage door in a power outage. Thieves however use it to their advantage. They can push the door inward to create enough of a gap to insert a wire hook. Then they pull down on the cord. There are a few ways that you can protect the cord from this hack. You can pull the cord through a PVC pipe that is too thick and bulky to be pulled by the wire. You can cut the cord very short so thieves cannot easily grab it. You can zip tie it so it cannot be pulled. You can create a door lock shield with a scrap of plywood screwed to the opener’s arm.
Tip #10: Install a security camera.
Security cameras can help deter thieves, especially if they are visible. Make sure that the ones you buy are designed for outdoor use and specifically for the seasonal temperatures in your region. Consider features like motion-activated recording, and WiFi or mobile access via your smartphone or other device. Add a door alarm or security sensor to alert you of a breach. This is especially valuable if you are not home or are on vacation.
Finally, for added peace of mind, you will want to make sure that you fully protect your home with the right coverage. After all, your home is one of your greatest investments.
This article is furnished by California Casualty, providing auto and home insurance to educators, law enforcement officers, firefighters, and nurses. Get a quote at 1.866.704.8614 or www.calcas.com.

by California Casualty | Finances, News |
If your bill at the grocery store is higher than you’d like, you’re not alone. The average cost of groceries is 13% higher than this time last year. A family of four can spend as much as $932 on their monthly food bill…
Fortunately, there’s something you can do about it. From how you pay for groceries to where and when you shop, here are our top tips for saving money on groceries and feeding your family on a budget.
1. Redefine dinner.
Who says that dinner has to be a three-course affair with meat, veggies, a starch, and a dessert? Take the pressure off and serve breakfast for dinner a few times a week. Omelets are a relatively inexpensive meal and very filling. You also can have soup and sandwich night or a big salad. Be creative. Try going meatless to save money or adding beans to ground beef to increase the amount of food. Put shredded chicken over a soup, salad, or pasta and you’ll use a lot less than when serving pieces of chicken.
Pro Tip: Plan to cook so that you definitely will have leftovers. It’s easier and often cheaper to make a large portion than to plan a whole new meal with new ingredients.
2. Make a list and actually stick to it.
Make a meal plan for the week so you know exactly what to put on your shopping list. Pre-planning cuts down on impulse purchases, which can put you over budget. Then shop only for those items on your list. To help stick to your list, always make sure to eat before shopping,
3. Raid your pantry.
When meal planning, remember that you likely have plenty of food at home that you can incorporate. Look through your pantry and see if you can create a recipe around the food that is there. Check your freezer too. That way, you may just need a few items on your list to create some delicious meals.
Pro Tip: Check out websites that can help you build a recipe with ingredients that you already have like MyFridgeFood or SuperCook.
4. Sign up for the store’s loyalty program.
Most grocery stores offer loyalty programs that are free to join. You can get discounts automatically deducted at checkout. If you’re not on your store’s program, sign up the next time you’re there.
5. Clip coupons and look for sales.
Look at the weekly circular in print or digitally for sales, and clip/save coupons for the items you use. Digital coupons can even be loaded directly onto your loyalty card. Remember to do the math, however. Not all sales are the same good deal. Look at the unit price per ounce to compare the costs of different brands. Plus, if you’re not sure that you’ll use it, don’t buy it. Spoiled fruit in the garbage is the same as throwing away money.
6. Buy store brands.
The cost of store brands is usually 20-25% less. Try them out next time and see if you notice enough of a difference to justify buying the name brand. If you can’t buy all generic brands, at least try store brands for staples like salt and sugar.
7. Avoid pre-made items.
Convenience comes at a price. That means if something is prepared for you, you’re likely paying more for it. When you’re shopping, try to find food closest to its natural state. Buy block cheese instead of shredded cheese, and a box of pasta rather than a heat-and-eat variety. Snacks are some of the priciest items to buy. You can really save a lot here if you prepare them yourself.
8. Tally as you go.
Use the calculator on your phone to add up your order as you shop. You’ll be less likely to add items this way, and there will be no surprises when you get to the checkout. It might cause you to think, “do I really need this?”
9. When you shop matters.
Shop midweek when many grocery stores restock their shelves. That’s also when they change the discounts. If you’re lucky, you’ll get the price cut from last week’s sale. If you’re looking for clearance specials, shop first thing in the morning – or right after a holiday. If you’re looking for specials in the bakery, deli, or prepared foods section, shop right before closing. Many supermarkets mark down their rotisserie chickens, for example.
10. Pay with a rewards credit card or cash.
You might as well get some cash back when you shop. Pay with a grocery rewards card and you can automatically see some savings. Or if you can, pay with cash. Bring only the amount you want to spend, and when the cash runs out, you can’t buy anything else.
11. Compare prices at different stores.
Compare prices at different nearby grocery stores. Switch to a store that’s known for more affordable food prices like Walmart, Aldi, or Trader Joe’s. Even Dollar Tree has grocery items. Or you can join a wholesale club like Costco or Sam’s Club. These stores stock items in bulk at often lower prices. You’ll have to spend more upfront but you’ll save in the long run. That might not be for everyone but it’s a good value for large families.
12. Use a rebate app.
Sign up for apps like Ibotta and Rakuten. They give you cash back for buying groceries, among other items. Stores pay these apps a commission for sending them your way. Find out which apps link to your grocery store to make sure that they are an affiliate partner.
Happy shopping!
This article is furnished by California Casualty, providing auto and home insurance to educators, law enforcement officers, firefighters, and nurses. Get a quote at 1.866.704.8614 or www.calcas.com.
by California Casualty | Homeowners Insurance Info |
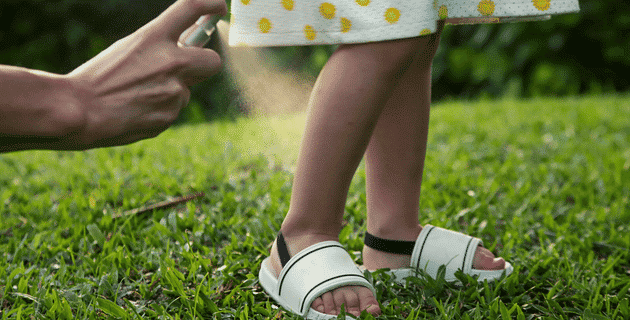
We love being outside in the summertime for a backyard barbecue or an evening gathering around the fire pit. Unfortunately, the bugs love it too. If you’re tired of itchy mosquitos, armies of ants, and other pesky pests, read on. We’ve got the answer for what bugs you!
Here are some of our favorite tips and tricks to keep backyard bugs away.
1. Start with scents.
Bugs hate strong smells of mint and citrus. They’re also not fond of some other scents. Here are some ways to use these smells against them.
-
-
- Put mint-flavored mouthwash in a spray bottle and spray your tables, chairs, and patio perimeter.
- Place a few drops of essential oils on cotton balls and place them around your entertaining area. Choose scents of peppermint, citrus, lavender, or eucalyptus.
- Make fly-repelling sachets of potpourri using cloves and bay leaves.
- Burn a citronella torch or candle. Citronella is made from bug repellant grasses and helps to mask the smell of carbon dioxide and human lactic acid, both of which attract some bugs.
2. Place your plants.
Some herbs and flowers are natural pest deterrents. Bringing them into your garden and around your entertaining areas can help keep bugs at bay. These plants are often bug-specific.
-
- To protect against mosquitoes, try basil, catnip, lavender, citronella, lemon-scented geraniums, lemon thyme, marigold, and rosemary plants.
- To ward off flies, try basil, catnip, and lavender plants.
- For moths and fleas, use lavender.
- Chrysanthemums help protect against roaches, ants, ticks, and fleas.
- Garlic and rosemary plants can repel biting insects.
- A chive and lemongrass garden can ward off other pests.
3. Mind your mulch.
Too much mulch gives cockroaches and ants the perfect home for nesting. You don’t want that too near your entertainment area or your home.
-
- Keep mulch at least 12 inches from the foundation.
- Consider replacing mulch with inorganic rock or gravel.
- Do make sure to have some mulch, grass, or ground covering. Yellow jackets make their nests by tunneling into bare dirt.
4. Turn on the fan.
Fans work in two ways to keep mosquitos away. Mosquitos aren’t strong fliers and so the breeze can prevent them from getting close. Fans also help disperse carbon dioxide and other chemical cues that mosquitos use to locate their hosts.
-
- Turn on the patio fan or bring a portable fan outside. Both will work. Set them on medium or high settings.
- Oscillating fans may be even more effective, as they help to move the air in different directions.
- Consider several fans blowing in different directions to cover your entertaining area.
5. Redo your outdoor lighting.
Bright white or bluish lights attract insects because they emit shorter wavelengths. Bulbs that burn hotter also attract their share of bugs. Switch your outdoor lighting to reduce the number of your nightly “visitors.”
-
- Replace white light bulbs with longer wavelength colors like yellow ones. The orange or yellowish glow is less visible to some insects.
- Replace your incandescent and halogen bulbs, which give off a lot of heat, for ones that don’t. LED and fluorescent bulbs emit much less heat than others with the same wattage.
- Reduce the wattage. Rather than 100 watts, try 60. Dimmer bulbs are harder for insects to see.
Pro Tip: If you are using older LED bulbs, you will need to replace them. Early versions had a coating that gave off more heat than current models.
6. Address standing water.
Standing water is the perfect nursery for mosquitos, gnats, and other bugs. Make sure you don’t have any standing water on your property, or if you do, take steps to eliminate or reduce the risk.
-
- Remove standing water from gutters and downspouts.
- Keep kiddie pools, buckets, and watering cans empty when they are not in use.
- Get a birdbath with running water to reduce the chance of mosquitoes breeding.
- Treat standing water with mosquito dunk pellets. This will allow them to fly but they will be sterile and cannot reproduce.
7. Build a bat house.
Attracting the predators that eat bugs can help you naturally reduce the insect population. One small bat can eat up to 1,000 mosquitoes an hour, which is a great reason to buy or build a bat house.
-
- Buy or build one that is at least 24 inches high by 16 inches wide.
- Bats prefer to roost on buildings or concrete structures rather than trees. It helps protect them against their predators.
- Mount the house at least 10 feet off the ground and 20-30 feet from the nearest tree if possible.
- The location should have a nearby water source and at least 6 hours of daily sun.
8. Build a bug trap.
Commercial bug traps are available, but it’s easy to make your own from materials that you probably already have around the house. Put your bug trap outside a few hours before you entertain or anytime you want a bug-free area.
-
- Start with a 2-liter soda bottle. Take off its cap and throw that away.
- Measure about 4 inches from the top of the spout and mark that. Use that line to cut around the bottle so that it is now in 2 pieces.
- Insert the spout inside the open top so it points back down to the bottom.
- Tape the pieces together to seal them.
- Fill with soda or a sweet liquid to attract bugs, bees, wasps, etc.
Pro Tip: Fill a small bowl of apple cider vinegar and mix in a few drops of dish detergent. The scent will attract fruit flies and the soap will create a barrier that prevents their escape.
9. Keep it clean.
Keeping your patio or deck clean will help deter bugs. That’s because any morsel of food or sticky substance can attract them.
-
- Sweep any crumbs. Wipe away spilled liquid.
- Make sure all your garbage cans and recycling bins have covers to prevent breeding flies. Move them away from your entertaining spots.
- Fill a spray bottle with a mixture of one part hydrogen peroxide to two parts water. Spray your patio or deck surface and perimeter. Be careful not to mix this with food or drinks.
- Ticks like to hide in tall grass so keep your grass mowed and maintain your lawn. Trim back bushes or tree branches that touch your home, and which help pests get inside.
This article is furnished by California Casualty, providing auto and home insurance to educators, law enforcement officers, firefighters, and nurses. Get a quote at 1.866.704.8614 or www.calcas.com.
