
by California Casualty | Auto Insurance Info, Finances, Homeowners Insurance Info |
From groceries to gas, it seems like we’re paying more for everything these days. Now insurance rates are increasing as well. Why is this happening, and more importantly, what can we do about it? Here’s what you need to know.
What we’re seeing…
Car insurance rates rose 9% over the course of 2022, a trend that is expected to continue with another 7% rate growth in 2023 according to Insurify. Home insurance rates increased by an average of 12.1% in 2021, and another 3% in 2022 said Bankrate.com. Experts predict rate increases each year for the next few years due to the perfect storm of inflation, supply chain issues, weather changes, and other factors.
We’re experiencing historic inflation.
Inflation is at its highest level in decades. Inflation has had a significant impact on the cost of auto parts and labor, as well as medical expenses for bodily injuries.
From March 2021 to March 2022, here’s how prices have increased:
-
-
- Medical services – increased 2.9%
- Auto repair costs – increased 4.9%
- Car rental costs – increased 13.8%
- Used vehicles – increased 35.3%
Similarly, the costs associated with a home claim also have been affected by inflation. This includes additional temporary living expenses, replacement of personal property and home furnishings, cost of construction labor, and costs of construction supplies.
From March 2021 to March 2022, here’s how prices have increased:
-
-
- Rent – increased 5.1%
- Home furnishings – increased 10.1%
- Construction labor and trade services – increased 21.3%
- Construction materials and goods – increased 22.2%
Supply Chain Issues
There are supply chain issues created by the pandemic and by a labor shortage. When we can’t get parts or supplies to repair a vehicle or a home, the process becomes lengthier and results in repairs simply costing more.
Other Factors
The severity and frequency of vehicle accidents are on the rise. Traffic fatalities reached a 16-year high in 2021 according to the National Highway Traffic Safety Administration, due to an increased trend in post-pandemic risky driving behaviors – speeding, driving distracted, not wearing seatbelts, and driving under the influence. This rise in accidents directly affects claims, which contributes to rising auto insurance costs.
Similar conditions come into play for home insurance costs. The number of extreme climate events and weather disasters is also increasing. In 2022, there were 18 disasters with losses of more than $1 billion each, according to the National Centers for Environmental Information.
An inside look at how this affects your insurance rate
As material and labor costs rise, the cost to repair and replace damaged homes and vehicles increases. Factor in the ongoing supply chain issues and costs increase even more. The amount you pay for insurance is likely to go up when the cost to settle claims rises.
“But I’ve never been in an accident, so why would my rate go up?”
Even if you have a spotless driving record or never filed a claim, it’s likely that your insurance costs could be impacted due to economic factors that are out of your control – regardless of the company that provides your coverage. Insurers across the country have been raising rates, some multiple times in the past 12 months. However, it’s not all doom and gloom. There are ways you may be able to reduce your costs.
What You Can Do to Lower Your Premiums
Your insurance provider can recommend adjustments that still give you the quality coverage you need but with a lower premium. Start with a thorough policy review and make sure to look at these areas.
• Review deductible options. Generally, the higher your deductible, the lower the cost of your insurance premium. Since the deductible is the amount your insurance provider will subtract from an insurance payout, you’ll have to select a deductible that you’re comfortable paying out-of-pocket after a loss. Note that there can be diminishing returns if you set your deductible much higher than average, so as a consumer, you need to balance the premium savings against the amount you’d be required to pay after a loss.
• Take advantage of discounts. You may qualify for insurance discounts for being part of a professional association, such as groups for teachers, nurses, or first responders. There are also discounts for being retired, good student discounts, setting up automated payments, and for paying in full upfront. You may also receive a discount for quoting online.
• Buy home and auto insurance from the same company. When you bundle your home and auto insurance, you can often qualify for reduced rates, saving hundreds of dollars.
• Remove Gap coverage if no longer needed. When you buy or lease a new vehicle, it starts depreciating once you drive it off the lot. Gap insurance ensures that you will get the full replacement value of your car if it is totaled or stolen. As a car begins to age, this gap goes down and the need for coverage is less.
• Make your home disaster resistant. Talk to your insurance agent about how you can disaster-proof your home. You may be able to save on your premiums by adding storm shutters, reinforcing your roof or buying stronger roof materials, or even clearing brush from around your home. Older homes can be retrofitted to make them better able to withstand earthquakes or other natural disasters. In addition, consider modernizing your heating, plumbing, and electrical systems to reduce the risk of fire and water damage.
• Choose electronic documents rather than mail. This is an easy change that often comes with a discount and can add up in the long run.
• Skip a payment. Some insurance companies allow you to skip payments around the holidays. At California Casualty, you have the option to skip payments during the summer or holiday months when budgets tend to be extra tight. Ask your agent for details.
California Casualty has been slower with rate increases than the bigger carriers. We will always strive to keep our prices as affordable as possible for our members. When we do make rate changes, it is to be able to maintain the financial fortitude to keep our promises to every policyholder during their time of need.
This article is furnished by California Casualty, providing auto and home insurance to educators, law enforcement officers, firefighters, and nurses.

by California Casualty | Homeowners Insurance Info |
We all know the dreaded drip, drip, drip of a water leak. It’s the sound of a potentially expensive repair or at minimum, an annoying cleanup. Either way, you want to be prepared when it happens. Knowing what your homeowner’s insurance covers in terms of plumbing and pipe leaks is the first step.
In general, sudden plumbing issues are typically covered by insurance but plumbing problems that occur over time due to lack of maintenance may not be. The policy may cover damage resulting from plumbing breakdowns, but it won’t cover the cost to repair the plumbing itself. Insurance is intended to help in emergencies, not a substitute for regular maintenance.
What Insurance (Probably) Does Not Cover
Most policies do not cover old plumbing and pipe leaks. If you’ve got a slow leak and you ignore it until it gets worse, that’s likely not covered by your homeowner’s policy. When you file a claim, your insurance company will send an adjuster. They will determine the cause of damage, and decide whether it qualifies for coverage. Here are general guidelines on what insurance probably does not cover.
-
- Normal wear-and-tear and lack of maintenance are not covered. If you neglect your plumbing and pipes, you essentially have voided your policy.
-
- Leaks that started small and have gotten progressively worse over a period of years are not covered. The time to address them was when they started.
-
- Pipes that freeze because you turned off the heat would be categorized under neglect. So, if you went away on a winter vacation, and failed to take the necessary steps to protect your pipes, the damage that results may not be covered under your policy.
-
- Mold may be excluded from your standard policy. However, you could purchase additional coverage.
-
- Water damage from any flooding is not covered unless you have a flood policy.
What Insurance (Probably) Covers
From certain plumbing issues to broken, burst, or frozen pipes, your homeowner’s policy probably covers the ensuing damage if you have taken reasonable care and performed continued maintenance. For example, coverage for freezing of a plumbing system only applies if you “maintain heat in the building; or shut off the water supply and drain all systems and appliances of water.”
Insurance pays to repair the pipes or plumbing in these cases. It also compensates you for covered items that are damaged by the leak. Coverage A (which includes the plumbing system) will cover the plumbing system if there is a fire, tornado, explosion, etc. The contract specifically excludes coverage for “wear and tear, deterioration and latent defect, inherent vice” – basically, the policy will not pay for the plumbing system or pipes for leaks, broken, etc. – that is the homeowner’s responsibility. If it is a covered loss, the insurance company pays for the ensuing damage, i.e. flooring, baseboards, drywall, and personal property.
Your insurer will likely send someone out to determine the cause of loss and inspect the damage. You will get reimbursed by your policy, minus your deductible (which is the amount that you chose to pay out-of-pocket before insurance kicks in).
There are four different parts of your homeowner’s policy that address damage caused by plumbing and pipe leaks:
-
- Dwelling coverage covers the structure of your home. This includes the roof, walls, and floorboards. However, if you have to remove a wall to see if there is a leak, that would not be covered. There are companies that will come out and complete a Leak Detection Report to determine where the water is coming from. If the loss is covered and over the deductible, your insurance will pay for the report.
-
- Personal property coverage protects your possessions that may be damaged. Coverage may apply if there is “an accidental discharge or overflow of water from within a plumbing system or household appliance.” Damage that occurs gradually due to a leaky pipe is generally not covered. Protected possessions include clothing, TVs, and furniture. There are dollar limits for certain items such as money, jewelry and firearms, so check with your insurer. (You could add an extra rider to cover those items.) For personal property coverage on a homeowner’s policy, you typically get 50 or 75% of Coverage A, the total amount of coverage for your home.
-
- Other structures coverage protects detached buildings, such as garages or guest houses, that may be damaged due to plumbing issues. The coverage limit for other structures is generally set at 10% of your home’s coverage limit. That means if your home is insured for $200,000, the coverage limit for your garage would be $20,000. For an additional premium, you can add an endorsement for additional coverage.
-
- Depending upon the extent of the damage, your house may not be livable. If that’s the case, you would need to stay somewhere else. You would be covered for any necessary increase in living expenses, such as lodging, food, and gas. Under Coverage D – Loss of Use, called “Additional Living Expense,” your policy will provide a flat percentage toward living costs, usually 30% of the Coverage A amount. Some states have time limits (e.g. 12 months) on when you can use that coverage. Plan to cover those additional expenses out-of-pocket.
How to Know if You Have a Leak
Taking the time to inspect your pipes and plumbing periodically can give you a heads-up that there could be a problem. The earlier you address it, the less costly it will be. Look for these signs that you may have a leak.
-
- Stains or discolorations on walls or ceilings
- Bulging or sagging spots on walls or ceilings
- A trickling sound when it is quiet, such as at night
- A musty smell, which can be a sign of moisture and mold growth
- Poor water pressure
- Rusted metal
- Peeling paint
- Steady increases in water bills
Finally, make sure your homeowner’s policy is up to date, and that it provides the coverage that you need. That will go a long way toward having peace of mind should you have a plumbing problem.
This article is furnished by California Casualty, providing auto and home insurance to educators, law enforcement officers, firefighters, and nurses. Get a quote at 1.866.704.8614 or www.calcas.com.
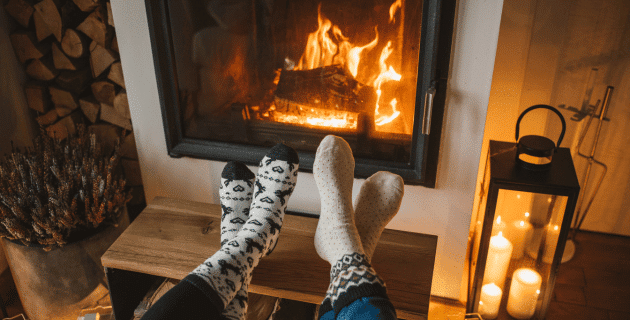
by California Casualty | Homeowners Insurance Info |
Try these clever hacks for making and keeping rooms warm this winter.
1. Change the furnace filter.
Filters get clogged with dust and pet hair. Dirty filters make your furnace work harder and less efficiently. They also impact your home’s indoor air quality. Replace your filters when they are dirty to help air circulate freely.
2. Move your furniture.
Furniture can block heat from getting into the room. Moving a couch, chair or table away from radiators or vents can help heat to flow freely. Pro Tip: Put foil behind the radiator to reflect the heat into the room.
3. Layer your bedding.
The order of the sheets and blankets on your bed can affect how warm you feel. Put sheets on first, followed by a lightweight fluffy blanket. Finish it off with a thick, dense blanket on top. This will create a heat barrier, keeping the warmth in. Add a hot water bottle by your feet for added comfort.
4. Let the sun in.
Open your curtains and let the sunshine in on sunny days. This will help to warm your home, but remember to protect against UV Rays. Then close those curtains at night to keep the heat in. Choose a heavier fabric for winter curtains to provide an extra layer of warmth.
5. Cover your windows and drafty openings.
Create a barrier between drafts and your home. Cover windows with bubble wrap. Just cut a piece to the outer edges, spray the window with water, and press the wrap firmly. Stop mini-drafts from mail slots and doggy doors with old towels. Use draft stoppers under doors. For more ideas, see our blog on Winter Window Hacks.
6. Boost your ducts.
If you have forced-air heat, you can use duct booster fans to increase the flow of air. Some plug into outlets; others are hard-wired. Just know that cheaper ones can be noisy.
7. Reverse ceiling fans.
Most ceiling fans have a switch that allows you to easily change their direction. In colder months, make sure your fan is moving clockwise. Run your fan on low and it will push the warm air downward where it’s needed.
8. Use shower steam.
Leave the bathroom door open when you’re showering. The warm steam will travel through the house. Similarly, a boiling kettle will help warm your kitchen.
9. Leave the oven door open.
After baking, leave the oven door open slightly. The heat will help warm the kitchen. A word of advice: If you have small children, pets or elderly house guests, make sure the kitchen is securely closed off and that your charges are under constant supervision while the oven is open.
10. Use a dryer to warm items.
Put your pajamas in the dryer for a few minutes before bed and you’ll be wrapped in toasty comfort. You can also use this trick for blankets, mittens, scarves, and hats.
11. Use a fireplace plug.
You can lose a lot of heat through your fireplace if there are loose dampers. Try a fireplace draft stopper to seal the flue. Be sure to measure first so you get the right fit.
12. Make your own heater.
You can transform terra cotta pots into a makeshift room heater with candles and a few other supplies. Learn how in this video, and make sure to take safety precautions if you live with children or pets. This heater can get hot and should not be left unattended.
13. Add some rugs.
Heat can escape through your floorboards, and cold can come up from your floor, especially if it is uninsulated. Cover your floors with some rugs to provide an extra layer of warmth right under your feet.
14. Use outlet insulators.
If you’re feeling a slight chill when you go to plug into your electric outlets, you’re not imagining it. Cold can come through those small openings. Pick up some outlet insulators at your local hardware store. These foam sheets are installed right behind the face plate to block drafts.
For added peace of mind, protect your home with home insurance. An annual review of your homeowner’s policy will ensure you are fully covered.
This article is furnished by California Casualty, providing auto and home insurance to educators, law enforcement officers, firefighters, and nurses. Get a quote at 1.866.704.8614 or www.calcas.com.

by California Casualty | Auto Insurance Info, Homeowners Insurance Info |
You slow down for the yellow light but the car behind you does not. Bam! It wasn’t your fault but now you have to get your car fixed. Or maybe a storm knocks out a window in your house. Now you need to get it repaired.
Accidents happen. Washing machines overflow; things are stolen or vandalized. That’s why you have insurance. Your policy protects your vehicle, your home, and your belongings, taking some of the financial stress away to help you repair and replace those necessary items. Here’s an overview of the insurance claims process so that you can do it easily.
When to File a Claim
Every policy has a deductible, an amount that you are required to pay out-of-pocket before insurance kicks in. The general rule is to file a claim when the payout is greater than the deductible and you cannot cover it on your own. You also should file a claim whenever someone is injured and when it’s not clear who is at fault. That way, the insurance companies can get together and determine the outcome.
How to File a Claim
Let’s say you were in a car accident. Here are the steps to take to file a claim. (You also can refer to the back of your California Casualty insurance card. It lists the steps to follow in the event of a loss.)
Step 1: Call the police if needed.
-
- Call 9-1-1 if anyone is injured or you suspect drugs or alcohol are involved.
- Call the non-emergency police number to report the accident. An officer may show up and take a police report. While you don’t necessarily need one, it will make the claims process easier. If the police are not needed, or available, you may file an accident report online, by mail, or at the police station.
Step 2: Get the other driver’s information.
-
- You feel bad so it may be tempting to say the accident was your fault. Whether or not it was, don’t take the blame. Don’t apologize.
- Exchange information. Get the other driver’s name. Take a photo of the other driver’s license, insurance card, and registration. Alternatively, you can write down the information. Make sure you have the year, make, model, license plate number, and color of the other car.
Step 3: Write down facts and take photos. Look for witnesses.
-
- Take photos of the scene, license plates, traffic signs, and anything else that may help you to remember the details of the accident.
- Include the direction the cars were traveling, your speed, weather, road conditions, and what happened.
- Use your phone to make detailed notes.
- There may be witnesses. Look around and ask for the contact information of those individuals. They may later be contacted by your insurance company or police, if needed, to support your rendition of the accident.
Step 4: Call your insurance company.
-
- Report the accident. The adjuster will ask questions. Answer them honestly and thoroughly. If you don’t know the answer, say so.
- Your adjuster will share the process of getting your car repaired. They will send you paperwork to fill out.
- Let them know if there is a police report.
- Don’t sign anything from the other person’s insurance company. Let your insurer take the lead.
Step 5: File your claim.
-
- Most insurance companies allow you to file your claim online. That means you’ll fill out the necessary paperwork online or by email.
- To complete the filing of your claim, you’ll need to fill out the forms that you are sent.
- You may have to get a repair estimate and include that information.
- Then, you’ll wait for approval. Once the repair is authorized, you’ll be able to proceed with the repairs. Either you or the repair shop will receive payment from the insurance company, so check with your adjuster.
The Difference with a Homeowner’s Claim
A homeowner’s, renter’s or personal property claim follows a similar process. The main difference is that you need to provide a Proof of Loss statement. That’s a list of items that were damaged or stolen and how much it costs to replace them.
Can you wait to file a claim?
You should not wait. Your insurance contract specifies your specific Duties After Loss. You must give prompt notice to the insurer; notify the police in case of loss by theft; protect the property from further damage, prepare an inventory of damaged personal property; and cooperate with the investigation.
So, the next time that life throws a wrench into your plans, remember that you have insurance. The claims process is an easy way to get the help you need.
This article is furnished by California Casualty, providing auto and home insurance to educators, law enforcement officers, firefighters, and nurses. Get a quote at 1.866.704.8614 or www.calcas.com.
by California Casualty | Auto Insurance Info, Homeowners Insurance Info, Safety |
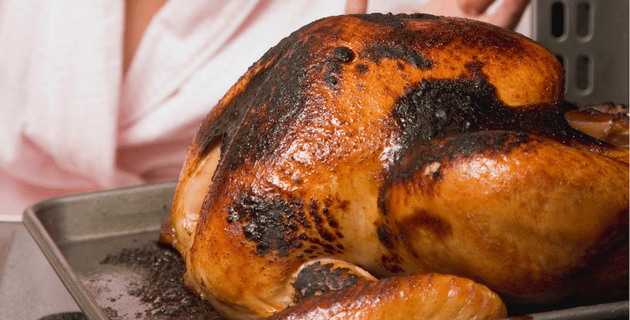
Thanksgiving is a special time to gather with loved ones. But when your turkey catches fire, your aunt drinks a little too much and falls and breaks her leg, or your fur baby takes a little nip of a guest, it’s time to be thankful for insurance. Fortunately, there’s coverage for most Thanksgiving dinner disasters. Whether you’re home entertaining guests, or traveling to friends or family, we’ve compiled a quick guide.
Cooking Fires
It’s easy to lose sight of something on the stove or in the oven when you’re also attending to guests. That’s why you’re more likely to have a holiday cooking fire on Thanksgiving than on any other day of the year, according to the National Fire Protection Association (NFPA). The risk increases if you’re deep-frying a turkey. Deep fryers heat up to such a degree that they have caused severe burns and injuries, and even deaths. (If you must have a deep-fried turkey, consider ordering one from your local grocery store.) When cooking fire accidents happen, your homeowner’s or renter’s insurance policy will cover the damage to your home, your belongings, and any related injuries to your guests. (For the guest injury part, skip to the next section.)
-
- Your homeowner’s policy includes dwelling coverage. This covers the repair or rebuilding of the structure of your home up to your policy limit. So, if the fire damages your kitchen or other areas, you can report the claim to your insurance adjuster. They will advise you on how to proceed. Your insurer will likely send someone out to inspect the damage and write up an estimate. You will get reimbursed by your policy, minus your deductible (which is the amount that you chose to pay out-of-pocket before insurance kicks in).
-
- Personal property coverage is that part of your homeowner’s or renter’s policy that protects your possessions such as kitchen appliances, furnishings, and if the fire spreads beyond the kitchen, your television, clothing, etc. Fire is one of 16 different named “perils” that your policy covers. There are dollar limits for certain items such as money, jewelry, and firearms, so check with your insurer. For personal property coverage on a homeowner’s policy, you typically get 50 or 75% of Coverage A, the total amount of coverage for your home. If you’re renting, you get to choose the amount of personal property coverage when you select your policy.
-
- You can select replacement cost or actual cash value (ACV) for personal property. ACV is the amount the item is worth, minus depreciation for its age. It will cost a little more for a policy that provides replacement cost (and we strongly recommend it).
-
- Depending upon the extent of the fire, your house may not be livable. If that’s the case, you would be covered for any necessary increase in living expenses, such as lodging, food, and gas. Under Coverage D – Loss of Use, called “Additional Living Expense,” your policy will provide a flat percentage toward living costs, usually 30% of the Coverage A amount. Some states have time limits (e.g. 12 months) on when you can use that coverage. Plan to cover those additional expenses out-of-pocket.
Pro Tip: Having a fire extinguisher could earn you a discount on your home insurance policy.
Guest Injuries
Injuries can happen anytime, especially during gatherings where people may drink. Guests could become tipsy and trip, slip, and fall. That could happen even if they’re not drunk, of course. Burns could occur if there is a kitchen fire. Your guests could get food poisoning. Your normally well-behaved fur baby could bite one of your guests. While you can’t anticipate every situation, you can make sure there are no obvious dangers in your home, such as tripping hazards or unsecure handrails. Keep everyone’s safety and comfort in mind, including where your pet may be during the festivities. Then, if a guest does get injured, your insurance can kick in.
-
- You may be covered for guest injuries under your homeowner’s or renter’s liability coverage. If you are found liable, the policy may cover damages to the injured party. This can include medical expenses, lost wages, pain and suffering, and permanent scarring. The policy also provides a defense in court, if needed, for the policyholder. This is at the insurance company’s own expense.
-
- If you are not liable, but your guest was injured through his/her own fault, then Coverage F – Medical Payment to Others may cover your guest’s medical bills.
-
- Liability coverage does not apply to you and your family. Your own injuries or illnesses are not covered under homeowner’s or renter’s policies. You would use your own health insurance policy to cover any injuries that you might have in your home.
-
- If your dog has bitten a guest, make sure that your dog’s breed is not restricted by your insurance policy. Some policies will not cover breeds such as Pit Bulls, Doberman Pinschers, or Rottweilers. California Casualty does not currently have such restrictions.
Thanksgiving on the Road
If you’re among the millions who drive to Thanksgiving celebrations, you’ll want to make sure your car is well-maintained, and that your car insurance is up to date. Be ready for the holiday traffic, and drive safely. An accident can put a damper on the holiday. The good news is that you’re covered if you do have one.
-
- If you cause an accident, you are responsible for damages. You would pay with your vehicle’s liability policy. Importantly, auto liability does not cover any damage to your own vehicle; that’s covered by collision. It also does not cover injury to you and your family; it only covers the people in the other car. Liability coverage is required by law in most states.
-
- There are two types of liability coverage:
- If you are found liable for the accident, bodily injury coverage helps pay for medical expenses, lost wages, and pain and suffering for the driver and passengers in the other vehicle. We say “helps pay” because it depends on how much coverage you choose. The costs of an accident can be more than your insurance policy limit.
- Property damage coverage helps pay for repairs for the other vehicle or for repair/replacement of property, such as a fence, damaged or destroyed in the collision.
-
- If you are not at fault for the accident, the other driver is responsible for damages. Your insurance kicks in if the other driver does not have enough insurance. Collision covers your car for any type of damage, regardless of fault or if the person does not carry any/enough insurance. Underinsured motorist (UIM) and uninsured motorist (UM) coverage are for injuries. They cover you and your passengers if you are hit by an at-fault UM or UIM. Uninsured motorist property damage (UMPD) can cover your car if hit by an at-fault uninsured motorist.
-
- Unlike liability insurance, collision coverage is not usually required—unless you’re leasing a car or paying off a loan on a vehicle. However, it may be good to have.
No matter where you enjoy the holiday, we wish you a safe celebration. From our family to yours, Happy Thanksgiving!
This article is furnished by California Casualty, providing auto and home insurance to educators, law enforcement officers, firefighters, and nurses. Get a quote at 1.866.704.8614 or www.calcas.com.

by California Casualty | Homeowners Insurance Info |
It’s the beginning of the holiday season. In the coming weeks, you’ll be hosting guests, gathering with family, and celebrating in your home.
As a host, there’s a lot to do, so we’re here to help you get organized. From fall home safety updates to getting ready to entertain, we’ve got your November Home Checklist.
Entertaining
Entertaining is a big part of the season, no matter which holiday you celebrate. Here’s how to get your home ready.
Clean and prepare guest rooms.
Are you going to be hosting guests? Get a jump start on preparing the guest room. That way, you can give it a quick touch-up just before your guests arrive.
• Make the bed with fresh linens.
• Dust, vacuum and clear out any clutter. Empty the waste basket.
• Clear out the closet. Make sure there are empty hangers and room for a suitcase. Put an empty laundry basket in the closet for your guest’s dirty clothes.
• Set up the nightstand with a box of tissues, and don’t forget to leave the WiFi password!
Deep clean your bathrooms.
Whether or not your guests stay over, they will be using the bathroom. Do a deep clean of all of your bathrooms, but especially the ones your guests may use.
• Wash all washable items such as towels and mats.
• Scrub the shower, tub, and toilet.
• Clean the floors, walls, mirrors, and vanity. Dust the blinds.
• For overnight guests: Add a basket of travel-size toiletries your guests may have forgotten to pack.
Get your linens and serving pieces ready.
Whether you’ll be using the fine linens and China, or saving yourself some time and choosing to go with disposable utensils, make sure they are ready to go when you are.
• Launder and press fancy linens and napkins.
• Sharpen your kitchen knives. You’ll be doing a lot of cooking.
• Stock up on disposable items to get you through multiple snacks and meals.
• Pull out your favorite holiday pieces, inspect them and clean them.
Pro tip: Roll up fancy linens on old wrapping paper tubes to store them in a way that prevents wrinkles.
Decorate inside and out.
If you love to decorate for the holidays, now is the time to start. Make a realistic plan for your décor so you can ensure it’s safe and so it’s not too overwhelming.
• Many holiday traditions revolve around light. Add lights or candles, but keep fire safety in mind. Don’t overload extension cords.
• Decorate with a shopping bag nearby so you can easily toss old items you no longer use. You can donate or trash them.
• Immediately get donations out of your house by boxing them up and putting them in your car.
• Keep your holiday spending on budget whether for décor, entertaining, or gifts.
Pro Tip: To make decorating easier next year, take a picture of each room so you can easily duplicate it.
Home Maintenance
You’ll need to perform fall maintenance for your appliances and home systems. In addition, you’ll want to address common problem areas before they become problems during the holiday season.
Fix any plumbing issues.
That slow drain, finicky toilet, or nonworking garbage disposal can get worse over time. Take the time to look at these and see if you can DIY a fix or if they need professional help.
• Clean your garbage disposal to prevent it from growing bacteria.
• Use a “snake” tool to pull up debris from a slow drain.
• Fix your dripping faucets and address your running toilets, both of which can waste water on a daily basis.
• Make sure your sump pump is working before rainy season.
Cover gaps in your home.
Mice can squeeze through a gap that is about the width of a pencil. Bugs can enter even tinier cracks. To prevent rodents and bugs from taking refuge in your nice warm home, you will want to check your home for any gaps and cover them.
• You can use caulk to seal skinny gaps, squirt foam for medium-size gaps, and wire mesh and plaster for larger ones. Cover exterior vents with hardware cloth, a type of wire mesh.
• Common places for gaps are around doors and windows, where pipes and wires enter your home, or vents for exhaust fans. You also may find gaps where the wall and floor connect, and inside and around cabinets.
• Attach door sweeps to the bottoms of exterior doors.
Guard against carbon monoxide poisoning.
With the stove and fireplace in use, a buildup of carbon monoxide is common. Carbon monoxide is produced when we burn gasoline, wood, propane, charcoal, and other fuel. This gas is colorless and odorless, and can be deadly.
• Install battery-operated carbon monoxide detectors in your home (and replace the batteries each spring and fall).
• Have a professional check your heating system, water heater, and any gas or oil-burning appliances every year.
• Be careful about burning any fuels inside your home. Make sure there is proper ventilation.
• Be aware of the signs of carbon monoxide poisoning: headache, dizziness, nausea or vomiting, shortness of breath, and confusion. Get outside to fresh air, and seek medical attention.
Protect against slips and falls.
You and your guests will be walking in and around your house this season. Make sure the walkways are safe.
• Do a walk-through inside and outside your home. Make sure that there are no obstructions on common paths.
• Check that stairs and paths inside and out are well-lit. Falls can happen when you can’t easily see where you are going.
• Check railings to make sure they are secure and not wobbly.
• If you’re using a ladder for holiday decorations, make sure it is sturdy. Place it on firm, level ground. Maintain 3 points of contact whenever you climb it.
Other
Do your fall yard cleanup.
It will be winter soon. Make sure you have cleared your yard and prepared it for what’s to come so you will avoid any winter home hazards.
• Finish raking any leaves. Use a tarp to haul them to the curb or to a compost pile. Or you could run your lawn mower over them to shred them. They will decompose into a natural fertilizer.
• Remove any dead shrubs or trees. (Check for signs of life by scratching the bark at the base. If you see green, it’s alive.)
• Bring in, or cover, patio furniture.
• Only cut your grass if it is still growing. Once it’s below 50 degrees consistently, you can put your mower away.
Stock up for the winter
It’s been a while since you’ve had to use your winter gear. Make sure that it’s there and in good shape, and replace what is needed.
• Check your snow shovels, ice scrapers, and other snow tools.
• Service your snow blower and buy fuel.
• Order firewood if you use it.
• Pick up a bag of pet-safe ice melt.
• Restock emergency kits.
Check in on your home insurance policy.
For added peace of mind, check with your insurer and make sure your homeowner’s policy covers your current needs. Ask your provider about how to lower your home insurance costs.
What else is on your November Home Checklist? Tell us in the comments.
This article is furnished by California Casualty, providing auto and home insurance to educators, law enforcement officers, firefighters, and nurses. Get a quote at 1.866.704.8614 or www.calcas.com.
