by California Casualty | Helpful Tips, Homeowners Insurance Info |
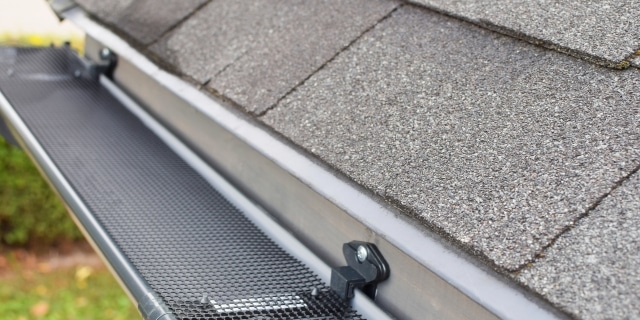
Those beautiful autumn leaves you’ve been admiring are not so pretty when they’re clogging your gutters. Acorns, leaves, branches, and other debris have a way of piling up, leading to blockages that can cause water damage and costly repairs. Enter gutter guards—a practical solution that keeps debris out while letting rainwater flow freely. Here’s a quick guide to gutter guards, including why autumn is the best time to check and clean your own gutters.
What exactly are gutters?
Gutters are channels along the edge of your roof that direct water away from your home. They include downspouts that bring water down to the ground, moving it at least 5-10 feet away from the foundation. When gutters get clogged, they no longer work the way they should. Water could stay pooled in the channels or move in ways that negatively affect your home. Clogged gutters can lead to expensive problems: soil erosion, basement flooding, structural damage, roof damage, siding damage, and foundation issues. A buildup of debris could also increase the risk of a fire. Luckily, there is an easy way to protect your gutters from getting clogged – gutter guards.
Types of Gutter Guards
There are many different types of gutter guards. Some can be self-installed, and others require a professional. Below is a brief description of the main kinds along with their pros and cons. (Check the warranty on your shingles before you install a gutter guard that requires attaching directly to shingles with screws or nails as that could potentially void it.)
Screen Guards
This is like a window screen for your gutters. The screen keeps out debris while the holes let the water pass through.
Pros: These guards are affordable and can be self-installed.
Cons: Dirt and small debris can still pass through the screen and get in your gutter. These guards need to be removed and cleaned at least once a year.
Micro-mesh Guards
Micro-mesh guards are like screen guards, but with holes that are much tinier. They are particularly good at keeping out pine needles and dirt, which can slip through larger openings. These guards are usually made of stainless steel and other durable materials.
Pros: Micro-mesh guards are low maintenance, and long lasting. They are easy to clean and should be cleaned every 3-12 months.
Cons: They require professional installation.
Reverse-Curve Guards (Surface Tension Guards)
These guards are attached beneath the shingles, and they go over the gutter and curve back a little. The curve creates a hood, so debris doesn’t get into the gutter, but the unique design lets the water seep through.
Pros: These are long-lasting and low maintenance guards.
Cons: Reverse-curve guards require professional installation. They also are highly visible and could affect your home’s aesthetic.
Brush Guards
These guards are made of stiff brushes that point up inside your gutters. The bristles catch debris as the water passes through.
Pros: They are easy to install and remove for cleaning.
Cons: These guards require frequent cleaning. Small debris can get caught in the brushes’ bristles, and these guards can be tough to clean as a result.
Foam Guards
This triangular-shaped foam fits inside your gutter to prevent leaves and other debris from lodging there. It’s usually made from polyurethane and has a spongy texture that allows water to flow through. Some foam guards restrict water flow more than others.
Pros: These are affordable and easy to install. They are good at blocking large debris.
Cons: Small debris can enter through gaps between the foam and gutter walls. The foam also can break and is susceptible to mold due to dampness. These need to be replaced every 1-2 years, depending on weather conditions in your area.
DIY vs. Professional
Should you install your own gutter guards or hire a professional? Here are some things to consider.
Choose DIY gutter guards and install them yourself if:
- You want or need to save money.
- You’re generally handy and comfortable on a ladder.
- Your roof is easy to access.
- You like the choices available for DIY. You can find most at your local home improvement store.
Hire a professional to install your gutter guards if:
- You have the budget for professional installation, and you prefer the convenience.
- You want a warranty to show the installation was done correctly and that will address potential future issues.
- You want a higher quality gutter guard than is available DIY.
- Your roof is unusually steep or is difficult to access.
- You have concerns about doing it yourself.
Before the Installation
The best time to install gutter guards is late summer and early fall. This helps prepare for the large volume of leaves that start coming down during the season. Before the installation, you will want to clean and check your gutters.
Cleaning your gutters is part of fall home maintenance. It helps to ensure that your home is ready for winter storm season and severe weather. Here’s a quick overview of how the process is done.
- Gather your supplies: a bucket for debris, trowel or gutter scoop, garden hose with spray nozzle, latex or waterproof gloves to protect your hands from wet debris, safety eyewear, and a sturdy ladder.
- Start at the downspout. Use your gloved hand or a trowel to remove leaves, twigs and packed material.
- Then go up to roof level on your ladder. Use your gloved hand to clear large debris like leaves or twigs. Use the trowel for compacted debris.
- Remove and clean the downspout strainer.
- Flush the downspout and the gutter with water from your hose.
- Look for leaks, making sure water flows freely through the downspout. You will want to repair any issues before you add gutter guards.
- Inspect your gutter for rust spots or peeling paint which could show signs of deterioration. Again you will want to address any issues and potentially replace those parts before adding the guards.
- Look for mold or mildew near the foundation which could mean water is getting in there. That could signal a larger problem.
Ready to start the project?
Once you have clean gutters without any issues, you are ready to protect them with gutter guards. Measure your gutters so that you will be able to purchase the right length of gutter guards. If you’re doing a DYI installation, make sure to fully read and understand the instructions. Watch tutorials and online customer reviews for a heads up on potential mistakes. Know that installing gutter guards can take anywhere from a couple of hours to a couple of days. If you’re choosing a professional installation, make sure to get several estimates and ask for references to avoid scams.
Your home is your greatest investment. Keep it fully protected for added peace of mind.
This article is furnished by California Casualty, providing auto and home insurance to educators, law enforcement officers, firefighters, and nurses. Get a quote at 1.866.704.8614 or www.calcas.com.

by California Casualty | Helpful Tips, Pets |
Your pet is part of the family, so you want to make sure they’re welcome wherever you rent. From understanding pet policies to preventing your four-legged companion from leaving a lasting pawprint on the property, there are a few key things to keep in mind. Whether you’re moving with a playful pup, a curious cat or a chatty bird, here’s how to navigate the rental process and find a home that’s both pet-friendly and hassle-free!
Almost half of renters live with pets, according to Zillow. Pet owners tend to be responsible and reliable. They renew their leases more frequently than non-pet owners. In this regard, they’re desirable tenants. There is a chance with pets, of course, of damage to the rental property or possible disturbances with neighbors. Landlords who welcome pets will make accommodations, such as charging a pet feet, to minimize their financial risk.
Importantly, not every property is ready to welcome your pet. The following steps will help guide you in finding the perfect home.
Research pet-friendly rentals.
Start your search early. It will take extra time to find the right fit. There are several ways to find pet-friendly rentals in your area. Importantly, do not try to hide the fact that you have a pet. That would put you in violation of your lease.
- Ask friends and family members to keep a lookout for pet-friendly places.
- Inquire about pet-friendly apartments and homes in pet groups on social media, at the local Humane Society, and at your veterinarian.
- When searching rental websites, look for filters for pets. Make sure to check if there are restrictions on types, breeds, or numbers of pets.
- If a rental does not mention pets, don’t discount it. Reach out and ask. Single family rentals may be more likely to be flexible on a case-by-case basis.
- Some websites allow you to search for pet-friendly rentals. These include Apartment Advisor, Hotpads, People with Pets, and Zillow.
Note that landlords are required by the Fair Housing Act to make reasonable accommodations for disabled renters with service dogs, even if they don’t generally allow pets.
Create a pet resume.
One effective way to present your pet to your future landlord is by creating a pet resume. This can help turn tolerant landlords into pet-friendly ones.
- Start with a cute photo, your pet’s name, age, breed, and weight. For dogs and cats, note whether they are spayed.
- Describe your pet’s personality and favorite things.
- Include a list of vaccinations and proof your pet is licensed in the town, showing you are a responsible pet owner.
- If there are any past incidents, include them and tell how you will take action to prevent them in the future.
- Get a reference letter from your current landlord, your trainer, or previous roommates about your pet. Make sure to talk about areas of concern to landlords: behavior around others, odor, noise, etc.
- You may find a sample resume here: https://rentberry.com/blog/wp-content/uploads/2017/04/Dogs-resume-sample-by-Rentberry.pdf.
Set an extra budget.
Be prepared to pay extra when renting with a pet, as compared to those without pets. The landlord must cover his/her risk in case there is damage. For example, carpets may have to be replaced when a renter leaves if a pet urinated there.
- Expect to pay a pet deposit ranging from $250 to $500. The landlord can use this money to make repairs when you leave. However, it may or may not be refundable, so make sure to ask.
- You may be charged a monthly pet rental fee in addition to your own rent.
- Note that if you have a service animal, your landlord cannot charge you a pet fee. It is against federal law to do so.
- Review local and state laws as they apply to pets. Some states limit what landlords can charge in pet fees.
Check out the space for your pet.
Once you find a good rental, you will want to visit it and check it out. What you see online may not always be what’s there in reality. A personal visit will show you if it’s right for you and your pet.
- Find out if there are any restrictions on where pets can go.
- If your pet needs an outdoor space, is there a backyard area? A nearby park or place to walk?
- If you have a small living space and no backyard, make sure that setup will be right for your pet.
- For cats, keep them entertained with multi-level living such as cat condos and kitty condos placed up high.
- Check whether there are plants that are poisonous to your pets on the property.
Read your lease thoroughly.
Before you sign a lease at your new place, make sure that it says exactly what you were promised by your landlord. Specifically check that it spells out the pet policy.
- Never sign a lease that says no pets even if the landlord verbally gives you permission. Make sure it is written in your lease that pets are allowed.
- The lease should clearly outline pet deposits and fees.
- Take the time to understand and agree to the rules you and your pet must follow.
Include pet coverage in your renter’s insurance.
Many landlords require you to have renter’s insurance. It’s also a good idea to have it to protect you, your possessions—and your pets.
- Renter’s insurance is like homeowner’s insurance but for tenants. As a start, it protects your personal belongings (that’s right, your landlord’s insurance policy will not cover your belongings) but that’s not all. It’s an important safeguard if you’re found at fault for property damage or injuries at your place (and even around the world). It also can help if you don’t have access to your apartment or home due to a covered loss.
- Adding your pet to your renter’s policy will cover you if your pet damages someone else’s property or injures another pet or person.
- Note that sometimes, there are breed restrictions for coverage.
Moving with Your Pet
Your pets are part of the family, but moving day will be particularly stressful for them. After all, they won’t understand why strangers are taking their furniture. With all the commotion, it’s also easy for a pet to get lost in the shuffle, or have a scared animal run away or hide. Consider having relatives or friends take care of your pets or board them in a kennel for moving day. Also make sure that you have your pet’s records for easy access when you need them.
Are you renting without a pet but would like to adopt? Make sure your lease allows it. Finally, don’t forget to protect your fur baby with pet insurance for added peace of mind, and to save on your vet bill. Remember, you can easily add pet insurance from Pet’s Best to your California Casualty auto or home policy. Find out more about what pet insurance can cover by talking with a California Casualty customer service representative today.
This article is furnished by California Casualty, providing auto and home insurance to educators, law enforcement officers, firefighters, and nurses. Get a quote at 1.866.704.8614 or www.calcas.com.

by California Casualty | Calcas Connection, Finances, Homeowners Insurance Info, Safety |
Flooding is one of the costliest natural disasters in the United States, with the potential to impact millions of homes and communities. While FEMA and other agencies provide flood maps to help homeowners understand their risk levels, many of these maps are outdated, leading to a false sense of security for people who live in areas not designated as high-risk. Floods, however, aren’t limited to high-risk zones; even areas classified as low-risk are vulnerable under certain conditions. For these reasons, it’s vital to consider flood insurance no matter where you live.
Outdated Flood Maps and the Misleading Risk of Flooding
Flood maps are designed to inform residents and local authorities about the likelihood of flooding based on historical data, topography, and other factors. FEMA’s maps, for instance, divide areas into high, moderate, and low-risk zones, which guide flood insurance requirements and building regulations. However, some flood maps haven’t been updated for years and many don’t accurately reflect changes in land use, climate patterns, or new developments, which can significantly alter flood risks.
Changes to flood risks include:
- Urban Expansion: As cities and towns expand, natural land is replaced with pavement and buildings, which leads to increased runoff and reduced soil absorption. Areas previously considered low risk might become more prone to flooding as water has fewer places to go.
- Climate Change and Extreme Weather: Flood maps are based on historical data and often don’t account for the increasing frequency and intensity of extreme weather events that can result in both droughts and unprecedented rainstorms, often within the same year. In areas affected by wildfires where vegetation loss reduces soil stability, runoff increases. Outdated flood maps may fail to reflect these climate driven impacts, leading many property owners to underestimate their exposure.
- Erosion and Infrastructure Changes: Natural factors like erosion, as well as human-made infrastructure changes, can impact flood patterns over time. Rivers shift, drainage systems get updated, and dams or levees are added or removed—all of which can alter the flow of water and increase the risk in areas thought to be safe.
The Risks of Flooding in “Low-Risk” Areas
Approximately 40% of flood insurance claims in the U.S. come from properties located outside designated high-risk flood zones. Many low-risk or moderate-risk areas are prone to what is known as “flash flooding” from sudden, heavy rainfall or overflowing drainage systems that cannot keep up. Recent flooding incidents in areas far from coastlines or rivers illustrate how floodwaters can impact anyone, anywhere.
Causes of flooding in low-risk areas include:
- Heavy Rainfall: Even a few hours of intense rain can lead to flash flooding, especially in areas with inadequate drainage or impermeable surfaces like concrete. Low-risk flood zones can still see significant flooding from strong, localized storms.
- Snow Melt and Frozen Ground: In colder climates, rapid snowmelt or rain on frozen ground can lead to significant runoff, overwhelming waterways and drainage systems even in low-risk flood areas.
- Infrastructure Failures: Overflowing sewer systems, clogged drainage, or burst water mains can also lead to localized flooding, impacting areas that flood maps don’t highlight.
Because low-risk zones are not usually required to have flood insurance, many homeowners assume they’re safe. Unfortunately, without a flood-specific insurance policy, any flood damage may need to be covered out-of-pocket, which can lead to devastating financial loss.
Why Flood Insurance Is Essential, Even Outside High-Risk Areas
Given the limitations of flood maps and the growing risk of unexpected flooding, flood insurance is a wise investment for all homeowners. Standard homeowner insurance policies typically do not cover flood damage, so without flood insurance, homeowners face the full financial impact of repairs, replacement of belongings, and sometimes even temporary housing costs.
Here are several reasons to consider flood insurance regardless of risk classification:
- Affordable Coverage in Low-Risk Areas: In areas considered low- to moderate-risk, flood insurance premiums are often lower than in high-risk zones. This makes it possible to secure essential coverage without significant cost.
- Financial Protection: The cost of even minor flooding can add up quickly. Carpets, drywall, and flooring may need to be replaced, and waterlogged appliances or furniture might be beyond repair. Flood insurance helps cover these costs, sparing you from paying out of pocket.
- Home Value and Mortgage Requirements: While most mortgage lenders don’t require flood insurance in low-risk areas, opting for coverage can help protect your home’s value by making it easier to get it back to pre-flood condition.
- Adaptability to Climate Change: As weather patterns continue to change, so does the risk of flooding. Flood insurance ensures that you are protected no matter what nature brings, providing adaptable protection in an unpredictable environment.
Taking a Proactive Approach to Flood Protection
Beyond purchasing flood insurance, you can take steps to protect your property from potential flooding:
- Upgrade Drainage Systems: Make sure gutters and downspouts are clear and well-maintained to help direct rainwater away from your home.
- Install Sump Pumps or Flood Barriers: For homes with basements, sump pumps can be a lifesaver in the event of heavy rain. Flood barriers can also be installed around doors and windows for additional protection.
- Regular Property Checks: Monitoring your property for pooling water and ensuring nearby storm drains are clear can help reduce localized flooding.
Outdated flood maps and assumptions about risk can lead to costly surprises for homeowners. While flood insurance may seem unnecessary in low-risk areas, recent floods across unexpected locations show that no one is entirely safe from flood risks. By securing flood insurance and taking proactive protective measures, you can shield your finances and assets from unforeseen disasters – and be prepared no matter what the flood maps say.
If you’re interested in learning more or getting a flood insurance quote, the California Casualty Agency Services team can help. Call 1.877.652.2638 or visit https://www.calcas.com/flood-insurance.
by California Casualty | Firefighters, Nurses, Peace Officers |
On National First Responders Day, we honor the brave men and women who selflessly rush into danger when others flee, putting their lives on the line to protect and save. Whether battling fires, responding to medical emergencies, or maintaining order in the face of chaos, first responders serve with unmatched courage and skill. In the spirit of gratitude and admiration, we’ve gathered inspirational quotes to celebrate their heroism and offer encouragement to those who work tirelessly to keep our communities safe. Let these words serve as a tribute to their bravery and a reminder of the unwavering dedication they show every day.
On Heroism
“I’ve always seen first responders as unsung heroes and very special people because, when everyone else is running away from danger, they run into it.”
– Dwayne Johnson, actor
“Real heroes don’t wear capes. Real superheroes wear uniforms and badges and stethoscopes! Real superheroes are members of our military, law enforcement, and first responders. Pretend superheroes wear capes.”
– Dean Cain, actor
“How important it is for us to recognize and celebrate our heroes and she‑roes!”
– Maya Angelou, poet
“Next to creating a life, the finest thing a man can do is save one.”
– Abraham Lincoln, 16th President of the United States
“The hero is the man who lets no obstacle prevent him from pursuing the values he has chosen.”
– Andrew Bernstein, American philosopher
“Courage is being scared to death but saddling up anyway.”
– John Wayne, actor
On EMTs
“Even if we’re not saving lives, what we do matters. It matters in ways unnoticed by us, to people you may not even remember tomorrow…EMTs are privileged to play in life’s great game. Too many unlucky people watch the action thunder by, stuck at a desk, or watching it on television at home.”
– Kelly Grayson, pep talk published in Ambulance Drive Files
“I didn’t become an EMT to get a front-row seat to other people’s tragedies. I did it because I knew the world was bleeding and so was I, and somewhere inside I knew the only way to stop my own bleeding was to learn how to stop someone else’s.”
– Daniel José Older, New York Times best-selling author who worked as an EMT earlier in his career
On Police Officers
“The police officer who puts their life on the line with no superpowers, no X-Ray vision, no super-strength, no ability to fly, and above all no invulnerability to bullets, reveals far greater virtue than Superman — who is only a mere superhero.”
– Eliezer Yudkowsky, American writer
“Being a good police officer is one of the most difficult, dangerous, idealistic jobs in the world.”
– Thomas Hauser, writer
“Many of the best parts of America’s history would have been impossible without police. All the freedoms we enjoy — freedom of speech, freedom of worship, freedom from fear — sit on a foundation of public safety.”
– William Bratton, former New York City Police Commissioner
“When a man becomes a fireman his greatest act of bravery has been accomplished. What he does after that is all in the line of work.”
– Edward F. Croker, former New York City Fire Department Chief
“I can think of no more stirring symbol of man’s humanity to man than a fire engine.”
– Kurt Vonnegut, author
“All men are created equal, then a few become firemen.”
– Anonymous
On Nurses
“Save one life, you’re a hero. Save 100 lives, you’re a nurse.”
– Anonymous
“Our job as nurses is to cushion the sorrow and celebrate the job, every day, while we are ‘just doing our jobs.’”
– Christine Belle
“Not all angels have wings…some have scrubs.”
– Anonymous
“Nurses—one of the few blessings of being ill.”
– Sara Moss-Wolfe
On Caring
“There is no higher honor than to be given the responsibility to care for another human being.”
– Richard K. Schachern
“For me, I am driven by two main philosophies: know more today about the world than I knew yesterday and lessen the suffering of others. You’d be surprised how far that gets you.”
– Neil deGrasse Tyson, American astrophysicist and writer
“Dare to reach out your hand into the darkness, to pull another hand into the light.”
– Norman B. Rice, former mayor of Seattle
“To know even one life has breathed easier because you have lived. This is to have succeeded.”
– Ralph Waldo Emerson, poet
“You make a living by what you get, but you make a life by what you give.”
– Anonymous
“The best way to find yourself is to lose yourself in the service of others.”
– Mahatma Gandhi, social activist
“What we have done for ourselves alone dies with us; what we have done for others and the world remains and is immortal.”
– Albert Pike, American author and poet
At California Casualty, it’s our policy to do more for the people who give more. Educators. Firefighters. Law Enforcement. Nurses. We have been protecting our Community Heroes with top-notch home and auto insurance for over 100 years.
This article is furnished by California Casualty, providing auto and home insurance to educators, law enforcement officers, firefighters, and nurses. Get a quote at 1.866.704.8614 or www.calcas.com.

by California Casualty | Auto Insurance Info, Helpful Tips |
Turn your next drive with your kids into a meaningful moment. Whether it’s a quick trip to the store or a longer journey, being in the car together can spark conversation. It’s the perfect chance to connect and dive into the little things that matter most. With fewer distractions, the car becomes a place where stories flow, questions unfold, and you create memories that last beyond the ride. Here are some guidelines to get the conversation started.
Create an Inviting Atmosphere for Great Conversations
- Ensure it’s easy to listen and be heard by keeping distractions to a minimum—turn down the radio and ask everyone to stow away devices.
- Mix up the topics with a balance of fun and thoughtful discussions that match your child’s age and interests.
- Keep the vibe upbeat and supportive—focus on connecting rather than correcting.
- Engage by listening just as much as talking. Listening is the key to deepening your bond.
- Encourage open dialogue by asking questions that spark more than a yes or no response.
- If the conversation doesn’t flow right away, stay patient and keep the lines of communication open.
Creative Ways to Build Stronger Connections
Try any of these creative approaches to tap into topics that are meaningful to your child or teen.
Hobbies and Interests:
Whether your kids are into sports, art, reading, or something else, ask them about it. Your interest shows that their hobbies matter and helps boost their confidence. Inquire about the latest scrimmage, the book they’re reading, their favorite TV show or another beloved activity. You will want to show genuine curiosity and pose follow-up questions. Remember, your role isn’t just to guide, but to celebrate their unique interests and growth.
New Technology:
There are plenty of fun, new gadgets and apps that help us manage our world. Talk with your children about some of the latest tech. Then reveal what the world was like, before they were born, without this technology. Help them imagine what it was like with an engaging story or two. Ask them what new technology of the future should be invented. You never know how that might inspire them.
Current Events:
Talking about social media trends or other age-appropriate current events with your teens is an opportunity to teach them about the world and develop their critical thinking. Encourage them to share their thoughts and opinions, asking open-ended questions like, “How do you feel about what’s happening?” or “What do your friends think about this?” These discussions can help them process information, understand different perspectives, and build a sense of empathy and awareness. Create a safe space for them to ask questions or express concerns.
Role Plays:
Car rides can be the perfect time to role-play with your child and help them work through different problems in a relaxed setting. You can create scenarios based on challenges they may face, like dealing with a disagreement at school or preparing for a big test. By playing different roles, you can guide them to think through solutions, practice how to respond, and build confidence in handling tricky situations. It’s a great way to engage their problem-solving skills. Plus, the casual environment of the car makes it feel less pressured for both of you.
Fun and Silly:
For a lighthearted and engaging conversation with your kids, try mixing in some fun and silly questions. Ask them, “If you were an animal, what would you be?” or “What food could you eat every day for the rest of your life?” These boredom-busting questions can spark creativity and laughter. You might also ask, “If you could switch places with anyone in the world, who would it be?” or “If you could change your name, what would it be?” For an extra challenge, try speaking only in questions to keep the conversation flowing in unexpected ways. And when all else fails, throw in a dad—or mom—joke to lighten the mood!
Driving Safety:
Being in the car is a natural time to talk about vehicle safety. Again, keep the conversation age appropriate. If you have a teen, point out decisions that you make as you drive, and share safety tips such as how to safely pull over on the side of the road. Note the dangerous behaviors that you see from other drivers such as tailgating. Get them ready to focus on the road by asking them to navigate and tell you where you should turn. For younger passengers, point out road signs for stop, yield and crosswalks. Ask them what they notice when looking outside the window. Talk about why we wear seatbelts and what could happen if we forget. Teach them safety around vehicles.
Finally, you’re traveling with precious cargo when you transport your family. Make sure your car is well-maintained and protect it with the right car insurance. Safe travels.
This article is furnished by California Casualty, providing auto and home insurance to educators, law enforcement officers, firefighters, and nurses. Get a quote at 1.866.704.8614 or www.calcas.com.
