
by California Casualty | Travel |
Traveling with your kids is always an adventure no matter where you go, but let’s face it; flying with young children can be exhausting. Between the endless amounts of luggage (sometimes even including strollers and car seats), working your way through a crowded airport, trying to get everyone through security, all of the bathroom breaks, finding activities for them to do before boarding, dealing with tantrums, etc. you’ve got your hands full.
Flying with your kids takes a lot of planning and preparation (and patience!), but it’s rewarding when finally get to your destination with your entire family in tow. If you are planning a family vacation in the near-distant future, here’s some advice to help you fly with your kids on a less stressful note.
Book direct flights (or longer layovers)
When you are booking your travel avoid layovers whenever possible. Sure your flight might be longer or a bit more expensive, but it’s worth it knowing you won’t have to deal with the grueling process of getting all of your luggage and children on and off of multiple planes. And you won’t have to get your children reacclimated to being in the air all over again. If you have no choice and you have to have a layover, opt for a longer one so kids can have a chance to get their energy out.
Schedule accordingly
We all know a sleep-deprived child is a cranky child, so steer clear of red-eye flights. If you don’t have a certain time that you need to arrive at your destination, you have the advantage of choosing a flight time around your child’s schedule! For example, if their nap time is usually in the afternoon, see if you can book an afternoon flight that way they are more likely to nap during the trip.
Talk to your child about the flight process
Obviously, babies won’t know any better, but toddlers can understand basic rules. So set some easy expectations for your trip. Talk to them about how to behave in the airport, what it will be like going through security, and boarding the plane. They probably won’t remember everything you talked about, but you can always remind them of “what you talked about earlier”. You can’t expect them to succeed if you don’t give them a little bit of direction.
Take advantage of early boarding… or don’t
Airlines usually let families board the aircraft first. You don’t have to, but it may be worth your time to get on the plane right away, stow your carry-ons, and get your child settled before other passengers start to board. On the other hand, you may want to wait to board until the very last minute so your child can get as much energy as they can out before you get in the air. Ultimately, the choice is yours.
Pack the essentials to keep them occupied
Your carry-on should include all of the essentials you and your kids will need for your entire flight. This also includes emergency items, and items that will help keep your children occupied throughout the flight; like backup pacifiers, toys, games, ipads, extra headphones, baby wipes, extra formula, extra clothes or diapers, etc.
Be prepared for a meltdown
Children are unpredictable little creatures, one minute they are completely fine and the next they are kicking and screaming for no apparent reason. Pair this with their ears popping and being stuck in one place for hours and you’ve got yourself a meltdown waiting to happen. Be prepared to use any calming mechanism necessary and ride out the storm.
Snacks should also help!
Nothing calms down a screaming toddler better than pulling out a tasty bag of treats that you snagged from one of the snack stands on your way to board. You never know what kind of food the flight attendant will pull out, so be prepared with a few options you know your child loves.
Answering the “Are we there yet?” questions
Questions like “How much longer?”, “Are we getting close?” are signs that your child is getting restless during the flight. You could handle this one of two ways. Pull up the flight map, either on the monitor on the screen in front of you or on your phone, and entertain your child by letting them watch your plane’s path. Or if your child has no interest and watching the plane, let them know that you will be landing soon. Even if soon is an hour away, this will encourage them to sit tight and try to hold their wiggles in until you land.
Lastly, don’t be embarrassed. Accept that you can’t control everything. On some flights, your kids may act perfectly calm and on some flights, they may not and that’s ok. Don’t be afraid of being “that” family. You are doing the best you can and chances are, outside of the airport, you will probably never seen the majority of the people on your flight ever again. These things happen to everyone. Don’t let a bad flight ruin your whole trip.
As always, don’t forget to protect your trip with the correct insurance coverage. And for more travel tips, like how to save money when you travel, click here.
This article is furnished by California Casualty. We specialize in providing auto and home insurance to educators, law enforcement officers, firefighters, and nurses. Get a quote at 1.866.704.8614 or www.calcas.com.

by California Casualty | Homeowners Insurance Info |
Summer is here and (unfortunately for most) so is the heat and humidity. But humidity in your home isn’t just uncomfortable. Did you know it can also do some serious damage to your house and your health?
Humidity describes the amount of moisture in the air. When the humidity is high, a hot day feels that much hotter. When there’s too much humidity inside your house or apartment, mold and mildew begin to take hold, rotting the wood and creating the ideal environment for dust mites and other allergens. If you’ve ever noticed a musty odor in your home, chances are you are smelling mold and mildew. And if you have asthma or allergies, this can make your symptoms that much worse.
What causes humidity?
Cooking, bathing, washing dishes, and line drying clothes inside can all add moisture to the air inside your home. Leaks in your pipes or cracks around your doors and windows can let in humid air, as can dampness from your home’s crawl space. Even houseplants can create humidity.
How can you tell if your home is too humid?
Look for condensation on windows or wet spots on ceilings or walls. You may notice mildew and mold. You also can measure humidity with a hygrometer, available inexpensively online. The ideal humidity indoors is between 30-50%.
Tips to reduce humidity
The good news is that you can take steps to decrease the humidity in your home—and improve your air quality while reducing your cooling costs. Here’s how.
Tip #1: Running your air conditioner will help with humidity.
-
- Set your air conditioner to “auto” rather than “on.” During the “on” setting, your air conditioner blows air over a wet coil which can create more humidity.
- Make sure your air conditioner is well maintained. Change the filters. Keep drip pans and drain lines clear and clean.
- If your air conditioner is too big for your home, it will have shorter cooling cycles. That won’t be enough to reduce your home’s humidity.
Tip #2: Buy a dehumidifier or consider these DIY alternatives.
-
- Since lower humidity feels cooler, a dehumidifier will allow you to reduce the use of your air conditioner, thus reducing your cooling costs.
- Though not as effective as a dehumidifier, you can try DIY versions:
- A basket or can of charcoal briquettes can absorb humidity in a room. Replace it every 2-3 months.
- Rock salt or kitty litter also absorbs moisture in the air. Take two similarly size buckets. Drill holes in the bottom of one. Stack the drilled bucket inside the other bucket – making sure to leave a gap. You may wish to put an object in between the buckets to create that space. Fill the top-drilled bucket with salt or kitty litter. Then, check it every few days. Water will collect in the bottom bucket. Empty as needed.
Tip #3: Fix leaks and gaps.
-
-
- Fix leaky faucets and pipes so there’s no excess water in your home.
- Put caulk and weatherstripping around doors and windows to keep cool air in and hot, humid air out.
Tip #4: Create airflow.
-
-
- Install vent fans in the kitchen and bathrooms. Keep them on a little longer after showering or cooking. Fans move air around and help with evaporation.
- Make sure there is ventilation in your attic. A lack of airflow can cause condensation, creating mold growth in your home’s structure.
- If you have a sealed, unused fireplace, that can cause condensation. Make sure there is airflow or it could affect your walls.
Tip #5: Limit humidity from under your home.
-
-
- Cover dirt floors in your crawl space with a vapor barrier. This piece of plastic will help contain the humidity below your house.
- Slope the soil away from your foundation so water doesn’t pool underneath your home.
- Keep gutters and downspouts clear so you don’t have standing water. Extend your downspouts so they flow away from your home.
Tip #6: Be conscious of daily living choices.
-
-
- Instead of hanging clothes inside to line dry, hang them outside (if allowed in your community).
- Lower the temperature of your showers by a few degrees, and take shorter showers. This will help reduce humidity.
- Crack the window open during a shower to help release the extra humidity.
Tip #7: Position your house plants to help with humidity.
-
-
- Some house plants produce moisture and others absorb it. A Boston fern will absorb humidity while a spider plant will make it more humid.
- Move your moisture-producing plants to one room with good airflow or outdoors if possible.
Follow these steps and you’ll soon be enjoying a cooler, more comfortable home.
This article is furnished by California Casualty, providing auto and home insurance to educators, law enforcement officers, firefighters, and nurses. Get a quote at 1.866.704.8614 or www.calcas.com.

by California Casualty | Homeowners Insurance Info |
Looking for projects to do this summer to enhance your home? Try these 6 fun, easy and creative ways to spruce up your living space. We’ve even added some helpful tips so that you can get the most out of each DIY (do-it-yourself) project. Happy decorating!
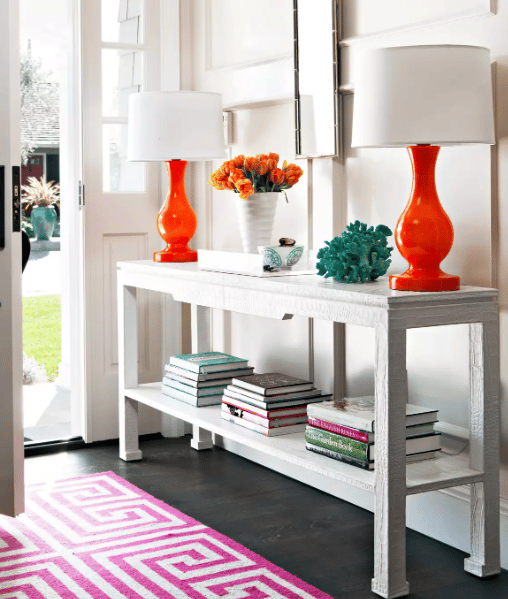
Project 1: Add Storage to Your Entryway
Get ready to transform your entryway into the perfect spot for storage. Not only will this give you a place to put your keys (and find them later), but it will offer a beautiful focal point for guests as they enter and exit your home. Choose a small table or bench that fits in the space. Look for one with a second shelf or drawer for additional storage. Decide on the perfect spot, out of the way of the front door and the closet door. Once it’s placed where you’d like it, hang a wall-mounted shelf or hooks above the table for easy storage of keys and other items.
Project Tips:
-
- Look on Facebook marketplace for cheap benches, tables, or cabinets that you can refinish.
- Make sure you leave enough room to still walk through your entryway.
- Don’t forget the décor! Add pillows and lamps for a fun pop of color.
- Use baskets to group items, such as stacks of incoming mail, in a decorative way.
- Store items here that you need as you enter or exit your home, such as keys or sunglasses, for added convenience.

Let’s face it. It’s fun to write on your walls, and with a chalkboard wall calendar, you can do exactly that! This type of calendar is so much fun that it encourages everyone to stay organized. Plus, it’s easy to create. All you need is some chalkboard paint, painter’s tape, and measuring tools. Sketch out your plan on a piece of paper. You can plan one large rectangle or a series of rectangles that come together as a whole: monthly or calendar, daily reminder lists, etc. Once the design is set, it’s time to measure and paint, and voila—you’ll have a masterpiece before you know it.
Project Tips:
-
- Start in the middle and work outward when you paint. Use a roller for large areas and a brush for small areas. Make sure to use two coats of paint.
- It takes three days for the paint to fully dry. You may be tempted to test it out, but don’t. You’ll be happy you waited.
- Personalize your calendar by adding your family’s name at the top. You can use beautiful stencils to create the perfect lettering.
- Add “to do” lists for each family member at the bottom of the wall calendar, within easy reach.
- Color code your activities by person with different color chalk.
- Your chalkboard wall doesn’t have to be black. Chalkboard paint comes in many colors!
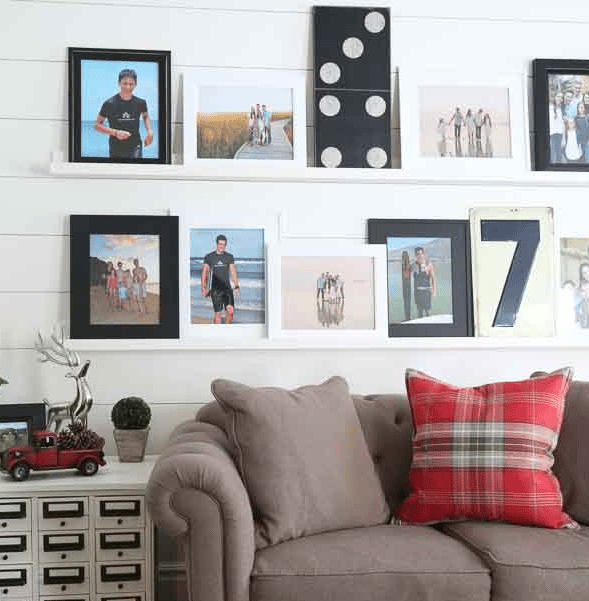
Who said you had to hang your pictures on the wall? A picture ledge is a great alternative. Picture ledges are a cross between bookshelves and fireplace mantles. They’re decorative and they give the room a little extra depth and interest. Picture ledges are great ways to display family photos and smaller artwork pieces. Choose a wall for your picture ledge, such as your living room or den. Then follow these steps to make your own picture ledge. It’s not hard to make your own but you also can buy premade picture ledges or use a fireplace mantle or decorative crown molding.
Project Tips:
-
- You can find beautiful premade pieces that could be used as picture ledges on Etsy
- For a more finished look, choose pictures with frames and mattes that have a similar color scheme.
- If you have furniture beneath the picture ledge, you can use it as a guide for how long the ledge should be.
- For an instant room makeover, change the pictures that you’re displaying!

If you’re looking to add some red, white, and blue to your summer celebration, this patriotic wreath is easy and fun to create. It looks great displayed indoors or out. You can get a wire wreath frame at any craft supply or fabric store and the clothespins at a grocery or discount store. Then it’s just a matter of painting and assembling for a beautiful, artistic result!
Project Tips:
-
- Paint the clothespins and the stars on top of a craft mat so you don’t get paint all over your table.
- For a shortcut, squirt some paint into a gallon plastic bag, add your clothespins and shake them up. Then touch up any missed spots.
- Change the colors of the clothespins to shades of blue and add some shells or starfish for a fun beach theme.

Light up your room with elegant lamp shades that you made yourself! It’s as simple as cutting and pasting to transform a ho-hum beige shade into a stunning showpiece. Choose the decorative paper that you like. Create a pattern by rolling the lamp shade along kraft paper as you trace the outline. Cut out the pattern and check that it fits around the shade. Then cut the fancy paper into the pattern shape. Glue it to lamp shade and add decorative trim for a finished look.
Project Tips:
-
- Hold the patterned paper up to a light. This will give you an idea of how your pattern will look on a lamp.
- Use clothespins to hold the trim in place as it dries.
- If you use spray adhesive for the paper, make sure to spray both the lamp shade and the paper. Then, work quickly as it dries fast.
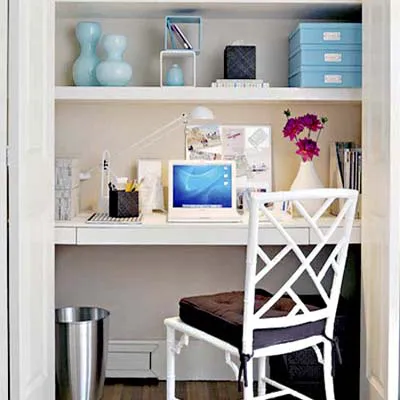
With so many people working from home, it’s nice to have your own space. You can transform a closet into an office or homework space with just a few adjustments. Take off the door and remove the clothing rods. Add a large shelf at desk height and two narrower shelves above it for storage. Then add the supplies that you need when you work such as a desk lamp, pens, pencils, etc.
Project Tips:
-
- Add a pop of color to your desk décor with a vase or planter.
- Add a corkboard to the back wall to post notes or display photos.
- Keep the closet door in the attic or garage in case you’d like to replace it someday. Or you can choose to keep the door on and close it when not in use.
This article is furnished by California Casualty, providing auto and home insurance to educators, law enforcement officers, firefighters, and nurses. Get a quote at 1.866.704.8614 or www.calcas.com.

by California Casualty | Educators |
“It must be nice to have the whole summer off.” At least that’s what many people say to (and assume about) teachers. However, if you’re like the majority of educators, you can’t even remember a summer when you didn’t work or teach summer school, complete professional development, attend classes and meetings, prepare and refine lessons, learn new curricula – the list goes on and on…
We set out to dispel the myth of teachers’ relaxing summer vacations. Here are 10 things teachers really do on their “summers off.”
1. Summer Job
Teacher’s pay is historically low, especially compared to other professions with similar educational requirements. Plus, many teachers have to pay for their own supplies during the school year. That’s why it’s common for teachers to work one or more jobs in the summertime.
Teachers’ summer jobs may be related to education, such as teaching summer school, tutoring, or teaching abroad. Some teachers work at their kids’ summer camp so they may attend for free. However, sometimes teachers take seasonal jobs that, not only supplement their income, but also expand their horizons. Examples include:
-
- Landscaper
- Lifeguard
- Bartender or waiter/waitress
- House sitter, pet sitter, babysitter or dog walker
- Hotel clerk
- Grocery store worker
- Uber/Lyft driver
Sadly, because teachers don’t get paid in the summer, these second—and sometimes third—jobs are almost necessary to make ends meet in many locations.
2. Professional Development
Teachers are required to complete continuing education credits in order to renew their license, and summer is a great time to take these workshops.
Continuing education is offered in subject specialty areas, such as math, science, and foreign language, as well as general teaching strategies, assessment, technology tools, and more. Teachers can catch up on their professional summer reading too.
3. Graduate School
Many educators pursue graduate degrees. Not only do these degrees enhance a teacher’s skill set, additional degrees mean higher pay. Summer is a good time to complete some of this coursework without the additional pressure of teaching a class.
4. Department and District Meetings
These meetings are a requirement to attend. Summer is when districts update the curriculum and prepare for the upcoming school year. Teachers are active participants in these meetings and must collaborate with their peers so that everyone is on the same page during the school year.
5. Coach
Teachers are natural coaches and many teachers coach their school teams where they are expected to fundraise, travel, go to tournaments, etc. during the summer. Since teachers are natural coaches, some even take on this role outside of school at club or youth leagues, clinics, and summer camps.
6. Volunteer
Teaching is a work of heart, and we already know educators have some of the biggest hearts out there. Giving back to the community is a wonderful way to spend time in the summer, and many teachers choose to support their favorite causes by volunteering.
7. Parent Their Children
We forget sometimes that teachers are often parents of school-age kids. The summer is their chance to spend time with their children. As parents, they may set up or host playdates, drive their children to activities, and be the primary provider for childcare during the summer months.
8. Catching Up on the “To Do” List
While teachers can schedule time off during the school year, it’s a hassle to make sub plans. That’s why teachers tend to catch up on everything in the summer that they can’t do during the school year. This includes doctor and dentist appointments, home maintenance projects, and visits with out-of-town relatives. Check out these summer goals for teachers that may help you organize your “vacation” time this summer.
9. Relax & Recharge
Teaching is such a demanding job that burnout is common. Even if teachers are working elsewhere, the summer provides a mental break from the school year. Create a summer routine that helps you find some balance. Many teachers plan a summer vacation with their families which is a wonderful way to relax and recharge. Other relaxing activities include reading for pleasure, binge-watching favorite shows, and pursuing favorite hobbies. Anything that refreshes you mentally will help you be ready by the end of the summer to start it all over again.
10. Get Ready for Next School Year
Although teachers aren’t teaching during the summer, they never stop thinking about their students. They continue to purchase supplies and research fun activities to include in their lesson plans for the new year all season. They also get into their classroom the minute they get the keys to make everything perfect for their new kiddos – flexible seating, reading corners, labeled folders, etc. – teachers have it all ready weeks before students even set foot in the school.
Next time think twice before you tell a teacher how great it is to have “summer off.”
This article is furnished by California Casualty, providing auto and home insurance to educators, law enforcement officers, firefighters, and nurses. Get a quote at 1.866.704.8614 or www.calcas.com.

by California Casualty | Travel |
If you’ve ever had to cancel a vacation or had an accident with a rental car, you know the value of insurance. But how much travel and rental car insurance do you need and do you really always need it?
Types of Travel Insurance
The two most popular types of travel insurance are…
- Vacation Plan. It provides the most coverage in a single policy, including trip cancellation, lost luggage, travel delays, emergency medical assistance, and more. This type of plan usually comes with 24/7 assistance.
- Medical Plan. Your health insurance policy doesn’t cover you outside the U.S.— or if it does, it’s often not a lot of coverage. Travel medical plans cover healthcare expenses and can connect you with a local doctor or pharmacy. Some plans cover pre-existing conditions. They also cover emergency medical evacuations, if you need to be airlifted to a hospital.
There also are specialty travel policies that you can buy. These include medical evacuations only, accident insurance, and rental car insurance. Read more about rental car insurance, below.
Why you need travel insurance:
-
- You don’t want to lose all your money from a prepaid trip that has to be canceled (for illness, a funeral, etc.).
- Flights can be delayed, necessitating unexpected expenses for meals and lodging.
- Lost luggage can spoil your trip.
- Accidents happen and health crises occur. Medical evacuations can be costly.
- Travel insurance can provide peace of mind, and assistance when you need it.
What to look out for in a travel insurance plan:
-
- Make sure you insure the full value of your trip. If you just insure your deposit, that’s the amount you’ll recoup.
- Make sure your plan has enough for emergency medical evacuation. This can sometimes be in the thousands of dollars.
- Know the services that come with your policy. It could include translation, concierge services, and 24-hour travel assistance. If you’re paying for these services, you might as well use them.
- Watch out for “cancel for any reason” coverage. Usually this is a substantial extra expense, and in most cases, is not needed. Check the reasons that you can cancel for the standard policy. Usually, those will cover what you need.
Types of Rental Car Insurance
Rental car insurance is a specialized kind of travel insurance. You can purchase rental car insurance as an add-on with many travel insurance policies. You will be offered the opportunity to buy rental car insurance when you rent a car. These coverages are all optional.
Following are the types of coverage you may be offered:
-
- Collision/Loss Damage Waiver – This covers the cost of repairs in the event of an accident. Rental car companies can charge you for more than just the damage. They can also bill for towing charges, loss of use, diminished value, and administrative fees.
- Supplemental Liability Protection – If you cause an accident, liability pays for the damage to another person or property.
- Personal Effects Coverage – This helps cover items stolen from your rental car (e.g. laptop, clothing). You may have this coverage through renter’s insurance.
- Personal Accident Insurance – This pays your and your passenger’s medical bills as well as for an ambulance and death benefits. You may already have this coverage through your health, life, or auto insurance.
Before you purchase rental car insurance, make sure you don’t already have coverage under your personal auto insurance policy, your health insurance, life insurance or your credit card. Know what your insurance covers in terms of car rentals, including the deductible you may need to pay in the event of an accident.
When you need rental car insurance:
-
- If you’re traveling for business, your personal auto policy will not cover you. You will need rental car insurance.
- If renting a vehicle of higher value than the car you usually drive, your auto policy may not provide enough insurance. In that case, you may need additional insurance.
- If you’re worried about your premiums going up due to a rental car accident using your own insurance, get the rental insurance.
What to look out for when purchasing rental car insurance:
-
- Some rental car companies will ask for damages above policy limits. So you should still read the rental contract to see what would work best for you.
- If you’re using your credit card’s rental car insurance, make sure you pay for the rental car using that card or it won’t cover you. Also, don’t sign up for supplemental rental car insurance. That may negate credit card coverage.
- Check your credit card terms for insurance. Sometimes insurance does not apply to luxury vehicles, RVs, motorcycles, or trucks.
- Credit card insurance doesn’t cover you in some countries, including Ireland, Israel, Italy, Jamaica, and Australia.
California Casualty offers rental car insurance on vacation with our auto policies! If you carry liability and physical damage coverage on your vehicle, you may extend that coverage to a rental car. Your coverage applies as long as you, your spouse, or a resident relative is driving the rental car.
Plus, we will waive the collision deductible for a collision with another Cal Cas policyholder, with an “identified” uninsured motorist, or while operating a rented non-owned vehicle while on vacation.
This article is furnished by California Casualty, providing auto and home insurance to educators, law enforcement officers, firefighters, and nurses. Get a quote at 1.866.704.8614 or www.calcas.com.


