Back-to-school means back to hectic schedules. Between sports, clubs, and other after-school events it feels like you are being pulled in all directions. Considering that other parents are making the same hectic trek, there’s an opportunity to lighten the load. Carpooling.
Not only can carpooling free up your schedule, but it can also help you save on gas. (Definitely a bonus!) Follow these tips to set up your carpool experience for success.
1. Find your carpool buddies.
It’s best to carpool within a trusted network of fellow parents. Don’t worry about coordinating around age or gender. The goal is to make your life easier and not simply offer car time for your child and his bestie.
That being said, start with your child’s friend group and see who might be joining the same activities. If they live nearby, that could be a match. Otherwise, ask the coach or coordinator for a parent contact list and reach out to those who live close to you. Also talk to parents at activity pickup, at school PTO meetings, or at your local religious services. Even friends of friends might be good carpool candidates.
Pro Tip: Pick the right number of kids for your carpool. Younger children need more attention and so their carpools should be smaller.
2. Set the schedule.
It’s important to make a set schedule so that kids aren’t left waiting. Using a carpool app can help you organize, and some apps even come with reminders. Some popular apps include Carpool-kids, Waze Carpool, and GoKid. You can even use Signup Genius or Google sheets. (If you use Google, you will want to download the sheets app to your smartphone.) You also can do an email or text chain.
Choose the system that works for your group and make sure everyone is comfortable with it. Also, it’s important to make sure you can communicate with other parents in the case of an emergency, accident, sickness, or unexpected change of plans. (Anyone who has forgotten an early dismissal day knows the importance of communication.)
Pro Tip: Post a copy of the carpool schedule near the door and include it in your child’s backpack. This way, he or she knows who is picking up.
3. Set expectations.
If possible, schedule an in-person meeting with your carpool participants. Not only does it make it easier to create the schedule, it helps you come to an agreement on rules and expectations. For example, how many minutes late is too late? What is the policy if you’re picking up a child who is not ready? Verify schedules and conflicts. Determine food allergies if any. Inquire about health-related concerns.
Pro Tip: Important point for discussion: Don’t let anyone outside of the carpool cover the route (e.g. babysitter, grandma) unless every parent is aware and agrees.
4. Stay safe.
Don’t forget to discuss the safety rules. For example, children must enter and exit the vehicle from the curbside. Only kids who are 13 and older may ride in the front passenger seat. Students who do not meet the necessary height and weight requirements must ride in a booster seat.
For carpools, consider harness-style options that move the seatbelt down, rather than boost the child up, such as the WhizRider. These lightweight accessories can travel with your child and fit right in their backpack for easy access for carpooling.
5. Do a practice run.
You know the route to your child’s activities but you may not be familiar with the addresses where you are dropping your carpool kids. Do a practice run with the kids. Take a trip to the local ice cream parlor or head to the library. This will help you to work out any issues before you start.
6. Bring snacks.
If you’re shuttling kids from school to after-school activities, snacks and drinks are a must. Even if you’re just taking them home, you’ll find that food and drinks help to keep them happy. Greet kids with healthy portable snacks that don’t create too much mess. Chilled water in reusable bottles make a great choice because if they’re spilled, there won’t be too much mess. Keep any food allergies in mind when selecting snacks; alternatively, you can ask parents to pack their own child’s treat.
Pro Tip: Have a cleanup pack on hand that includes paper towels and baby wipes. Put a trash bag in the backseat where the kids can put their trash.
7. Don’t forget entertainment.
Even a short car ride can be made more enjoyable when the occupants are entertained. This may include car karaoke with their favorite songs or taking turns reading aloud from a joke book. You also may want to provide games with magnetic pieces. Just make sure you have a place to store them, such as with a backseat organizer. For older kids with different musical preferences, headphones work well as they listen or watch on their devices. Finally, if you’re going to be waiting in the car, keep the things that entertain you. Bring a favorite book, a relaxing playlist, and a charger, and enjoy some much-deserved quiet time.
8. Check in with your child.
Things may be going well on your end, but you don’t know what happens when the other parents are driving. Check-in periodically with your child. Get his or her perspective on the carpool, and make adjustments as needed. It’s also a chance to determine if you need to rethink participating in a carpool.
Finally, if you’re transporting precious cargo, you’ll want to ensure that your vehicle is carpool ready. Keep your car well maintained. Protect your vehicle with the right insurance for peace of mind.
Safe travels.
This article is furnished by California Casualty, providing auto and home insurance to educators, law enforcement officers, firefighters, and nurses. Get a quote at 1.866.704.8614 or www.calcas.com.
When it comes to middle school and high school students, you know just any icebreaker won’t do. It has to be something inclusive, engaging, and team-building—and one that doesn’t require teens & tweens to immediately open up to their peers.
If you’re looking for a good first day icebreaker for middle or high school classes as you prepare to go back to school, we’ve got some ideas. Whether you’re a first-year or veteran teacher, here are 15 fail-safe ice breakers that are proven to work well.
1. Silent Line-up
Challenge your students to silently line up by height. Easy, right? Now have them try it by birthday month in calendar order. In doing so, they must communicate without talking or writing. You can even divide the class into random groups and have them compete to finish first. When students are done, go down the line and see how well they did. As a wrap-up, discuss how students used nonverbal cues to communicate and underscore how much they can achieve without talking.
2. Common Ground
Ask students to gather in groups by how many languages they speak, how many pets they have, or other criteria. Once students are in their group, have them share which languages they speak or their kinds of pets. Then challenge each group to find other things they share in common, such as number of siblings, favorite video game, etc. (Split the groups if needed to be more manageable.) Adding an incentive for the group that finds the most commonalities could motivate students.
3. Tarp Flip Challenge
Put some tarps on the floor, and assign a group to stand on each tarp. Then challenge the groups to completely flip over the tarp without ever stepping off of it. You’ll have to have a way to determine the different sides of the tarp (and may have to mark it). You also may need a volunteer or two to help you watch the groups to make sure they follow the rules.
4. 20+ Questions
This is the teacher variation on the popular game. Instead of thinking of something in the room, start with an item of personal importance. Tell your students you brought something with you but they will have to guess by asking only yes/no questions. Frame out some sample questions on the board, such as “Can you ____ with it?” and “Is it made of _____?” When students have guessed the object, show it and have them pose questions to you about it.
5. Snowball Station
Ask students to write three facts about themselves on a piece of paper but not to write their names. Offer prompts to make the task easier, such as favorite ice cream flavor, activities, number of siblings or pets, etc. Then have students crumple their papers into a ball and one by one have them come up and toss their ball into a bin. Then have each student retrieve a “snowball” and guess the student who wrote it.
6. Count Up
This next exercise works well when students are standing or sitting in a circle. Challenge them to count, in random order, from 1 to the number of students. Anyone can start the count, and anyone can count in any order but no one can do two numbers in a row. If students speak at the same time, they have to go back to the beginning. It’s more challenging than you might think, and it promotes great teamwork.
7. People Bingo
Create bingo cards with attributes that could describe your students, such as “has traveled out of the country,” “speaks more than 1 language,” “has a dog,” or “can name all of the seven dwarves.” Then give each student a Bingo card and challenge them to find classmates who fit a category. The student that does must initial the board, and can only do so once for that classmate. This gives students the best chance to meet everybody.
8. A Strong Wind Blows
Set up a circle of chairs that is one less than the students in your class. Ask for one volunteer to stand in the center. The remaining students take a seat in the circle. The object of the game is not to be in the center. The center student will say, “a strong wind blows on anyone….” and give an attribute (for example, has a cat or likes pizza). Anyone who fits the category must find a different seat, allowing for the person in the center to sit in theirs. The one rule is that students cannot name a category that targets only one person (e.g. the one wearing black sneakers or the one named Alex). The more general the category, the more fun it will be as students scramble for different seats.
9. Giant Jenga
Buy a giant Jenga set and label each piece with a “get to know you” question. As students add their pieces to the tower, they must answer the question. Make the questions easy and fun, so students will not feel vulnerable. Examples may include “favorite candy,” “favorite cause or charity,” and “what they would do with a million dollars.” Ask for elaboration based on a student’s comfort level and the question.
10. Race for the Truth
Line students up and let them know that you will be reading a list of attributes. You can use similar ones to People Bingo or A Strong Wind Blows, above. If the attribute applies to them, they are to take one step forward. (Demonstrate the length of step expected.) The first one across the finish line wins.
11. Who Am I?
This classic game puts the name of a well-known figure on a student’s back, and the student has to guess who they have, based on asking yes/no questions of fellow classmates.
Pro Tip: Have students write the name of a famous person on an index card. This will ensure that the names are relevant to your class. Collect the cards and use them to tape on the backs of everyone.
12. World’s Worst Employee
Write down types of jobs on index cards. Then have student volunteers pick a card, and make up a quote that might be said by the world’s worst employee in that profession. Example: For an Uber driver, a student might say, “I don’t have a driver’s license and I hate when people get in my car.” The class then has to guess the profession.
13. Build-it challenge
Pair or group students. Give them materials such as paper clips, drinking straws, Q-tips, string, paper, or other items. Then, challenge them to build a tower, a bridge, a class mascot, or another item within a certain timeframe. Then, have each group present their item to the class.
14. Two Truths and a Lie
This is a classic game that students will know well. Ask each student to come up with two truths and one lie about themselves. The other students vote on which is the lie.
15. Rock-Paper-Scissor Tournament
A throwback to their childhood, middle and high schoolers will love the chance to revisit this game. Start with pairs, and then have winners play winners until you’re down to the final two. Remember that rock beats scissors, paper beats rock, and scissors beat paper.
This article is furnished by California Casualty, providing auto and home insurance to educators, law enforcement officers, firefighters, and nurses. Get a quote at 1.866.704.8614 or www.calcas.com.
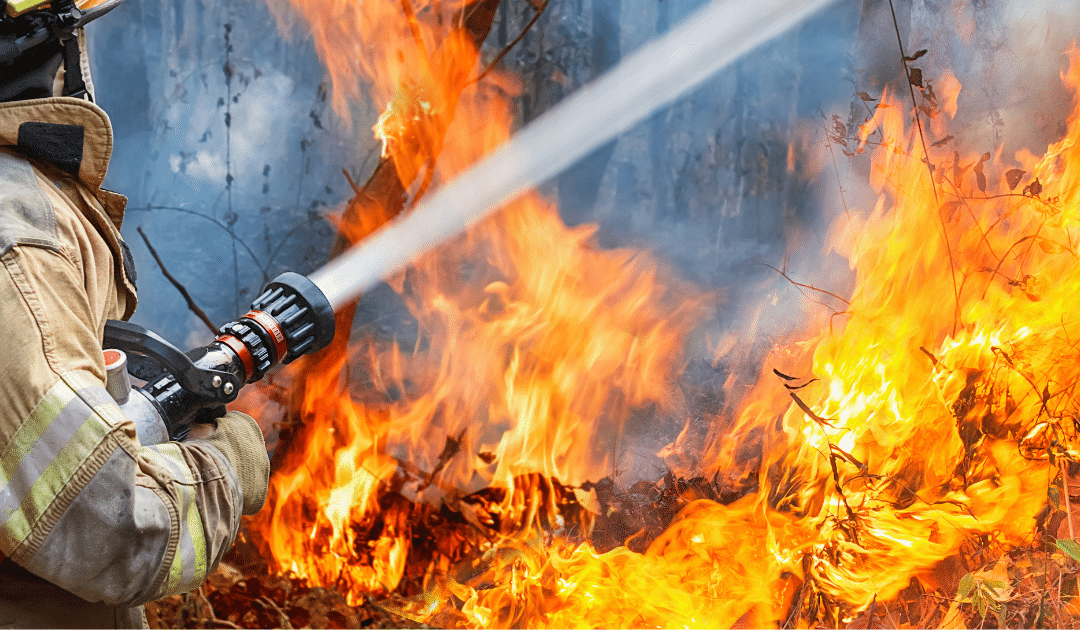
As the country takes in terrifying images of the latest wildfires scorching communities in California, Oregon and beyond, Chief Scott D. Kerwood is thinking of the firefighters out working the blaze. He knows that as weary as they may be, many are continually running on empty, worrying more about protecting others than taking care of themselves.
While the business of being a firefighter is physically demanding – even when they’re not putting out house fires or dealing with other emergencies, putting out wildfires is grueling work. And it’s made even more difficult by harsh environmental conditions that cause physiological and emotional stress. That’s why Kerwood says it’s critical for firefighters to take breaks to hydrate, rest, decontaminate their gear and take other important steps to recover. If they don’t take the time to take care of themselves during those arduous emergency situations, Kerwood warned, firefighters, risk causing injuries to themselves and to the colleagues they are supposed to protect.
“The goal is that when they are done with this job, they can go home to their family at the end of their shift — or at the end of their career,” said Kerwood, who serves on the NFPA committee that reviews the rehabilitation guidelines and requirements spelled out in standard 1584.
Given that wildland firefighters are exposed to extreme heat and toxic substances for extended periods of time may make them vulnerable to certain types of cancer, heart disease, and other chronic illnesses. There are long-term performance and health benefits related to rehabilitation practices for wildland firefighters. Beyond helping to lessen the risk of serious illness, adding services provided on the scene may also help firefighters recover properly so that they’re ready for the next emergency.
Although fire professionals have been urging the rank and file first responders to use incident-based medical services, showers, decontamination stations, and other rehabilitation resources for at least a decade, the recent push to focus on wildland first responders may be in part due to what some industry experts consider troubling trends.
A recent study, for instance, suggests that drier conditions at higher elevations may explain why some wildfires have occurred in areas previously considered ‘too wet to burn.’ Ten-year data suggest that the average number of acres that burned has increased in some regions. In addition, regions are also seeing more and more residential and commercial developments built in wildlands. Because of these additions, it may be more likely that we start to see more of the 1.1 million career and volunteer firefighters in the U.S. putting out wildfires.
Hydrate, Eat, Rest, and Repeat
Firefighters who are seeking guidance or need to review rehab practices and protocols should consult NFPA standard 1584. The materials for this year’s Firefighter Safety Stand Down campaign include helpful studies and handouts on nutrition, mental health, exposure mitigation, and other issues. Kerwood said the first responders should also take the time to study their agency’s rehabilitation action plans.
“They need to be prepared to take care of their own safety, as well as that of the rest of their crew,” he said. “We should, when we check out our apparatus, for example, at the start of the shift make sure that we have all the rehab supplies we need on that truck,” including cooling towels, hydration packs, and breath analyzers that measure carbon monoxide levels in the body.
“Because existing rehabilitation protocols were largely designed for incidents in built environments that have rapid access to medical care, protective equipment and portable facilities, such as decontamination showers, firefighters deployed to wildfires shouldn’t assume that all agencies have the proper gear and supplies for those incidents,” said Nathan Trauernicht, chief of the University of California – Davis Fire Department.
“But that also doesn’t mean the first responders shouldn’t ask for what they need,” he said. “For example, if a department doesn’t have a decontamination shower on the trucks to clean equipment at the scene, firefighters should ask the agency to provide cleaning wipes.
“Still,” Trauernicht said, ”firefighters should follow the basics of rehabilitation every time they take a break. For starters, they must hydrate, hydrate, and hydrate some more — and if possible take electrolytes. Because they burn tons of calories, they should eat foods that help replenish them. Their rehab routine should also include oxygen, blood pressure, and heart rate checks.
Rest, of course, is a must. And if firefighters need grief counseling or other mental health services, they should ask for them.”
More Improvements Needed
According to Kerwood and Trauernicht, while it’s very important for firefighters to diligently follow wildfire rehabilitation practices, they also urge first responders to stay physically and mentally fit. Being disciplined about their exercise, water intake and nutritional habits help them lessen their risk of injury or developing serious chronic illness.
“You may be off duty and not planning on engaging in your regular work activities, but when we send a strike team out, we start doing a station recall or several stations of recall,” Trauernicht said. “And you’re now in a position where you may be next out to go to a significant incident that’s going to require you to be nourished, hydrated, and rested.”
Kerwood and Trauernicht are among fire professionals who say agencies should do everything they can to protect the men and women in their departments who risk their lives daily.
Because it may become more commonplace for firefighters across the nation to work wildfires, Kerwood and Trauernicht said agencies need to accelerate changes to their standard operating manuals to keep up with trends.
They also would like to see administrators be more thoughtful about the protective gear and equipment they buy for their firefighters, because of the different environments they may encounter. For instance, the personal protective equipment firefighters wear for structure fires often isn’t appropriate if they need to fight a wildfire, because they can make them overheat. “When battling a wildfire, it’s about striking the right balance between protecting personnel from the obvious hazards of flames and the oftentimes the less recognized risk of heat stress,” Trauernicht said.
Manufacturers of protective personal gear and firefighting equipment should continue to pursue options that make it easier and safer for firefighters to work on wildfires. Trauernicht said he would also like to see additional research and emphasis on the development of respiratory protection solutions they would be able to use in those incidents.
As more and more studies shed light on the associations between the toxic substances firefighters are exposed to, the newer generations of firefighters are going to demand better PPE, Standard Operation Procedures for rehabilitation operations, and rehabilitation resources.
“If you look at the old photographs, not of just structure firefighters, but you look at wildland firefighters, and you see them with ashes and smudges on their face, and their gear’s nasty,” Kerwood said. “I mean, we all prided ourselves in that. Now, the folks that we’ve got coming in, it’s like, ‘Really? You lived that way?’
Our job as fire chiefs and fire service leaders, therefore, is to make sure ‘Everyone Goes Home.’”
And now that also includes fire leaders doing all they can to protect firefighters from heat stress, chronic disease, and other serious conditions they could develop from fighting fires.
Letting go is one of the hardest things we can do as parents. After all, we want to be there every step of the way—and that includes making sure our children get safely to school and home again.
But there comes a time when we step back, and send them on their way with pride (and just a little anxiety). How do we know when the right time is? Here’s some guidance on determining when and how to let your child walk or bike to school alone.
First, let’s remember the benefits.
Walking or biking alone to school is a milestone in growing up. It’s good for your child and it’s good for you. Here’s why.
It’s great exercise. It helps keep your child moving every day.
It gives your child a sense of independence and responsibility.
It boosts your child’s self-confidence.
It gives them a chance to follow rules and make good decisions.
It allows bonding time with friends, including a chance to make new ones.
It limits your family’s carbon footprint.
It frees your time so that you can do something else.
How do you know if your child is ready?
Every child is different. And not every school route is the same. Taking into account your child’s age and maturity, and the difficulty of the route, you can make a determination. As their parent, you are the best person to know if your child is ready and if walking or biking to school is safe. If you live in an area of high crime, you may want to reconsider letting your child walk or ride alone.
If you’re looking for guidelines, healthychildren.org (from the American Academy of Pediatrics) notes that most children are not ready to walk or bike alone until the fifth grade or about age 10. That’s as long as they can follow rules, show good judgment, and not be easily distracted.
Prepare for the moment.
The important thing is you don’t have to jump right into having your child walk or bike alone to school. You can put in the necessary preparation to make sure that he or she will be able to do so safely. Here’s how you can prepare.
Educate your child on street signs and what they mean. You can do this when you’re driving in the car as well as walking around the neighborhood.
Establish and practice the rules for crossing the street. Look left, then right, then left again. Then, cross. Never cross in the middle of the block.
Explain to your child that cars share the road with bikes and pedestrians. Show your child how to be aware of vehicles wherever they may be.
Remind your child to stay on the sidewalk and out of the street unless crossing at a crosswalk.
Remind your child to walk his/her bicycle across intersections.
Test the route by walking it with your child. Let your child lead the way so you are confident that he/she knows where to go.
Practice locking and/or storing the bike at school.
Prepare for an emergency.
You want to prepare your child for any possibility from getting lost to getting a flat tire to stranger danger. Role-playing helps your child practice the skills needed.
Point out the best people to ask for help if lost.
Practice having your child walk his/her bike the whole way to school and back in the event of a flat.
All of these tactics will help keep your child safe wherever they are, and not just walking or biking alone to school.
When your child is ready to walk or bike to school without you, follow these tips.
See if your child can walk or bike with a friend or group of friends. Some communities have started a walking school bus or bicycle train to help children travel safely.
Consider getting your child a basic cell phone. Have your child check in with you when he/she arrives at school, and when he/she is leaving. However, make sure they know not to text while walking or biking. That will distract them from their surroundings and put them in danger.
Brightly colored jackets and backpacks are most easily seen by cars, so dress your child accordingly.
Before your child gets on his/her bike, check the air and tire pressure, and test the brakes.
Have a backup plan for getting to school in inclement weather, such as riding the school bus.
This article is furnished by California Casualty, providing auto and home insurance to educators, law enforcement officers, firefighters, and nurses. Get a quote at 1.866.704.8614 or www.calcas.com.
You depend on your car, and your car depends on regular maintenance to keep it running smoothly. But sometimes it’s tempting to skip routine maintenance or put it off because of the cost or the inconvenience of being without your car. Don’t.
Your tires are the only parts of your car that make contact with the road and they do it for thousands and thousands of miles. That’s why even basic tire maintenance goes a long way.
Rotate your tires:Tires don’t wear evenly. The front tires usually have more wear on the outside edges, because they lean when you turn right or left. The front tires also hold the weight of the engine. To help your tires wear evenly, you need to rotate them every 5,000-7,000 miles.
If you don’t rotate them, your front tires will wear out more quickly and you’ll need to replace them thousands of miles sooner.
Align your tires: If you’ve ever taken your hand off the wheel while driving, and notice your car veering toward the side, you need an alignment. You need to align your tires to keep them pointing straight ahead. You can easily knock them out of alignment by going over a pothole.
If you don’t align your tires, you can experience steering problems, poor fuel economy, and uneven tire wear.
Check tire pressure: You should also regularly check the tire pressure. If yours is a newer vehicle, it comes with a Tire Pressure Monitoring System (TPMS) which helps you know when you’re low.
An underinflated tire will increase your risk of a blowout.
Mistake #2: Ignoring your fluids
Your car relies on engine oil, coolant, brake fluid, transmission fluid, and power steering fluid. Fluids deteriorate over time and can get dirty, making them less effective and even corrosive. It’s important for all of these fluids to be at the right levels so they can do their job.
Change the oil:Engine oil keeps everything lubricated, but it gets dirty over time. Changing the oil regularly is important. It used to be that we changed the oil every 3,000 miles but if you’re using synthetic oil, you can go longer. Check your vehicle recommendations for the timeframe.
If you don’t change your oil, it can become so dirty that it doesn’t work. That will cause your engine to overheat, blow a gasket or seize up.
Check the coolant:Coolant, or antifreeze, keeps your engine from overheating or freezing. If your temperature gauge is running high, it’s time for a coolant flush. You also might notice a maple syrup scent that occurs when your car is burning through coolant and needs a refresh. You should have your coolant system inspected regularly; check your vehicle’s maintenance schedule.
Your engine could overheat or blow a gasket, necessitating major repairs. Dirty coolant also can cause corrosion.
Check the brake fluid: Brake fluid can last for years. But sometimes moisture can get into the sealed system and impact your ability to brake and cause corrosion. Get your fluid checked every couple of years.
If you don’t maintain your brake fluid, your brakes may feel spongy and it may take longer to come to a stop. Your brakes could even fail.
Change the transmission fluid:Transmission fluid lubricates the gears, cools them, and helps provide hydraulic pressure to make them work. Whether you drive a vehicle with a manual transmission or one that’s automatic will depend on how often you need fresh transmission fluid. Check your vehicle’s maintenance schedule.
If you don’t change your transmission fluid, you will have difficulty shifting gears and your transmission could overheat.
Look for leaks in the power steering fluid: Power steering fluid helps you turn the wheel easily. As long as there are no leaks, and your car’s manufacturer does not suggest changing the fluid, you’re probably fine to leave it be.
If there is a leak, and your fluid dips down, it will be hard to steer. Parts of your steering system could corrode.
Mistake #3: Waiting too long to replace your brake pads
Brake pads apply pressure on the rotors, which is what ultimately slows and stops your vehicle. How fast they wear depends upon your driving habits, your car’s make and model, and other factors. You might notice signs of your pads wearing out, such as a squeaking sound or a clicking noise when you brake. The brake pedal may vibrate when you brake. Perhaps it takes you longer to brake. Don’t wait for weeks or months after the first warning signs.
Without good working brake pads, the whole braking system could overheat and fail. It also could cause damage to the rotors.
Mistake #4: Ignoring noises or dashboard warnings
Sounds serve as warning signals. That’s why if you hear something new or unusual when you’re driving, pay attention. Here’s what some common sounds could mean:
Hissing – leak in the cooling system or the vacuum system
Clunking over potholes or bumps – faulty, loose, or worn parts
Howling – bad bearings or worn gears
Knocking – valve clearances need to be adjusted or rod bearings need to be replaced
Shrieking – serpentine belt may be slipping or need to be replaced
Moaning or growling – failure of the power steering pump
Metallic rattling or pinging – abnormal ignition
Crunching – clutch issues in a manual transmission
Also, don’t ignore the dashboard warnings. Those lights are there to give you an early indication that something needs to be addressed.
Waiting too long to address a noise or dashboard indicator gives the problem a chance to become larger and more expensive.
Mistake #5: Not following your car’s maintenance schedule
The most important thing you can do is to follow your car’s maintenance schedule. This schedule is specific to your vehicle and will help to avoid costly repairs. It increases safety, helps maintain your vehicle’s value, and ultimately saves you time. Just as preventive care keeps you healthy, this maintenance schedule keeps your car operating at peak performance.
Not following your car maintenance schedule could void your warranty, and you’ll be responsible for the expensive repairs.
This article is furnished by California Casualty, providing auto and home insurance to educators, law enforcement officers, firefighters, and nurses. Get a quote at 1.866.704.8614 or www.calcas.com.