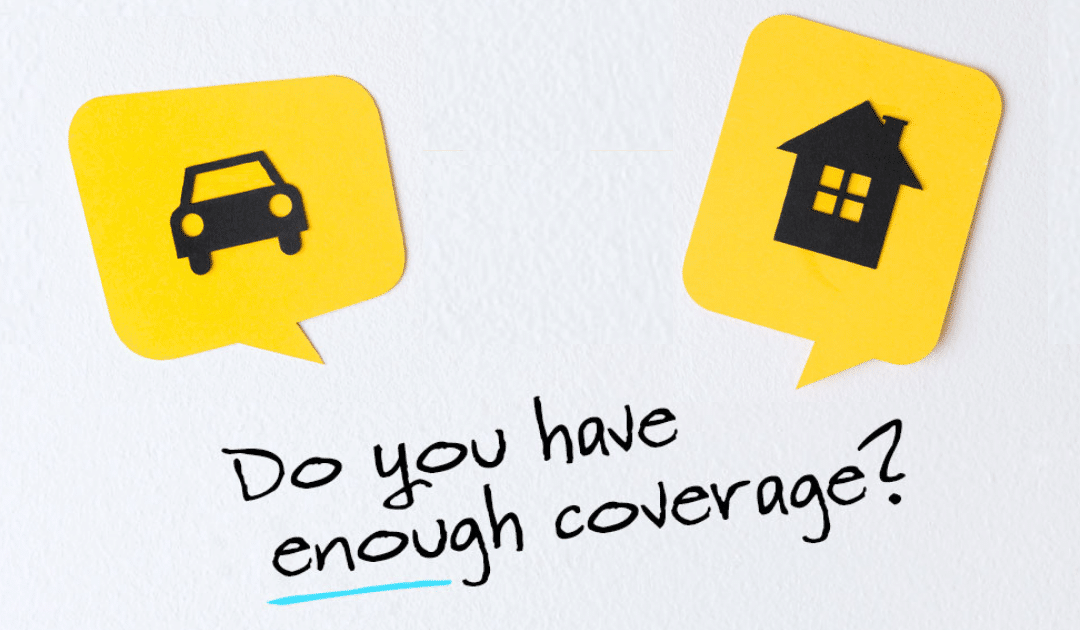
by California Casualty | Auto Insurance Info, Homeowners Insurance Info |
You know the basic coverage that comes with your health insurance, car insurance, and home insurance policies. But did you know there are other special insurance policies and add-ons that you could be missing out on?
If you’re traveling to Mexico, own an older home, a classic car, or have precious family heirlooms, etc., you should increase your protection by looking into purchasing these lesser-known insurance policies and options.
Planning to travel south of the border? Mexico does not recognize U.S. auto insurance. If you’re driving to Mexico from the U.S. in your own car or a rental, you will need to purchase a tourist auto policy.
-
- A Mexico auto policy will allow you to cover damages if you’re involved in an accident.
- If you cannot show proof of Mexican insurance, you can be heavily fined and even arrested. This is true even if you are not at fault for the accident.
- You can get coverage for the duration of your trip: a few days, a few months or longer.
2. Homes Built Before 1986
Homebuilding has changed over the years. If you’re living in a home built before 1986, it’s likely your house has outdated materials or old-fashioned types of construction. You can get a policy option that helps bring your house up to date if it is damaged.
-
- With this type of policy, in the event of a loss, your insurance covers repairs and/or replacement of outdated materials and construction methods.
- As a result, losses will cost less to settle.
- Those repairs and updates will reduce the coverage amount that you need to protect your home.
- This will ensure you have enough insurance to rebuild.
3. Special Computer Coverage
With everyone working remotely this past year, computers have become our lifeline. Consider a special computer coverage option to ensure you are covered for all of your devices: desktop computers, laptops, tablets, and smartphones. While homeowner policies typically cover possessions, special computer coverage offers more coverage.
-
- If you accidentally spill a glass of water on your computer, and your computer is damaged as a result, it would be covered.
- With this coverage, you will receive more money for your devices if they are damaged than with traditional homeowner’s.
Personal Property, also referred to as “contents coverage,” is the term insurance companies use to collectively define the things you own inside your home. Scheduled Personal Property (SPP) Coverage is for items that have higher values above your personal property coverage limits. This includes:
-
- Heirlooms
- Watches
- Jewelry
- Instruments
- Furs
SPP offers much broader coverage for your precious items – if you misplace a set of earrings, they are covered; if a diamond falls out of a ring, or a guitar neck breaks, they’re covered. There is no deductible if the covered items are stolen, lost, or damaged. SPP provides a replacement for the actual appraised value of the item.
Spending time and money on your classic car? Don’t let it go to waste. Make sure it’s protected with classic car insurance coverage. With this coverage, you will pay less than standard auto insurance coverage and you can determine the value, the deductible, and the policy options that work best for you including towing and coverage for lost or stolen parts. There are mileage plans that cover everything from cruising on the weekends to driving to attend auto shows.
-
- Classic Car Coverage is for all types of collectibles – collector trucks, classic and custom motorcycles, kit cars, fire engines, military vehicles, and more.
6. Refrigerated Property Coverage
When there is a power outage, the food in your refrigerator could spoil. A standard homeowner’s policy may cover the costs of replacing some of the food. A refrigerated property policy provides additional coverage.
- A refrigerated property policy adds up to $500 of coverage for property, such as meat that spoils because of a power outage or equipment failure.
7. Other Members of Your Household Coverage
Do you have someone living with you who is not a relative, guest, or tenant? You may consider this policy for other members of your household.
-
- If a boyfriend moves in, and he’s not on the lease, it may make sense to add this coverage.
- This policy adds personal property, liability, and additional living expense coverage for that person.
Our pets are like family and we want to keep them as healthy as possible. Pet insurance can help to offset those veterinary expenses.
-
- Depending on your policy, pet insurance may cover exams, prescriptions, lab tests and x-rays, surgeries, emergency visits, and even cancer.
- You make the initial payment and then are reimbursed depending upon the deductible and limits that you have selected.
9. Sump Pump Endorsement
If your home is prone to flooding, chances are that you have a sump pump to remove the water. A sump pump/water backup endorsement covers damage if your sump pump fails or something happened to cause water to back up into your home. This damage is not covered under standard homeowner policies.
-
- Just a couple of inches of water backup can cause thousands of dollars in damage – ruining carpets, destroying appliances, and crumbling drywall.
- This could happen to any system, and especially ones where sewer pipes are old.
10. Permitted Incidental Occupancies – Residence Premises (for Home-Based Businesses)
Do you have a home-based business? You may wish to add an endorsement to your homeowner’s policy.
-
- This policy covers limited activity for business that takes place in your home or in a detached garage or other building on your property.
- It protects entrepreneurs, such as teachers offering in-home tutoring or music lessons.
Ninety percent of Americans live in areas that are seismically active. If you live in an area that is prone to earthquakes, you may want to consider this additional coverage.
-
- Homeowner, condo, and rental insurance policies typically do not cover earthquakes.
- Earthquake insurance can help pay for some of your losses.
Floods are expensive. Just a couple of inches of water could cost thousands of dollars in damage to your home and belongings. There are a lot of myths about flood insurance; it’s important to know the facts.
-
- Flooding is America’s most common natural disaster.
- One in four homeowners will experience a flood during a 30-year mortgage.
- A flood insurance policy can protect your home and its contents.
This article is furnished by California Casualty, providing auto and home insurance to educators, law enforcement officers, firefighters, and nurses. Get a quote at 1.866.704.8614 or www.calcas.com.
by California Casualty | Homeowners Insurance Info |
Summer is a great time to tackle outdoor projects. We’ve highlighted 5 of our favorites—fun and easy DIY ideas that will transform your yard and your summer.

The hammock is a classic addition to any yard. Plus, a project that gives us a reason to nap afterward is okay by us! This hammock stand is light enough to move around the yard. You’ll need to purchase the actual hammock but if you prefer, you could make your own hammock, too. The project requires some knowledge of power tools and saws; if you aren’t used to them, ask for help from an experienced DIYer.
-
- You can get some big box stores or lumber yards to cut the wood planks for you.
- If you don’t have weatherproof wood stain or paint, use regular versions. Just add two coats of varnish.
- Put your hammock in a shady corner, and preferably one with a view.
- Make sure to supervise kids in a hammock. Hammocks can be an attractive nuisance where children can get stuck or injured.

A garden path is a beautiful addition to your home and can add curb appeal. While you could create expensive versions with stone or pavers, we’ve chosen an easy and lower cost version that uses gravel as its base. Gravel has several advantages. It works in many different climates. It allows rain to soak through to the ground. It’s also easy to reverse if you decide later to do something else.
-
- Gravel comes in different colors. Choose one that complements the color scheme of your house or garden.
- Include a decorative edge to set off your gravel path.
- Add flowers along the edges for a pop of color.
- Add interest with flat stepping stones in the center of the path.
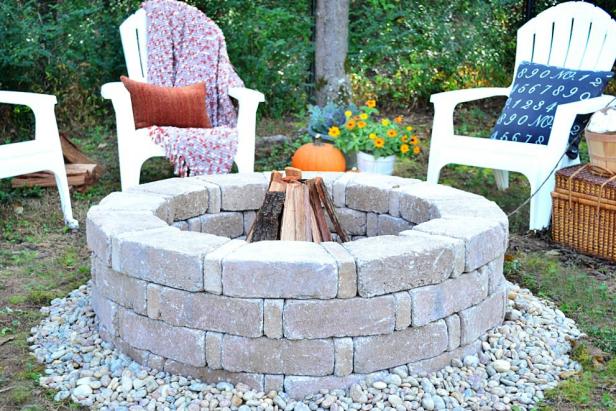
Gathering around the fire pit is the perfect activity to cap off a summer night. The supplies aren’t necessarily expensive, but they can be heavy so ask for extra help if needed. Make sure the fire pit is a safe distance from the house and away from high grass, bushes, and low-hanging trees. Clear and level the ground. Then build the pit using large and small bricks in a circular shape. Fill it in and edge it with small rocks. Then create a seating area, and let the fun begin.
-
- Check your local building codes and requirements so you know what is allowed.
- Avoid burning treated wood, wet wood, or anything that gives off a gas or dense smoke.
- Don’t use flammable fluids to start or relight a fire.
- Check the weather. If windy conditions are forecast, it could be dangerous to light a fire. Embers could easily blow towards your home creating a house fire.
- Supervise children closely around a fire pit. Do not leave them unattended for any reason.
- Safely dispose of ashes when you’re done for the night.
- Keep a fire extinguisher nearby.
- Your homeowner’s insurance may require extra coverage. Talk to your agent.
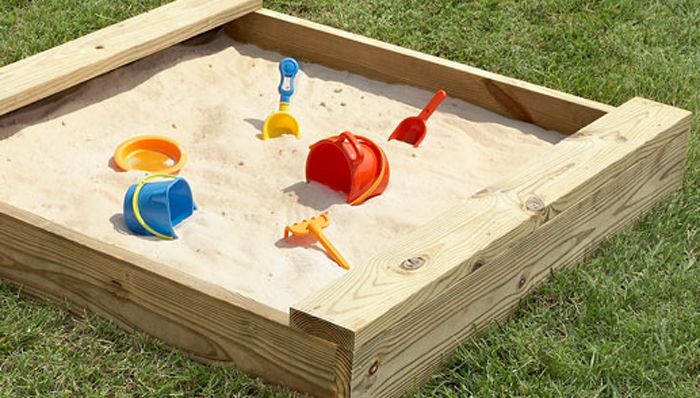
When you can’t take your kids to the beach, a sandbox is the next best thing. This DIY project is easy to construct and can offer hours of fun. With this sandbox plan, you construct the sides and use the earth for the bottom. Choose the right spot, clear the area and dig down a little bit further into the soil to help keep the walls in place. Then cover it with landscape fabric, assemble the sandbox and fill it with play sand.
-
- Add seats by adding 4 triangles to the corners of the sandbox.
- Add space for a beach umbrella by drilling a hole for a short piece of PVC pipe.
- Make sure you put the sandbox in a place where you can easily see the children.
- Cover the sandbox when not in use. Plywood works well. So does a plastic tarp.
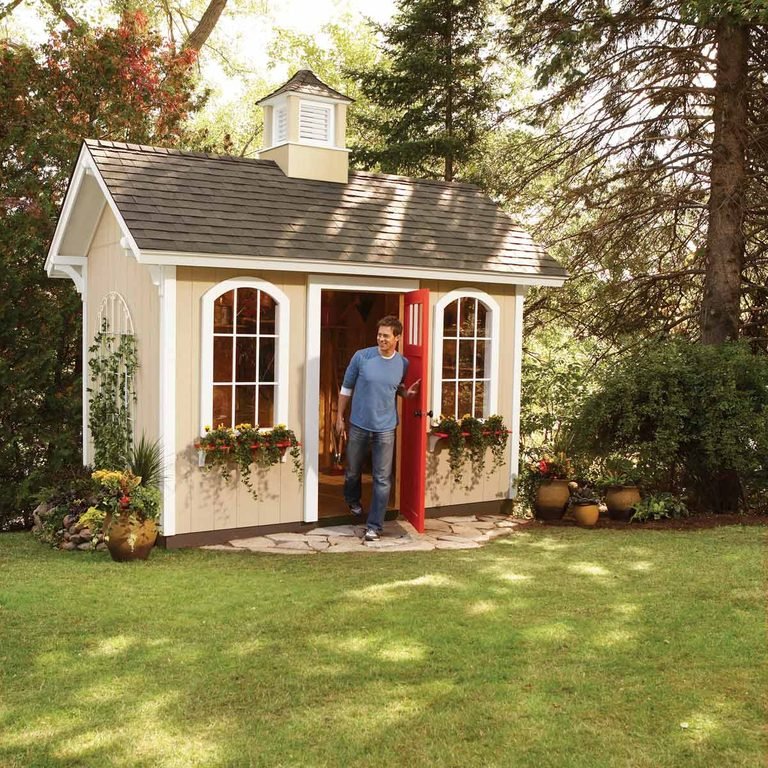
You can turn your storage shed into a fun, livable space, such as a music studio, children’s playhouse, or craft room. You’re only limited by your imagination. Start with a new coat of paint. Caulk any cracks, add insulation and drywall. Hire a subcontractor if you’d like to install electricity, lighting, air conditioning, or heat. Add some furnishings, décor and enjoy!
-
- Check with your town to determine if you need a permit for the renovation.
- If electrical or plumbing work is needed, chances are you will need to get a permit.
- Consider painting your shed in the same colors as your home for a “mini” version.
- Find inexpensive décor and furnishings on Facebook marketplace.
- Make sure you can lock your shed to protect your new living space.
If your project increases the value of your home or adds liability, you may need to adjust your insurance. Check with your agent or get a free policy review to find out more.
This article is furnished by California Casualty, providing auto and home insurance to educators, law enforcement officers, firefighters, and nurses. Get a quote at 1.866.704.8614 or www.calcas.com.

by California Casualty | Homeowners Insurance Info |
It’s time to make a move. Perhaps you landed that new job and you’re looking to live closer to work. Maybe you’re finally getting that extra square footage—and the backyard—you’ve always wanted. Or maybe you’re downsizing to a smaller rental. Moving is a fact of life. According to the U.S. census, Americans will move approximately 11.7 times during their lifetime.
But the big question is, will you do it yourself? Or will you hire movers? Here’s some guidance so that you can decide.
Moving Comparison At-a-Glance
| Do-It-Yourself |
Hybrid |
Moving Companies |
| Most affordable |
Affordable |
Most expensive |
| Time-consuming |
Time-consuming |
Least time needed |
| Need help from family, friends |
Don’t necessarily need help |
No help needed |
| Risk of injury, risk of lost or damaged goods |
Risk of injury, risk of lost or damaged goods |
Risk of lost or damaged goods |
Do-It-Yourself Moves
You’re strong and capable. You handle a lot of tough tasks in your life. Why not a move? Do-it-yourself, or DIY, moves are popular because they’re generally less expensive and we all want to save money. If you’re thinking about a DIY move, consider what’s involved in this type of move:
-
- You will need time in your schedule. If you don’t have enough time, this type of move is not for you.
- You will have to do all the organization and packing.
- You will likely need help from friends and family on the actual move day if not before.
- You will likely need to rent and drive a moving van or truck. You will have to pay for fuel and tolls.
- Factor in the time you will need to take off of work when you are moving yourself.
Hybrid Options
You don’t have to choose between a DIY move or a moving company. There are options that feature the best of both.
-
- Consider paying for labor to help with loading and unloading. Many truck rental companies offer add-ons of labor help. That way, you can do a DIY move with help.
- You can rent a portable moving container. In this type of move, a company drops the container or pod at your property. You load it up, and the company moves it to the new location, where you unload it.
Moving Companies
If you don’t have the time, or if you have a large move to make, hiring a moving company makes sense. Professional movers don’t just do the heavy lifting. They make moving less stressful and more efficient. But their services come at a cost. There are several factors that go into a moving company’s cost estimate:
-
- The size and weight of your belongings
- The travel distance, mileage and fuel, and time
- Packing and moving supplies if the company is contracted to handle those
- The moving date (Generally, moves done mid-month and midweek offer the best discounts).
What To Consider
Get a written cost estimate from your prospective mover. (We recommend getting at least three cost estimates from three different providers.) Make sure that the mover you choose is licensed and insured. Read the agreement carefully, including the small type, to ensure that there will be no surprises. Beware of moving companies who provide estimates for your move without visiting your home and taking an inventory of your belongings. Watch for movers who ask for cash or a large deposit before the move. You should only pay on delivery.
Most renters and home insurance policies will not cover your belongings while they are being moved. The moving company will offer liability and valuation coverage. You may decide to purchase additional moving insurance from a third-party provider. If you’re considering an interstate move, learn your rights and responsibilities as outlined by the Federal Motor Carrier Safety Administration.
Do you need to tip your movers?
Yes, it’s standard practice to tip each person who is moving you. Consumer Affairs recommends tipping 15% to 20% for long-distance or large moves. You can tip less, 5% to 10% for shorter, closer moves. This amount is split among the moving crew, so if your move costs $2,000 and you’re just going across town, plan to tip about $200 total.
How to Cut Costs and Save Time on Your Move
-
- Hiring a mover? Ask if there are cheaper dates and times to move.
- Downsize before moving. Donate or sell items that you no longer need or want. That way, you’ll have less to move.
- Use the buckets, baskets, clean trash cans, and suitcases that you need to move anyway to store items that you want to move. Use blankets and towels, in the same way, to protect and cushion breakables.
Be safe when looking at ways to cut your moving costs. You will often find websites offering helpful tools for moving such as moving cost calculators that require you to enter your information to get the link. What they neglect to tell you is that they will be sharing your information with moving companies. You will start to get calls immediately from dozens of companies trying to sell you services. Think twice about entering your information online.
Don’t Forget!
Whether you’re moving from a rental or you own a home, there are apps that can help you to organize your move and take away some stress. Here are some popular ones:
-
- MoveAdvisor
- Moved
- Dolly
- Unpackt
And if you’re moving because of work, your moving expenses may be tax-deductible! Keep your receipts and use IRS form 3903 to document your move when you file your taxes.
Here’s to the start of a wonderful adventure in your new home. Have a safe and successful move.
This article is furnished by California Casualty, providing auto and home insurance to educators, law enforcement officers, firefighters, and nurses. Get a quote at 1.866.704.8614 or www.calcas.com.

by California Casualty | Good to Know, Homeowners Insurance Info |
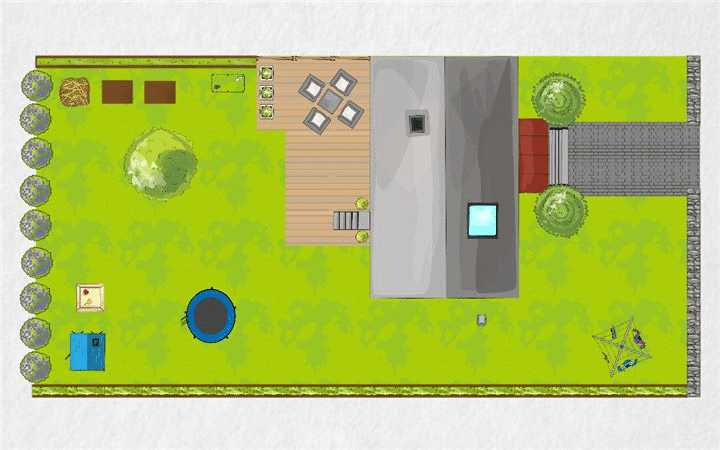
An attractive nuisance is anything on your property that is attractive to children, but in turn, could also put them in danger.
Examples of common backyard attractive nuisances include:
-
- Pools
- Hot tubs
- Trampolines
- Swingsets
- Firepits
- Fountains
- Treehouses
- Playgrounds
While these nuisances all serve as great ways for children to get outdoors and enjoy the summer sun, without the proper precautions, they can become problematic. In fact, attractive nuisances cause so many injuries when kids are out of school that summer is also known as “trauma season” among public health officials in the U.S. This is because unintentional deaths and serious injuries increase dramatically among children in the summertime.
Not only will these objects of entertainment put your own child at risk for serious or fatal injury, if one of their friends comes over to play one day and gets hurt on an attractive nuisance in your yard, you will be held liable for their injuries.
How to Minimize Your Risk
An attractive nuisance isn’t just limited to objects of entertainment like pools; they can also be anything that is on your property that draws curiosity like construction, weapons, grills, landscaping, lawn equipment, ponds, old cars, or appliances, etc.
This doesn’t mean that you will have to go and give all of your nuisances away, instead take the proper precautions to prevent the nuisances from causing harm.
Minimize the risk of an accident or injury by understanding what you have on your property that could be considered an attractive nuisance and take the necessary steps to safeguard against any future accidents.
-
- Keep your property clean. Pick up dangerous debris and clean up after projects that you have completed. If you have old items that you are using anymore, sell or get rid of them.
- Make dangerous items inaccessible. Keep dangerous weapons locked away in a safe, equipment, and vehicles in a garage or shed, and put a cover on pools, fire pits, grills, and hot tubs.
- Install a gate and lock system. If there is no way to make items in your yard inaccessible try installing a fence or locked gate with a no trespassing sign to help keep curious children out.
- Always supervise. If you have an attractive nuisance in your yard, never let your children or their friends play outside without adult supervision.
- Have adequate coverage. Make sure you have enough liability coverage with your homeowner’s insurance. Talk to your insurance agent and review your policy.
If you fail to minimize the risk of injury and a child in your neighborhood harms themselves (or worse) on your property, you may be subject to legal action. Read your local laws and use good judgment, if you feel like you have an item of concern in your backyard, use the steps above to help prevent an accident.
How an Attractive Nuisance Affects Your Insurance
Insurance agents look at your property to determine your home insurance rate. Certain features of your home or property could impact your rate because of their degree of danger. For instance, if you have an in-ground pool in your backyard you will likely have a higher rate because a pool increases the risk of danger.
When you speak to your home insurance agent you will need to disclose if you have any attractive nuisances on your property to protect you from getting future claims rejected, if an accident were to happen on your property.
Many people assume that their homeowner’s insurance will provide them the protection they need if someone gets injured at their home, but this isn’t always true. If you have an attractive nuisance, protect yourself and your family, talk to your insurance agent and ask about increasing your liability protection or about adding a personal umbrella policy to your homeowner’s insurance.
This article is furnished by California Casualty, providing auto and home insurance to educators, law enforcement officers, firefighters, and nurses. Get a quote at 1.866.704.8614 or www.calcas.com.

by California Casualty | Homeowners Insurance Info |
Have you heard the saying going around recently that “cleaning your house while everyone is home is like brushing your teeth while eating Oreos?” It’s so gross, but so true, especially when everyone is home together during the summer- living life and making messes.
These 5 quick cleaning hacks will help YOUR FAMILY get (and keep) your house clean.
Make It a Team Effort
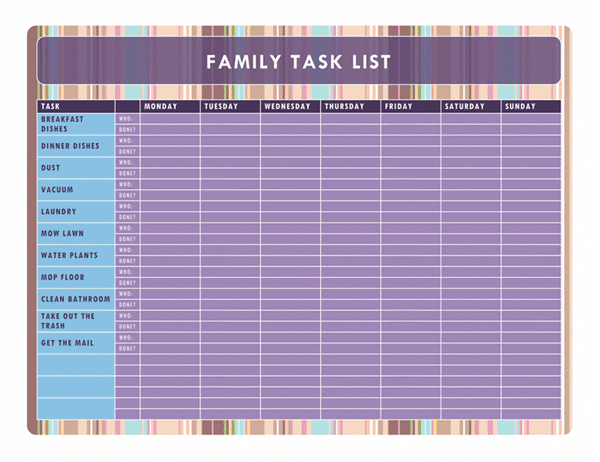
It’s time to assign chores. Everyone at home contributes to the mess, so each can be responsible for helping to clean it up. You can easily assign tasks to each family member (kids included) by using this age-appropriate chore list cheat sheet. You can get creative and write down the chores by person on a board piece of paper in plain view, or download an editable chore chart that you can print and hang.
Get In the Habit
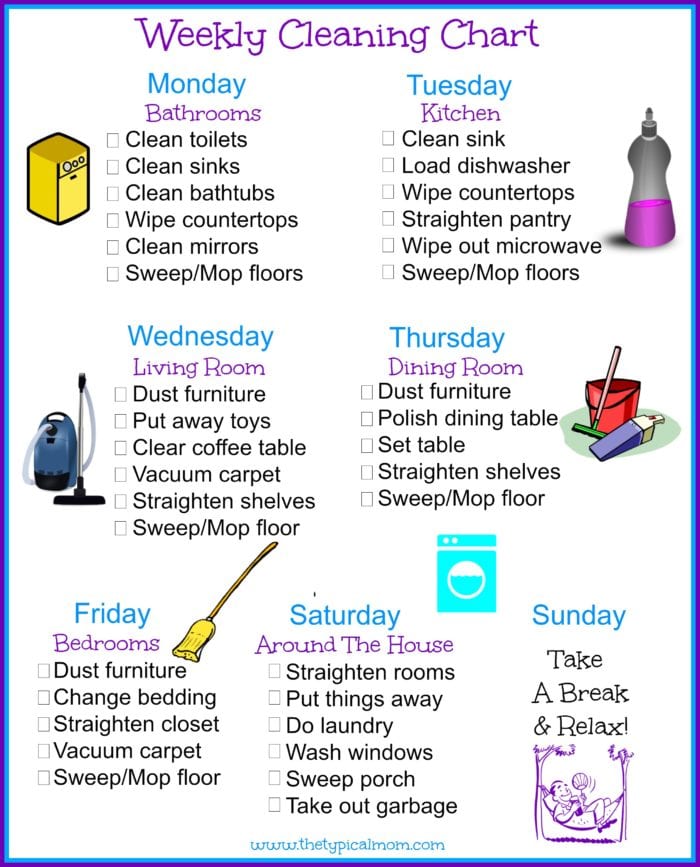
It’s all about muscle memory. If you create a daily cleaning schedule for all to follow, the assigned tasks are completed in less time than trying to tackle it all at once. Plus, the weekly schedule will help you stay on top of what needs to get done and avoid the procrastination that typically hinders our approach to housework. Another pro tip: make your bed every day.
Have the Right Tools
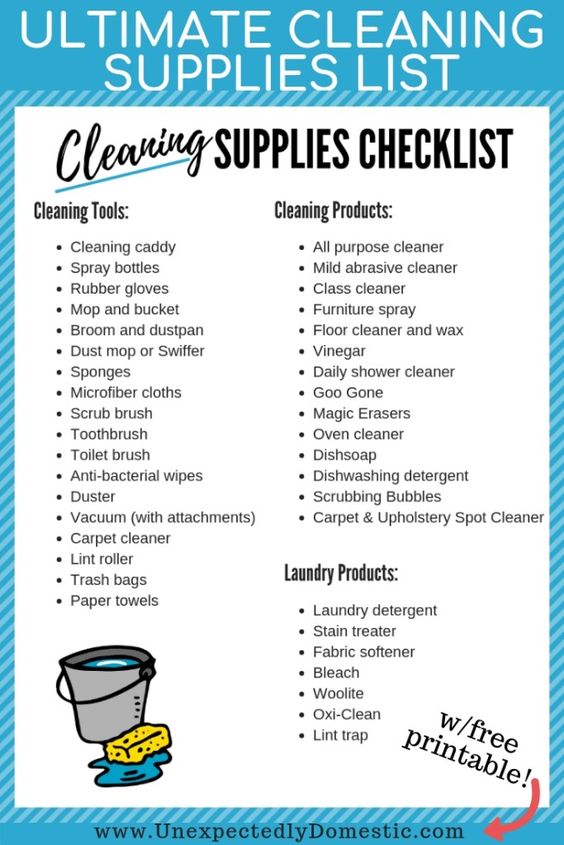
Like any job, having the right tools (in good working condition!) will make getting the job done so much easier. A good vacuum (with attachments), microfiber cloths, a bucket and mop, and a cleaning caddy filled with your favorite cleaners are just a few of the housekeeping essentials recommended. Here’s a more detailed list of recommendations. You may want to test your options to select the right tools for your home.

Pick Up, Pick Up, Pick Up
To keep your home clutter-free, it’s important that everything have a place. Putting things away immediately after use will save you time (since you won’t need to search for items), save you money (since you won’t need to replace items forgotten about or misplaced), and save you space. Here are other ideas to keeping your home clutter-free on a regular basis.
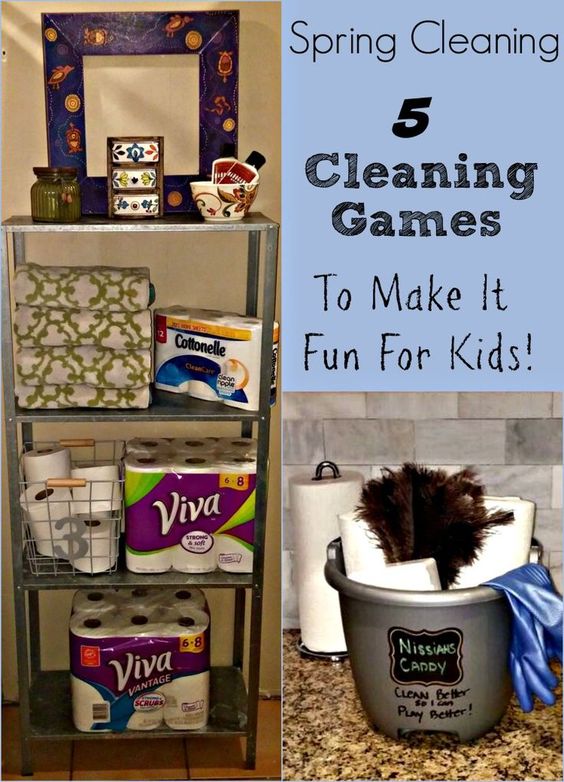
Stay Positive
Research tips and tricks that will make the chore of housekeeping seem more fun and less work. Simple things like playing music and creating family chore or cleaning games will keep everyone motivated. Positive reinforcement will go a long way. Let your loved ones know how much you appreciate their help.
Once you’ve had a chance to give these a try, let us know how they worked. And if you have additional tricks, tips, or recommendations, please share them with us as well. Housework is a way of life, but it doesn’t have to be such a chore! (pun intended)
This article is furnished by California Casualty, providing auto and home insurance to educators, law enforcement officers, firefighters, and nurses. Get a quote at 1.866.704.8614 or www.calcas.com.

by California Casualty | Homeowners Insurance Info |
Updated landscaping touches can make your address more appealing to you, your neighbors and/or your potential new buyers. In fact, real estate experts say that nice curb appeal can add 14% resell value and help your home sell six times faster.
As the saying goes, “You only have one chance to make a first impression.” So whether you’re selling your house or simply ready to add value to your current home, we suggest you get out the shovel and think outside the box.
Here are some slow but steady changes you can make to make a beautiful space outside your front door.
Start by Mapping Out Your Space
Careful planning will keep you on-task and on-budget throughout the landscaping process. First, sketch a rough design of your yard, drawing in what you think might work well, like paths, gardens, and trees. You could also use a tool like Gardena Garden Planner to visualize your space online.
This is a great time to gather ideas on how you get the most out of your outdoor areas. Can you capitalize on great views, sunrises/sunsets, or extend your current indoor space to the great outdoors? Bonus points for creative solutions that provide options for more outdoor living.
Deck, Concrete, or Pavers
A large outdoor space for extra seating, eating, or entertaining is on the wishlist of many homeowners. How you approach the construction of such a feature depends on the slope of your yard, the weather in your area, the size of your space, your preference for certain materials, and your budget. You will want to include the space on your plan and then heavily research your options to get the most bang for your buck.
Choosing the Right Path
Paths that help you, your family (including your fur babies), friends, and neighbors navigate your new outdoor oasis are also a must. Consider how people will enter the area (back door, side gate, etc.) and meander through the space as you decide where your paths should go. And as you choose the materials for your pathways, remember crushed gravel sticks to paws and little ones often trip or stub their toes on uneven pavers.
Time to Revisit Your Budget
Now that you have a plan in place, it’s time to cross-reference your wish list with your determined project budget. Hardscapes such as pavers, stones, and rocks are more expensive, so get a feel for how much you can allocate to these areas as indicated on your plan. Trees are another element that can quickly use up your earmarked funds. Here’s when you prioritize your needs, wants, and must-haves, and then refine your design to make your money go further.
Love Your Lawn, Don’t Just Live With It
You will want a lawn that takes less maintenance to thrive; giving you more time to enjoy the space you’re creating. Not every kind of grass will work in your climate. Do some research, and plan accordingly. If you live in a hot area, a drought-resistant variety like Bermuda grass would be better than Kentucky bluegrass, which does better in the cold.
How Will Your Garden Grow
Most importantly, know your planting zone. You will save a lot of money, time, and headache if you choose plants that are hardy for your area based on your planting zone. Then create six to eight-foot deeps garden beds that follow a general rule of 50% evergreens, 25% deciduous (or flowering) shrubs, and 25% perennials. Include a mix of plants that bloom at different times and there will always be something to admire! Sufficient spacing between each plant will also ensure that your garden continues to grow beautifully for years to come.
Be sure to plant your garden far enough away from the exterior your home to give room for upkeep, protect the façade and keep unwanted pests from using the garden as a highway into your home.
Laying down a two to four-inch layer of mulch can help combat weeds and keep your plants’ roots warm and well-fed. Avoid mulch around shrubbery or other plants with roots close to the surface, or they will be smothered rather than provided for.
Trees
Trees provide great shade, beauty, and curb appeal. Plan their placement carefully. Root systems, preference for particular soil conditions, and size at maturity must be top of mind when deciding on trees in your landscape. Study the impact your chosen specimens will have on the areas you intend to plant them before you buy. For instance, pine trees will shed needles, change the acidity of the soil around them (impacting any plants nearby) and not allow for grass to grow under their branches.
With your space mapped, your budget itemized and your plantings identified, doing a landscape update yourself can be really rewarding now and for years to come. If you’re not the DIY type or still unsure as to how to tackle your curb appeal, hiring landscape professionals is another viable option. Either way, an updated curb appeal could lift your spirits and your home’s value. So dig in!
This article is furnished by California Casualty, providing auto and home insurance to educators, law enforcement officers, firefighters, and nurses. Get a quote at 1.866.704.8614 or www.calcas.com.
