by California Casualty | Educators |
Our Education Blogger is a public school teacher with over a decade of experience. She’s an active NEA member and enjoys writing about her experiences in the classroom.
Speaking with students about traumatic topics can make any teacher uncomfortable. However, it is important to open up dialogue with students, especially when something distressing occurs. Our students are not immune to traumatic situations. Teachers play an important role in helping students process tragic events. Don’t shy away from talking to students about sad or scary situations. By speaking with your students, and having honest conversations, you send a message to your students that you care for them, support them, and will be available to them should they need you.
10 tips to remember before you begin talking about a difficult subject:
- Make parents aware you’ll be discussing the event in your classroom
- Find out what students know
- Listen to students
- Be as specific as possible, and clear up any misconceptions
- Answer questions with facts, and if you don’t know, don’t speculate
- Reassure students of their safety at school
- Be prepared with plenty of resources – limit graphic pictures and videos
- Talk about it – allow plenty of time for questions and discussion
- Keep it simple – mostly for elementary students
- It’s okay to get emotional – talk about why
After you’ve engaged your students in this emotional dialogue, don’t forget to take care of yourself. These conversations can wreak emotional havoc on you.
It’s okay to give yourself a break after your mentally exhausting discussions. Try to do things that will make you happy, lift your spirits, or have a positive impact. Avoid, or turn off, all sources of media . . . at least temporarily. Take a walk or do some yoga. Read an uplifting book. Spend time with family or friends. You can even do some volunteer work or get involved in activism group.
by California Casualty | Educators |
Our Education Blogger is a public school teacher with over a decade of experience. She’s an active NEA member and enjoys writing about her experiences in the classroom.
Honor and celebrate George Washington, Abraham Lincoln, and other United States Presidents, this President’s Day. Use our FREE educator-curated resources to assist you with teaching your students about President’s Day.
Videos
Lesson Plans and Activities
- President’s Day in the Classroom by Scholastic – Celebrate the national holiday with nonfiction reading, research projects, student activities, and more.
- Presidents’ Day Lessons – Center for Civic Education – Teach your high school students about the constitutional legacy of George Washington, James Madison, Abraham Lincoln, and Ronald Reagan this Presidents’ Day. These free, ready-to-use lessons will engage your students in learning about these important presidents and how they shaped the history and Constitution of our nation. Each lesson was written and reviewed by scholars and contains questions to test student knowledge. Elementary, middle, and high school students can learn the constitutional powers and limitations of the executive branch with our selection of classroom-proven lessons from our We the People: The Citizen & the Constitution student texts.
- President’s Day Collection – Share My Lesson – In addition to free lesson plans, educational resources and classroom materials on the accomplishments of U.S. presidents like George Washington and Abraham Lincoln, you’ll find some unexpected gems to help your students learn about the instrumental work and lasting legacy of some former first ladies, too.
- President’s Day – TeachingHistory.org – Learning resources, teaching resources, and quizzes.
- President’s Day for ESL Students by EL Civics – History, facts, photos, and free worksheets about Presidents Day.
- President’s Day Activities and Lessons The Teacher’s Corner – The Presidents Day seasonal pages will provide you with resources to help your students learn about Abraham Lincoln and George Washington, as well as the office of President. Ideas within this section include: journal activities, lesson plans and internet resources.
- 21 Fun Presidents Day Activities and Crafts TipJunkie – Celebrating President’s Day can be so much fun with these 21 easy presidents day activities and crafts for kids. I’ve got free printables and templates for George Washington wigs, Abraham Lincoln’s hat, cabin crafts, President’s Day crafty food, and so much more!
What are your favorite President’s Day Lessons, Activities, or Videos?
by California Casualty | Calcas Connection, In Your Community, News |
 We realize how dedicated you are to making your communities better places. That’s why California Casualty created giving initiatives to say thanks to the members of the affinity groups with whom we work.
Recently, Tucson fire captain Max S. was the recipient of a $5,000 Work Hard/ Play Hard “Choose Your Tools” award from California Casualty. The contest recognized the dangerous work first responders do. Max loved the prize because it’s a gift that will last him a lifetime. “I appreciate California Casualty for understanding how hard firefighters work,” he said.
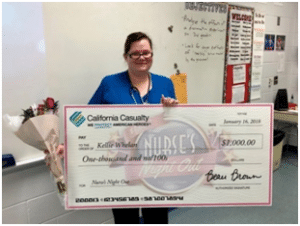 And New Jersey RN Kellie W., a policyholder herself, started the New Year with a $1,000 Nurses Night Out award from California Casualty. Kellie, a school nurse and a member of the New Jersey Education Association, said, “I was so surprised and honored to receive this prize from California Casualty.”
The Nurses Night Out award was created to thank nurses and nurse practitioners for all they do to keep their communities healthy. The winners can use the $1,000 in any way they wish: hosting a party, a relaxing day at the spa, or taking a much-needed vacation.
Nurse Kellie plans on using the funds for a summer tour of the national parks with her family, but will also treat teachers and staff at the school to a breakfast in the near future.
“California Casualty protects American heroes and we want to show our support to the men and women who take care of America,” emphasized Mike McCormick, California Casualty Sr. Vice President.
TAKEAWAY:
Learn more about the many ways California Casualty gives back to the individuals and groups that we serve by visiting www.calcas.com/newsroom.
Read all the articles from this edition of the Calcas Connection Newsletter:
by California Casualty | Calcas Connection, Consider This |
 Taking a ride on your snowmobile can be risky business. California Casualty has protection in case you or a family member accidentally runs into someone else gliding across the ice and snow.
Our snowmobile policies can provide coverage for:
 Bodily injury and property damage liability
- Comprehensive and collision
- Uninsured motorists
- Towing assistance
California Casualty also has the insurance you need for your RV.
Our Agency Services department can help insure high-performance snow machines and all-season, all-terrain vehicles such as quads and side-by-sides.
California Casualty wants to make sure that you can explore the great outdoors knowing that you have the insurance protection you need.
TAKEAWAY: Find out about the many insurance products California Casualty and our partner companies can provide for your snowmobile, ATV or RV at www.calcas.com/other-insurance.
Read all the articles from this edition of the Calcas Connection Newsletter:
by California Casualty | Calcas Connection, Good to Know |
Americans are driving more and there’s been a corresponding increase in in automobile crashes. As we go about the routine of driving our kids to school, battling traffic to and from work, or heading to weekend events, it’s easy to forget the simple things that can make the trip safer. Nothing is more important than the safety of you and your family, and here are some traffic and driving reminders:
- Always wear seat belts – the most effective way to protect your precious cargo – even for a quick trip to the store or a neighbor’s house
- Secure children and infants in appropriate car and booster seats at all times to reduce the risk of injuries by 70 percent – it’s also important to have seats inspected (as many as half of the children riding in vehicles are in improperly installed safety seats)
- Pay attention to the roadway and avoid electronic devices, applying makeup or turning around to interact with passengers – actions that double your risk of a crash
- Be familiar with areas where you are driving and obey road signs and local traffic laws
- Slow down in bad weather – conditions can change rapidly
- Practice defensive driving techniques
- Keep your vehicle well-maintained
- Check for recalls on your vehicles (safercar.gov/checkforrecalls)
Accidents and breakdowns happen when you least expect them. Now is also a good time to assemble a safety kit for your car or truck that includes a spare cell phone battery, first aid kit, blanket, fire extinguisher, jumper cables, reflective warning triangles and foam sealant for flat tires.
TAKEAWAY: Find a wealth of auto safety tips at our resources page, www.calcas.com/resources.
Read all the articles from this edition of the Calcas Connection Newsletter:
