
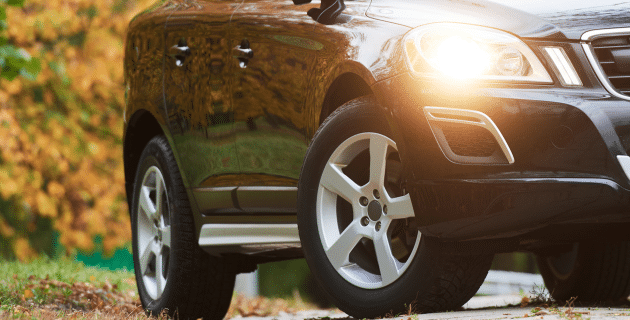
The nights are getting longer. That means your headlights are more important than ever. Keeping them clean and in good working order will help you stay safe. Follow this guide to keep your headlights shining bright and sparkling like new.
Why are clean headlights important?
You might think that foggy headlights don’t make that much of a difference. In reality, their light can be dangerously dim. Foggy headlights emit only about 20% of the light that new headlights do, according to AAA. Not only is that a problem at night, but cloudy headlights can limit your visibility in rain and fog, too. It is just as important to replace your headlights as it is to replace your windshield wipers.
What causes headlights to wear out?
Most headlights today are made of thick plastic. While these lenses are more scratch-resistant than glass and can last a long time, their surfaces do wear out. The sun’s UV rays cause the lenses to oxidize, which creates microscopic cracks and yellowing. That impacts the quality of light they can emit. A car wash won’t be able to clean this type of damage.
Pro Tip: You can help limit your headlights’ exposure to UV rays and slow the yellowing process. Park in a cool, dry place that is away from direct sunlight. Consider a protective cover for your vehicle. Park your car inside whenever possible.
Every vehicle is different, and some methods work better than others.
There are a variety of ways to clean your car’s headlights. You can do many of them with supplies you already have around the house. Depending on your vehicle, you will find that some methods work better than others so feel free to experiment.
How to Clean Your Headlights
Start with a clean surface. Headlights pick up dirt, grime, and dust. Before you dive into the deep cleaning, you want to remove that debris. Here are several ways to do so. (You just need to choose one method for the initial clean; you won’t want to do them all.) Remember to wear latex gloves to protect your skin.
- Soap and water: Use car wash soap that is made for plastic headlight lenses. Mix one part of the soap with two parts of water. Put the mixture in a spray bottle. Spray it directly onto your headlights and then wipe it off with a microfiber cloth.
- Use a specialized cleaner such as bug-and-tar remover. Spray it on your headlights. Let it sit for a few minutes, and then wipe it off with a sponge or microfiber cloth.
- Try rubbing alcohol. Dip a soft cloth into the alcohol and then gently scrub the headlights. Rinse with water.
Protect your vehicle’s paint. It’s a good idea to cover the painted finish around each headlight so that you don’t damage your car’s paint. Use a tape without a strong adhesive. Painter’s tape works well.
Method #1: Using a Restoration Kit
You can buy headlight restoration kits at your local auto shop. These kits come with sandpaper that help you to gently remove the microscopic cracks.
- Start with the roughest piece of sandpaper in the kit.
- In between sanding, keep headlights wet using water in a spray bottle.
- Repeat with the next coarsest sandpaper and continue to the finest one.
- Clean your headlights with soap and water. Use car soap made for headlights.
- Seal with a clear coat if the kit includes one.
Method #2: Vinegar and Baking Soda (or Toothpaste)
Common household supplies like vinegar and baking soda are effective cleaners. Alternatively, you can use toothpaste with baking soda. Just make sure the toothpaste does not have flavor crystals which can scratch the surface. Here’s how to use them to clean your headlights.
- Mix up a paste of baking soda and vinegar. Use two-parts distilled white vinegar to one-part baking soda. (You also can use toothpaste without the vinegar instead.)
- Apply the mixture using a microfiber cloth. Rub it on each headlight. Then let it dry.
- Wipe it off with a clean microfiber cloth.
- Rinse with water.
Method #3: Window Cleaner or WD-40
Chemical agents like glass cleaner and WD-40 also can do the job.
- For window cleaner, spray a generous amount onto your headlights. Let it soak in. Then, use a microfiber cloth to wipe it down.
- For WD-40, apply it with a clean, soft cloth. Rub it firmly in a circular manner. Rinse with car soap and water when you are done.
- Apply a car polish using a clean cloth to help protect the surface.
Method #4: A Quick and Temporary Fix
You can help fill in the microscopic cracks and scratches with petroleum jelly or olive oil.
- Put a coin-sized amount petroleum jelly or olive oil on a microfiber cloth.
- Rub it into your headlights.
- Do not rinse. The thin layer will coat your headlights but will disappear the next time it rains.
If you cleaned your headlights and it didn’t help:
- Check their alignment. Consult your owner’s manual on how to adjust your headlights or bring them to a professional.
- Check the inside if the headlight. Dissemble your headlight and use car soap and water or glass cleaner to clean the inside. Make sure to completely rinse and wipe away any liquid. Any residue can be heated by the powerful bulbs.
How to Change Your Headlights
Most new cars have LED headlights which can last the lifetime of the vehicle. However, if you have an older car, you will need to change your headlight bulbs. There are different headlight setups, with the most common being the twist and lock and the spring clip. Check your owner’s manual to see which one you have. Remember to replace bulbs in pairs. If one bulb went out, chances are the other is likely to go out soon.
Directions
- Make sure your car is turned off. Open the hood.
- Disconnect the negative ground cable from the battery.
- Look for the headlight connection. Disconnect the wires from the headlight bulb.
- For at Twist and Lock:
- To pull the bulb out, you will need to push the tab and twist the headlight counterclockwise.
- To install the new bulb, you will need to put it in and twist it clockwise until it locks.
- For a Spring Clip:
- Press the spring to release the bulb. Then pull it out.
- Put the new bulb in and lock it in place.
- Reconnect the wires to the headlight.
- Reconnect the negative ground cable to the battery.
- Close the hood.
Halogen Bulbs
Note that classic cars may use a sealed-beam halogen bulb. You can’t replace these bulbs. You must replace the entire headlight housing.
- Make sure your car is turned off. Open the hood.
- Disconnect the negative ground cable from the battery.
- Find the headlight housing and unplug the wires for the blinker and headlight.
- Disconnect any electrical connections from the back of the housing.
- You will need a screwdriver to loosen the bracket on the housing and remove it.
- Replace it with the new housing.
- Reconnect the housing to the headlights and blinker.
- Reconnect the negative ground cable to the battery and close the hood.
Your car is one of your greatest investments. Keep your car well maintained and protect it with the right insurance. Safe travels.
This article is furnished by California Casualty, providing auto and home insurance to educators, law enforcement officers, firefighters, and nurses. Get a quote at 1.866.704.8614 or www.calcas.com.

- California Casualty Earns Financial Stability Rating® of A, Exceptional, From Demotech, Inc. - April 28, 2025
- Music & Arts Grant Recipients – 2024 - December 13, 2024
- Understanding Auto and Home Insurance Rate Changes - December 3, 2024